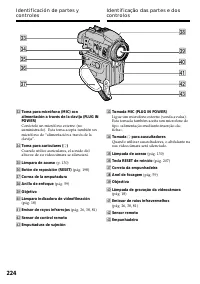
Sony DCR-PC110E - Manual de uso - Página 13
 2
2
 3
3
 4
4
 5
5
 6
6
 7
7
 8
8
 9
9
 10
10
 11
11
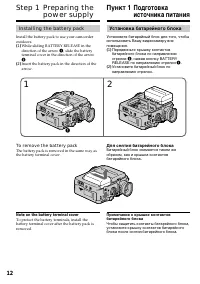
 12
12
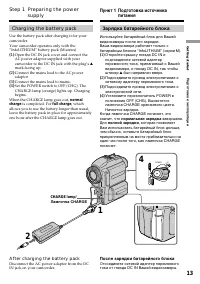
 13
13
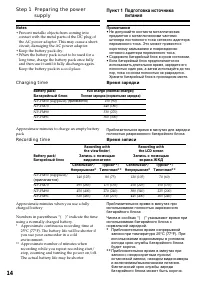
 14
14
 15
15
 16
16
 17
17
 18
18
 19
19
 20
20
 21
21
 22
22
 23
23
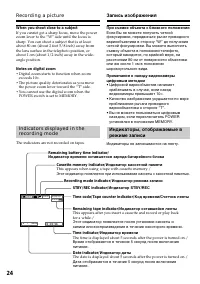
 24
24
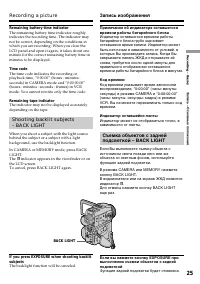
 25
25
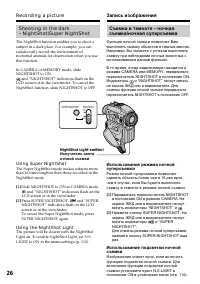
 26
26
 27
27
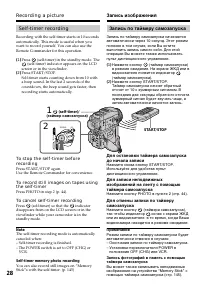
 28
28
 29
29
 30
30
 31
31
 32
32
 33
33
 34
34
 35
35
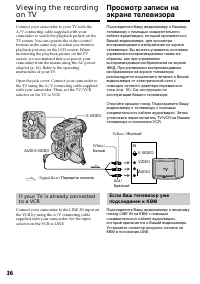
 36
36
 37
37
 38
38
 39
39
 40
40
 41
41
 42
42
 43
43
 44
44
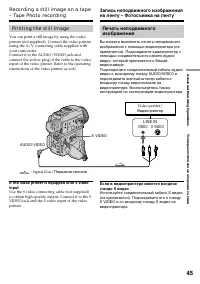
 45
45
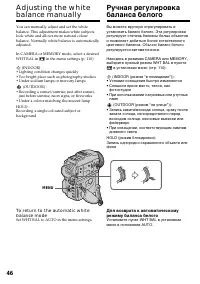
 46
46
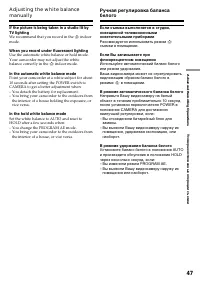
 47
47
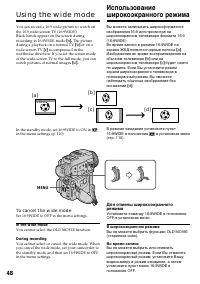
 48
48
 49
49
 50
50
 51
51
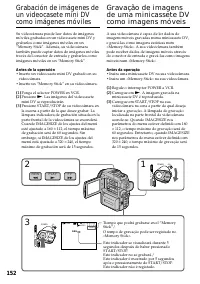
 52
52
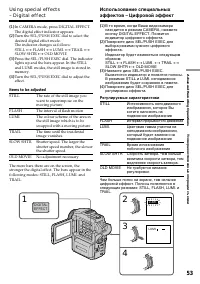
 53
53
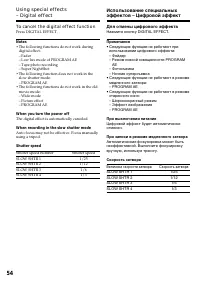
 54
54
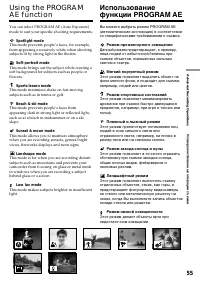
 55
55
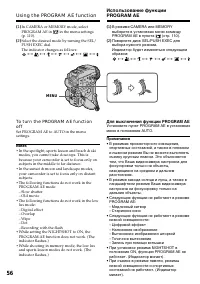
 56
56
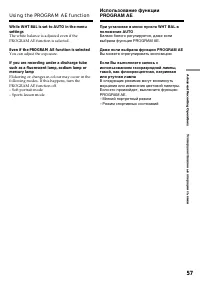
 57
57
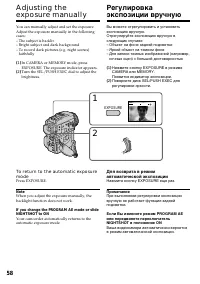
 58
58
 59
59
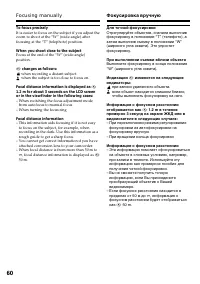
 60
60
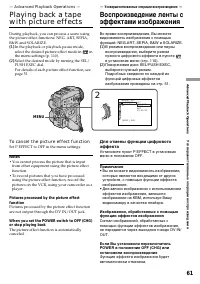
 61
61
 62
62
 63
63
 64
64
 65
65
 66
66
 67
67
 68
68
 69
69
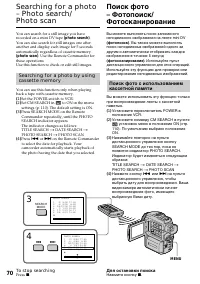
 70
70
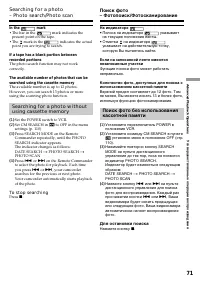
 71
71
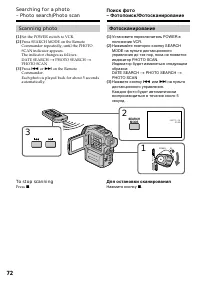
 72
72
 73
73
 74
74
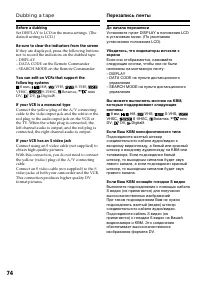
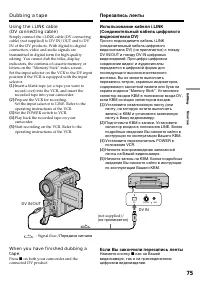
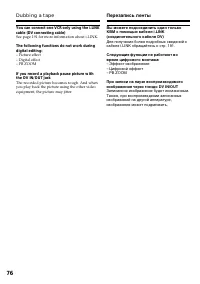
 75
75
 76
76
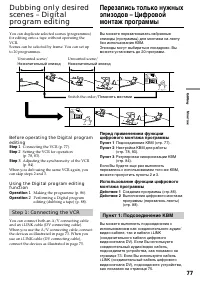
 77
77
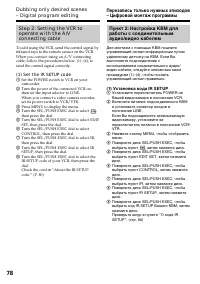
 78
78
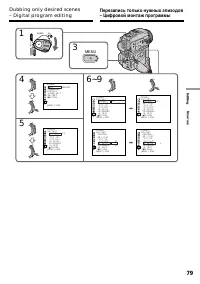
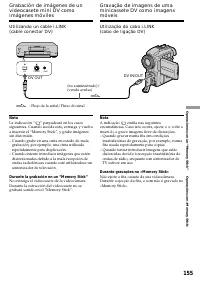
 79
79
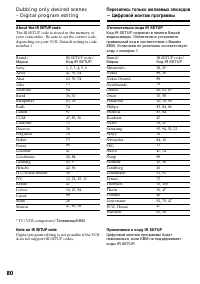
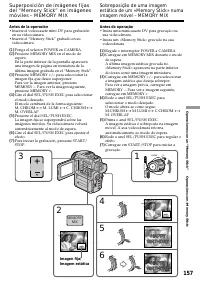
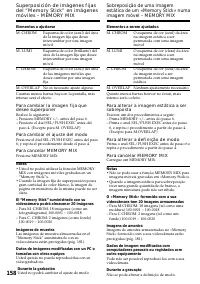
 80
80
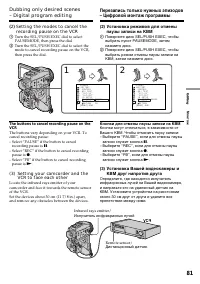
 81
81
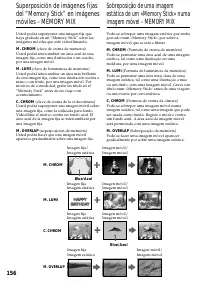
 82
82
 83
83
 84
84
 85
85
 86
86
 87
87
 88
88
 89
89
 90
90
 91
91
 92
92
 93
93
 94
94
 95
95
 96
96
 97
97
 98
98
 99
99
 100
100
 101
101
 102
102
 103
103
 104
104
 105
105
 106
106
 107
107
 108
108
 109
109
 110
110
 111
111
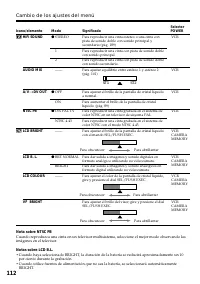
 112
112
 113
113
 114
114
 115
115
 116
116
 117
117
 118
118
 119
119
 120
120
 121
121
 122
122
 123
123
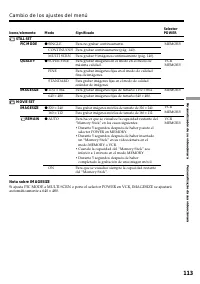
 124
124
 125
125
 126
126
 127
127
 128
128
 129
129
 130
130
 131
131
 132
132
 133
133
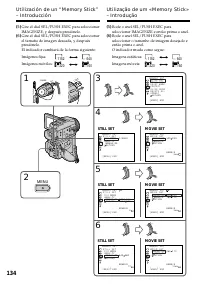
 134
134
 135
135
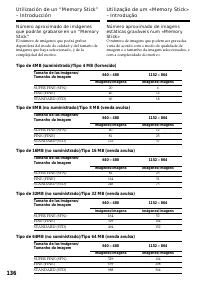
 136
136
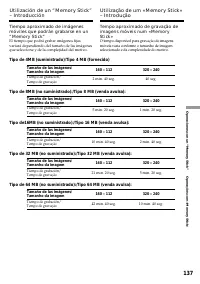
 137
137
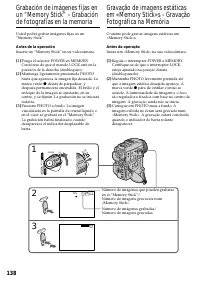
 138
138
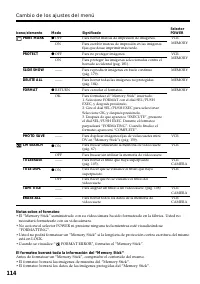
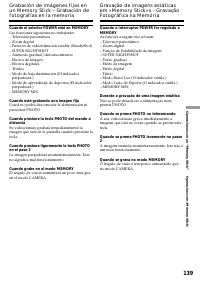
 139
139
 140
140
 141
141
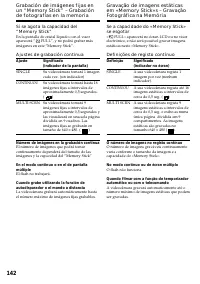
 142
142
 143
143
 144
144
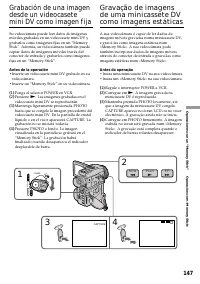
 145
145
 146
146
 147
147
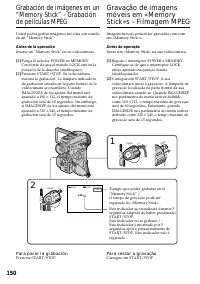
 148
148
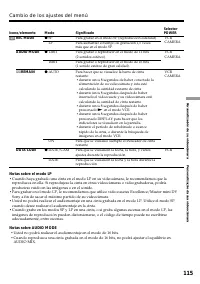
 149
149

Índice:
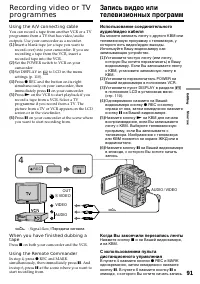
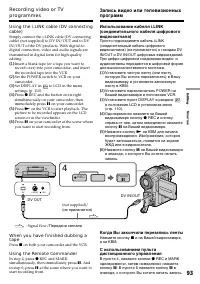
- Página 90 – Salte os passos 3 e 4. Carregue em
- Página 91 – AUDIO DUB
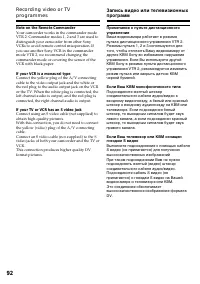
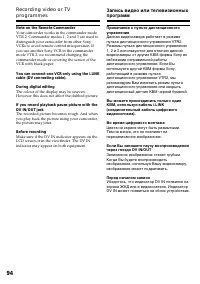
- Página 92 – Para reproducir el sonido; Para reproduzir o som; Notas
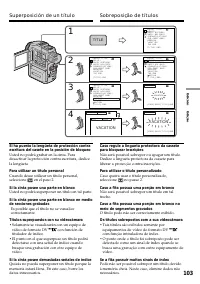
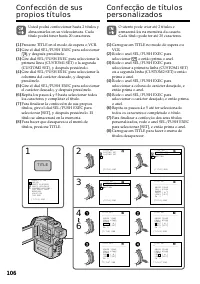
- Página 95 – Para borrar el título; Confección de sus propios títulos; ] e então prima o anel para eliminar; Para eliminar o título
- Página 96 – CAMERA
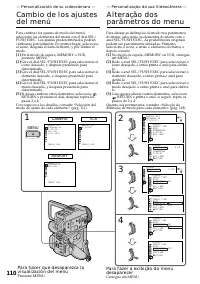
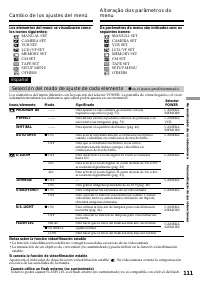
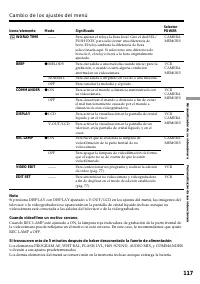
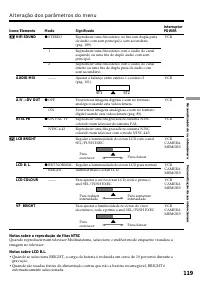
- Página 97 – Cambio de los ajustes del menú; Español; Selección del modo de ajuste de cada elemento; es el ajuste predeterminado.; . Su videocámara evitará la compensación
- Página 98 – Nota sobre NTSC PB; por ciento durante la grabación.
- Página 99 – Nota sobre IMAGESIZE
- Página 100 – Notas sobre el formateo; necesitará formatearlo con su videocámara.; El formateo borrará toda la información del “Memory Stick”
- Página 101 – Notas sobre el modo LP; Sony a fin de sacar el máximo partido de su videocámara.; Notas sobre AUDIO MODE
- Página 102 – Notas sobre DEMO MODE
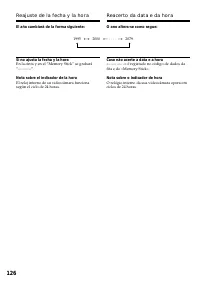
- Página 105 – Reajuste de la fecha y la hora; Caso não acerte a data e a hora; Reacerto da data e da hora
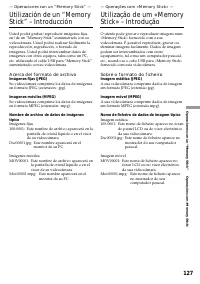
- Página 106 – — Operaciones con un “Memory Stick” —; Acerca del formato de archivo; Dsc00001.jpg: Este nombre aparecerá en el; Sobre o formato do ficheiro; Nome de ficheiro de dados de imagem típico; Dsc00001.jpg: Este nome de ficheiro aparece no
- Página 110 – Tempo de gravação
- Página 111 – Antes de la operación; Inserte un “Memory Stick” en su videocámara.; Antes da operação; Insira um «Memory Stick» na sua videocâmara.
- Página 112 – – Modo de aprendizaje de deportes (El indicador
- Página 113 – Ajustes de grabación continua; Ajuste; Definições de registo contínuo; Definição
- Página 115 – Para parar la grabación
- Página 116 – El sonido se grabará en forma monoaural.
- Página 121 – MEMORY
- Página 126 – Fecha de grabación
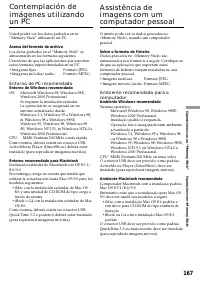
- Página 127 – Entorno de PC recomendado
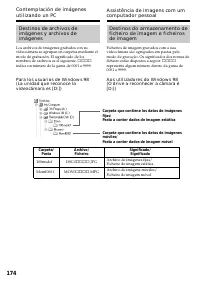
- Página 128 – Pasta; ssss
- Página 129 – Usted no podrá grabar la pantalla de índice.; Durante a cópia; Não é possível gravar o écran de índex.
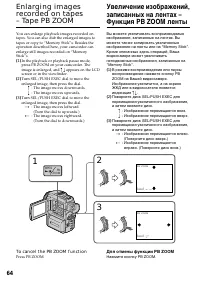
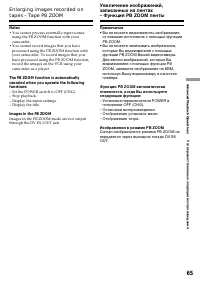
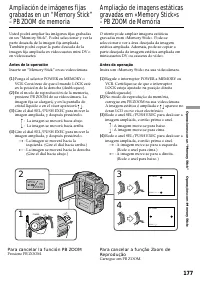
- Página 130 – Para cancelar la función PB ZOOM
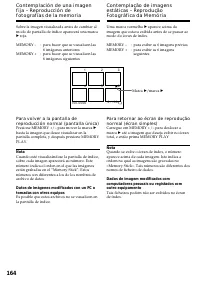
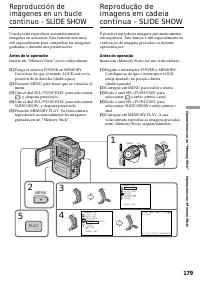
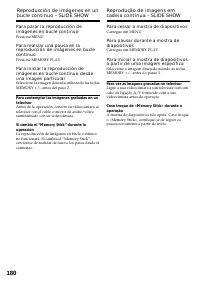
- Página 132 – Presione MEMORY PLAY.; Para cessar a mostra de diapositivos; Carregue em MEMORY PLAY.; Para ver as imagens gravadas no televisor
- Página 134 – Imágenes móviles
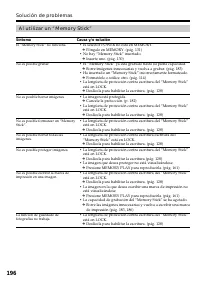
- Página 135 – Solución de problemas; ss; En el modo de grabación; Síntoma; La alimentación se desconecta.
- Página 136 – En el modo de reproducción; Síntom; El título no se visualiza.
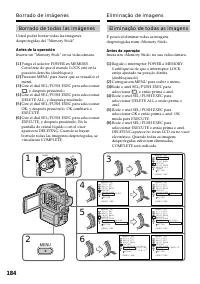
- Página 138 – El “Memory Stick” no funciona.
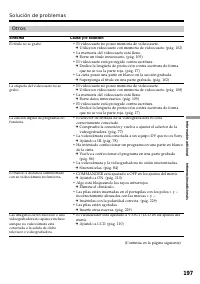
- Página 139 – Otros; El título no se grabó.
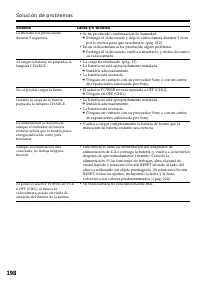
- Página 140 – No es posible cargar la batría.
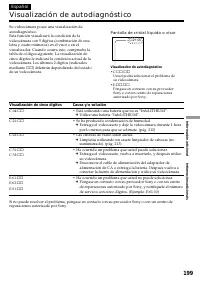
- Página 141 – Visualización de cinco dígitos; Visualización de autodiagnóstico
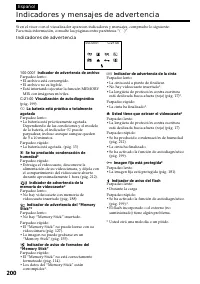
- Página 142 – Indicadores y mensajes de advertencia; MIX con imágenes móviles.; Indicadores de advertencia; • El flash incorporado o el externo (no
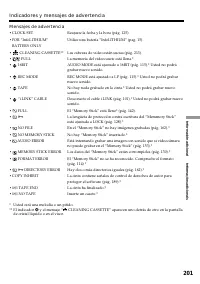
- Página 143 – Mensajes de advertencia
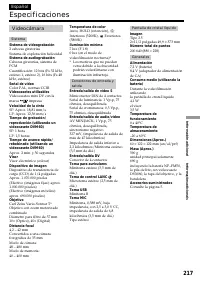
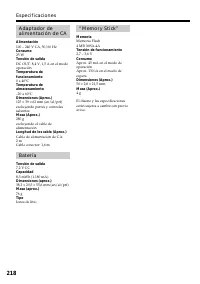
- Página 144 – Especificaciones; Videocámara
- Página 145 – Iones de litio
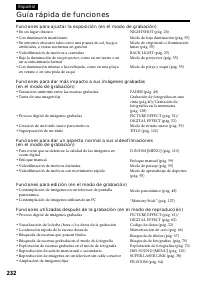
- Página 147 – Guía rápida de funciones; Funciones para ajustar la exposición (en el modo de grabación)
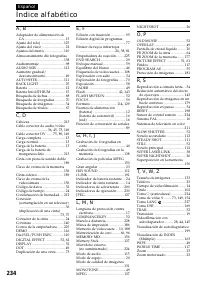
- Página 148 – Índice alfabético
19
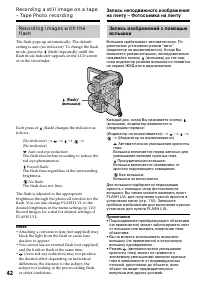
Recording – Basics
Запись – Основные положения
Notes
• Fasten the grip strap firmly.
• Do not touch the built-in microphone during
recording
Note on Recording mode
Your camcorder records and plays back in the SP
(standard play) mode and in the LP (long play)
mode. Select SP or LP in the menu settings. In the
LP mode, you can record 1.5 times as long as in
the SP mode.
When you record a tape in the LP mode on your
camcorder, we recommend playing the tape on
your camcorder.
Note on the LOCK switch
When you slide the LOCK switch to the left, the
POWER switch can no longer be set to MEMORY
accidentally. LOCK switch is set to the right as a
default setting.
To enable smooth transition
Transition between the last scene you recorded
and the next scene is smooth as long as you do
not eject the cassette even if you turn off your
camcorder.
However, check the following:
– Do not mix recordings in the SP mode and ones
in the LP mode on one tape.
– When you change the battery pack, set the
POWER switch to OFF (CHG).
– When you use a tape with cassette memory,
however, you can make the transition smooth
even after ejecting the cassette if you use the
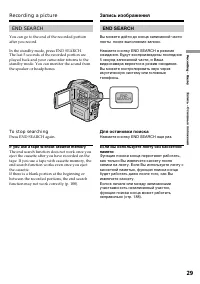
END SEARCH function (p. 29).
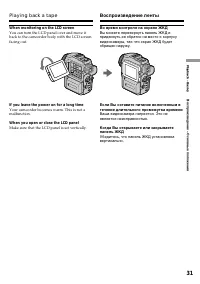
If you leave your camcorder in the standby
mode for 5 minutes while the cassette is
inserted
Your camcorder automatically turns off. This is
to save battery power and to prevent battery and
tape wear. To resume the standby mode, set the
POWER switch to OFF (CHG), and to CAMERA
again.
When you record in the SP and LP modes on
one tape or you record some scenes in the LP
mode
The playback picture may be distorted or the
time code may not be written properly between
scenes.
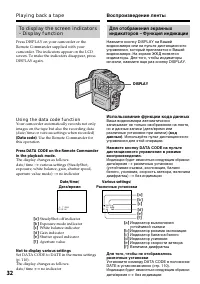
Recording date and time
The recording date and time are not displayed
while recording. However, they are recorded
automatically onto the tape. To display the
recording date and time, press DATA CODE on
the Remote Commander during playback.
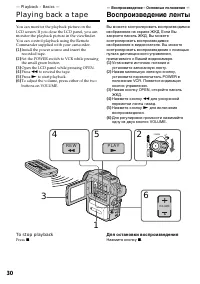
Recording a picture
Запись изображения
Примечания
• Плотно пристегните ремень для захвата
видеокамеры.
• Не прикасайтесь к встроенному микрофону
во время записи.
Примечание по режиму записи
Ваша видеокамера выполняет запись и
воспроизведение в режиме SP (стандартное
воспроизведение) и в режиме LP
(долгоиграющее воспроизведение). Выберите
команду SP или LP в установках меню. В
режиме LP Вы можете выполнять запись в 1,5
раза дольше по времени, чем в режиме SP.
При выполнении на Вашей видеокамере
записи на ленту в режиме LP рекомендуется
воспроизводить эту ленту также на Вашей
видеокамере.
Примечание по переключателю LOCK
Если Вы передвинете переключатель LOCK
влево, переключатель POWER уже не может
быть случайно установлен в положение
MEMORY. Переключатель LOCK находится в
правом положении по умолчанию.
Для обеспечения плавного перехода
Вы можете выполнять плавный переход
между последним записанным эпизодом и
следующим эпизодом до тех пор, пока не
извлечете кассету, даже при выключении
Вашей видеокамеры.
Тем не менее, проверьте следующее:
– Не чередуйте записи в режимах LP и SP на
одной ленте.
– При замене батарейного блока установите
переключатель POWER в положение OFF
(CHG).
– При использовании ленты с кассетной
памятью, Вы, тем не менее, можете
выполнить плавный переход даже после
извлечения кассеты, если Вы используете
функцию END SEARCH (стр. 29).
Если Вы оставите Вашу видеокамеру в
режиме ожидания на 5 минут при
вставленной кассете
Видеокамера выключится автоматически. Это
предотвращает расход заряда батарейного
блока и износ ленты. Для возобновления режима
ожидания установите сначала переключатель
POWER в положение OFF (CHG), а затем снова
верните его в положение CAMERA.
Если Вы записываете в режимах SP и LP на
одной и той же кассете, или Вы записываете
некоторые эпизоды в режиме LP
При воспроизведении изображение может
быть искажено или временной код может не
записаться правильно между эпизодами.
Дата и время записи
Дата и время записи не отображаются во
время записи. Тем не менее, они
автоматически записываются на ленту. Чтобы
отобразить дату и время записи, нажмите
кнопку DATA CODE на пульте дистанционного
управления во время воспроизведения.
"Cargando la instrucción" significa que debes esperar hasta que el archivo se cargue y puedas leerlo en línea. Algunas instrucciones son muy grandes y el tiempo de carga depende de la velocidad de tu conexión a Internet.
Resumen
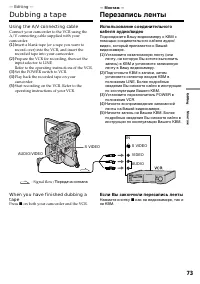
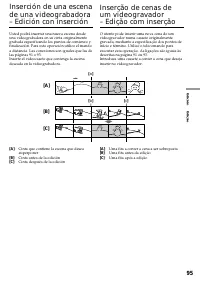
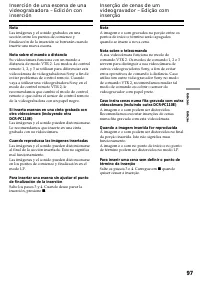
97 Edición Edição Nota Las imágenes y el sonido grabados en unasección entre los puntos de comienzo yfinalización de la inserción se borrarán cuandoinserte una nueva escena. Nota sobre el mando a distancia Su videocámara funciona con un mando adistancia de modo VTR 2. Los modos de controlremoto 1, 2...
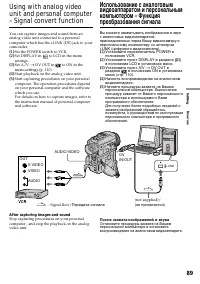
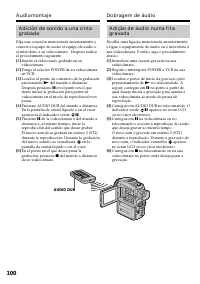
100 Adición de sonido a una cintagrabada Elija una conexión mencionada anteriormente yconecte el equipo de audio el equipo de audio oel micrófono a su videocámara. Después realiceel procedimiento siguiente. ( 1 ) Inserte el videocasete grabado en suvideocámara. ( 2 ) Ponga el selector POWER de su vi...
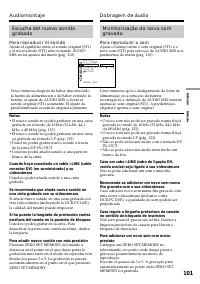
101 Edición Edição Escucha del nuevo sonidograbado Para reproducir el sonido Ajuste el equilibrio entre el sonido original (ST1)y el nivel sonido (ST2) seleccionando AUDIOMIX en los ajustes del menú (pág. 110). Cinco minutos después de haber desconectadola fuente de alimentación o de haber extraído ...