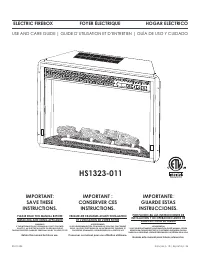
CASAINC WF-CYTVS08-EXP - Manual de uso - Página 2


8
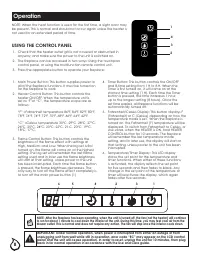
Operation
127(:KHQWKHKHDWIXQFWLRQLVXVHGIRUWKHÀUVWWLPHDVOLJKWRGRUPD\
be present. This is normal and should not occur again unless the heater is
not used for an extended period of time.
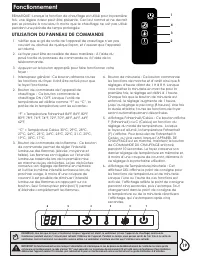
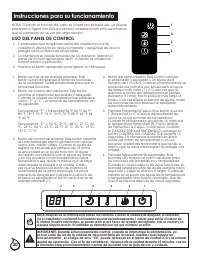
USING THE CONTROL PANEL
1. Check that the heater outlet grill is not covered or obstructed in
anyway, and make sure the power to the unit is switched on.
2.
7KHÀUHSODFHFDQEHDFFHVVHGLQWZRZD\V8VLQJWKHWRXFKSDG
control panel, or using the multifunction remote control unit.
3.
3UHVVWKHDSSURSULDWHEXWWRQWRRSHUDWH\RXUÀUHSODFH
1. Main Power Button: This button supplies power to
DOORIWKHÀUHSODFHIXQFWLRQV,WPXVWEHWXUQHGRQ
IRUWKHÀUHSODFHWRZRUN
2. Heater Control Button: This button controls the
heater ON/OFF. When the temperature unit is
VHWDV¶)µRU´&µWKHWHPSHUDWXUHVFRSHDUHDV
follows:
´)µ )DKUHQKHLWWHPSHUDWXUH))))
)))))))))
´&µ &HOVLXVWHPSHUDWXUH&&&&
&&&&&&&&
&&
3. Flame Control Button: This button controls the
EULJKWQHVVRIWKHÁDPHHIIHFWZLWKVHWWLQJVDW
+LJK0HGLXPDQG/RZ:KHQWKHORJVHWLVÀUVW
WXUQHGRQWKHÁDPHZLOOFRPHRQDWWKHKLJKHVW
VHWWLQJ7KHORJVHWZLOOUHPHPEHUWKHODVWÁDPH
VHWWLQJXVHGDQGLQODWHUXVHWKHÁDPHEULJKWQHVV
will start at that setting, unless power to the unit
KDVEHHQLQWHUUXSWHG(DFKWLPHWKHÁDPHEXWWRQ
LVSUHVVHGWKHÁDPHEULJKWQHVVGHFUHDVHV7KH
RQO\ZD\WRWXUQRIIWKHÁDPHHIIHFWFRPSOHWHO\LV
to turn off the main power button (1).
4. Timer Button: This button controls the ON/OFF
and 8-time setting from 1 H to 8 H. When the
7LPHULVÀUVWWXUQHGRQLWZLOOFRPHRQDWWKH
shortest time setting (1 H). Each time the Timer
button is pressed, the time increases 1 hour,
up to the longest setting (8 hours). Once the
VHWWLPHH[SLUHVDOOÀUHSODFHIXQFWLRQVZLOOEH
automatically turned off.
5. Fahrenheit/Celsius Display: This button displays F
(Fahrenheit) or C (Celsius) depending on how the
WHPSHUDWXUHPRGHLVVHW:KHQWKHÀUHSODFHLV
turned on, the Fahrenheit (F) temperature will be
displayed. To switch from Fahrenheit to Celsius, or
vise-versa, when the HEATER is ON, hold HEATER
&21752/EXWWRQIRUVHFRQGV7KHÀUHSODFH
will remember the last temperature mode
setting, and in later use, the display will start at
that setting, unless power to the unit has been
interrupted.
6. Temperature/Timer Display: This LED display
shows the set point for the temperature and
timer functions. When either of these functions
LVDFWLYDWHGWKHGLVSOD\UHÁHFWVWKHVHWSRLQW
IRUÀYHVHFRQGVDQGWKHQIDGHVWREODFN$Q\
change in the set point of the temperature or
timer will reactivate the display, which again
IDGHVDIWHUÀYHVHFRQGV
1
4
3
2
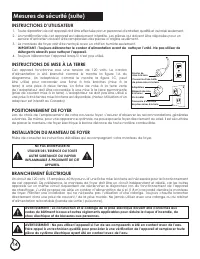
IMPORTANT: Under normal operation, when power is interrupted from either an outage of from
unplugging unit from wall while still in operation, error code “EC” may appear on the LCD control
panel and the unit will cease operation. In order to reset, unplug the unit for 10 minutes, then plug
back in for normal operation in accordance with the Use and Care guide.
127($IWHUWKHÀUHSODFHKDVEHHQRSHUDWLQJZKHQWKHXQLWLVWXUQHGRIIWKHIDQQRWWKHKHDWHUZLOOFRQWLQXH
to run for about 1 minute to cool down the interior of the unit. During this time, you may feel cool air from the
EORZHURXWOHW7KLVLVQRUPDODQGGRHVQRWUHTXLUHDQ\DFWLRQ7KHIDQZLOOVWRSRQFHWKHLQWHULRUFRROVGRZQ
6
5
4
2
3
1
"Cargando la instrucción" significa que debes esperar hasta que el archivo se cargue y puedas leerlo en línea. Algunas instrucciones son muy grandes y el tiempo de carga depende de la velocidad de tu conexión a Internet.