GE GTS18HYNRFS - Manual de uso - Página 4


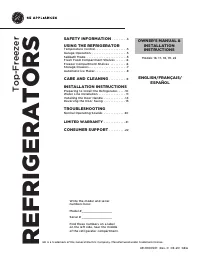
Índice:
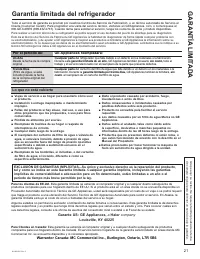
- Página 18 – GARANTÍA LIMITADA; REFRIGERADORS; Congelador superior
- Página 19 – GRACIAS POR HACER QUE GE APPLIANCES SEA PARTE DE SU HOGAR.; tenerlo en la familia.
- Página 20 – PRECAUCIÓN; ADVERTENCIA; RIESGO DE INCENDIO O EXPLOSIÓN Refrigerantes Inflamables
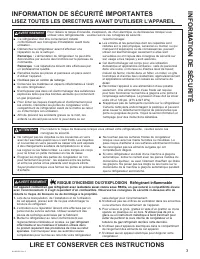
- Página 21 – FORMA ADECUADA DE DESCARTAR SU ANTIGUO REFRIGERADOR; PELIGRO DE SUFFOCATION Y ENTRAPMENT; Cómo Eliminar Refrigerantes y Gomaespumas:; CONEXIÓN DE LA ELECTRICIDAD; INFORMACIÓN DE SEGURIDAD; LEA Y GUARDE ESTAS INSTRUCCIONES; INSTALACIÓN; RIESGO DE INCENDIO O EXPLOSIÓN
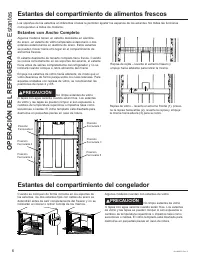
- Página 23 – Estantes; Estantes del compartimiento de alimentos frescos; Estantes con Ancho Completo
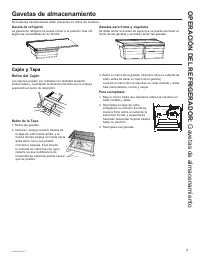
- Página 24 – Cajón y Tapa; Retiro del Cajón; Gavetas de almacenamiento
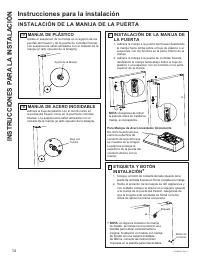
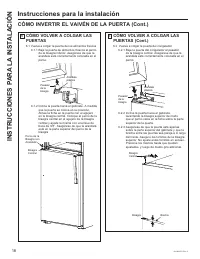
- Página 31 – INSTALACIÓN DE LA MANIJA DE LA PUERTA
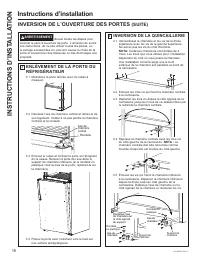
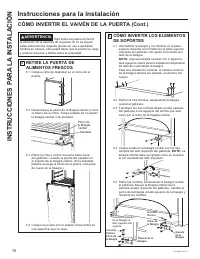
- Página 33 – CÓMO INVERTIR LOS ELEMENTOS
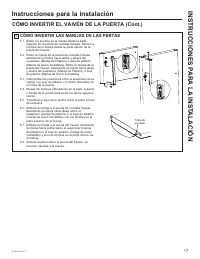
- Página 34 – CÓMO INVERTIR LAS MANIJAS DE LAS PERTAS
- Página 35 – CÓMO VOLVER A COLGAR LAS
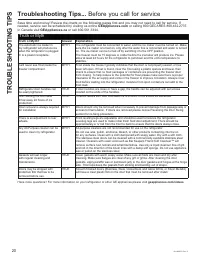
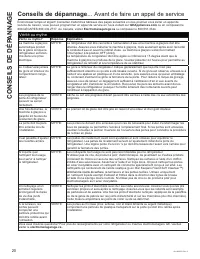
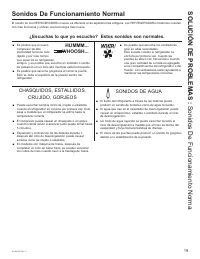
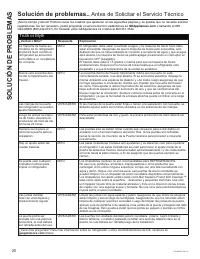
- Página 36 – Sonidos De Funcionamiento Normal; ¿Escuchas lo que yo escucho? Estos sonidos son normales.; SOLUCIÓN DE PROBLEMAS :
- Página 38 – *DUDQWtDOLPLWDGDGHOUHIULJHUDGRU; Lo que no está cubierto; RUHOSHUtRGRGH
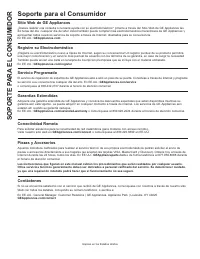
- Página 41 – Soporte para el Consumidor
12
49-1000478 Rev. 2
Installation Instructions
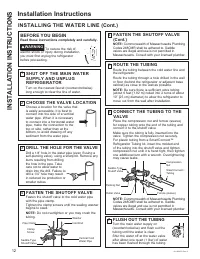
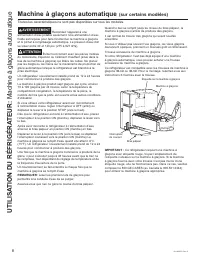
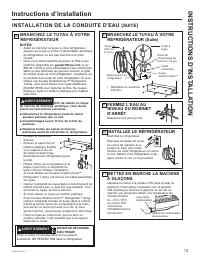
INSTALLING THE WATER LINE (Cont.)
1
SHUT OFF THE MAIN WATER
SUPPLY AND UNPLUG
REFRIGERATOR
Turn on the nearest faucet (counterclockwise)
long enough to clear the line of water.
2
CHOOSE THE VALVE LOCATION
Choose a location for the valve that
LVHDVLO\DFFHVVLEOH,WLVEHVWWR
connect into the side of a vertical
water pipe. When it is necessary
WRFRQQHFWLQWRDKRUL]RQWDOZDWHU
pipe, make the connection to the
top or side, rather than at the
bottom, to avoid drawing off any
sediment from the water pipe.
5
ROUTE THE TUBING
Route the tubing between the cold water line and
the refrigerator.
Route the tubing through a hole drilled in the wall
or floor (behind the refrigerator or adjacent base
cabinet) as close to the wall as possible.
NOTE:
Be sure there is sufficient extra tubing
(about 6 feet [1.82 m] coiled into 2 turns of about
´>FP@GLDPHWHUWRDOORZWKHUHIULJHUDWRUWR
move out from the wall after installation.
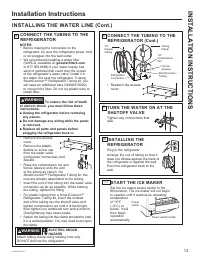
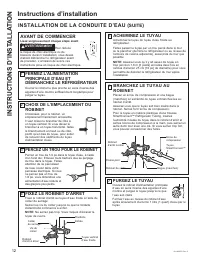
6
CONNECT THE TUBING TO THE
VALVE
Place the compression nut and ferrule (sleeve)
for copper tubing onto the end of the tubing and
connect it to the shutoff valve.
Make sure the tubing is fully inserted into the
valve. Tighten the compression nut securely.
)RUSODVWLFWXELQJIURPD6PDUW&RQQHFW
Refrigerator Tubing kit, insert the molded end
of the tubing into the shutoff valve and tighten
compression nut until it is hand tight, then tighten
one additional turn with a wrench. Overtightening
may cause leaks.
NOTE:
Commonwealth of Massachusetts Plumbing
Codes 248CMR shall be adhered to. Saddle
valves are illegal and use is not permitted in
Massachusetts. Consult with your licensed plumber.
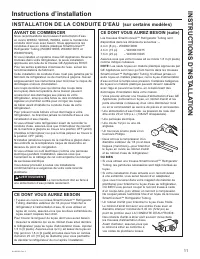
3
DRILL THE HOLE FOR THE VALVE
'ULOOD´KROHLQWKHZDWHUSLSHHYHQLIXVLQJD
self-piercing valve), using a sharp bit. Remove any
burrs resulting from drilling
the hole in the pipe. Take
care not to allow water to
drain into the drill. Failure to
GULOOD´KROHPD\UHVXOW
in reduced ice production or
smaller cubes.
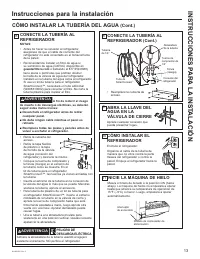
4
FASTEN THE SHUTOFF VALVE
Fasten the shutoff valve to the cold water pipe
with the pipe clamp.
Tighten the clamp screws until the sealing washer
begins to swell.
NOTE:
'RQRWRYHUWLJKWHQRU\RXPD\FUXVKWKH
tubing.
4
FASTEN THE SHUTOFF VALVE
(Cont.)
NOTE:
Commonwealth of Massachusetts Plumbing
Codes 248CMR shall be adhered to. Saddle
valves are illegal and use is not permitted in
Massachusetts. Consult with your licensed plumber.
Washer
,QOHW(QG
Clamp
Screw
Vertical Cold
Water Pipe
Saddle-Type
6KXWRႇ9DOYH
Pipe Clamp
Saddle-Type
6KXWRႇ9DOYH
Compression
Nut
SmartConnect
Tubing
Packing Nut
Outlet Valve
Ferrule (sleeve)
7
FLUSH OUT THE TUBING
Turn the main water supply on
(counterclockwise) and flush out the
tubing until the water is clear.
Shut the water off at the water valve
after about one quart (1 liter) of water
has been flushed through the tubing.
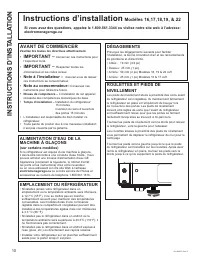
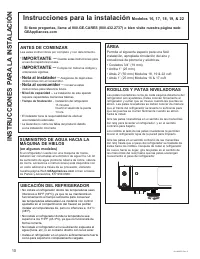
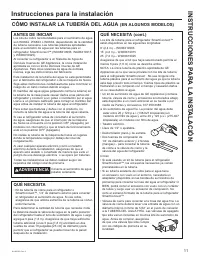
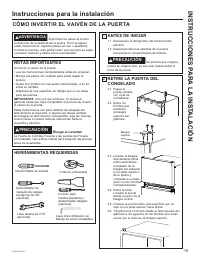
BEFORE YOU BEGIN
Read these instructions completely and carefully.
WARNING
To reduce the risk of
electric shock or injury during installation,
you must first unplug the refrigerator
before proceeding.
INSTALLATION INSTRUCTIONS
"Cargando la instrucción" significa que debes esperar hasta que el archivo se cargue y puedas leerlo en línea. Algunas instrucciones son muy grandes y el tiempo de carga depende de la velocidad de tu conexión a Internet.
Resumen
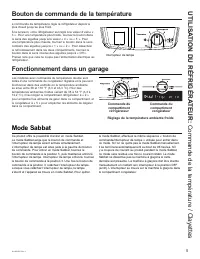
INFORMACIÓN DE SEGURIDAD . . . . . . . . . . . . . . . . . . . 3 OPERACIÓN DEL REFRIGERADOR Control . . . . . . . . . . . . . . . . . . . . . . . . . . . . . . . 5 Modo Sabático . . . . . . . . . . . . . . . . . . . . . . . . 5 Funcionamiento en Garaje . . . . . . . . . . . . . . 5Estantes del co...
2 49-1000478 Rev. 2 GRACIAS POR HACER QUE GE APPLIANCES SEA PARTE DE SU HOGAR. Ya sea que haya crecido usando GE Appliances, o que ésta es su primera vez, nos complace tenerlo en la familia. Sentimos orgullo por el nivel de arte, innovación y diseño de cada uno de los electrodomésticos de GE Applian...
49-1000478 Rev. 2 3 INFORMACIÓN DE SEGURIDAD LEA Y GUARDE ESTAS INSTRUCCIONES INFORMACIÓN IMPORTANTE DE SEGURIDADLEA TODAS LAS INSTRUCCIONES ANTES DE USAR PRECAUCIÓN A fin de reducir el riesgo de lesiones al usar el refrigerador, siga estas precauciones básicas. Ŷ 1ROLPSLHHVWDQWHVGHYLGULRQLWDSDVFRQ...
Otros modelos de frigoríficos GE
-
 GE GFD28GELDS
-
 GE GFD28GYNFS
-
 GE GFE28GELDS
-
 GE GFE28GYNFS
-
 GE GIE17GSNRSS
-
 GE GIE18DTNRBB
-
GE GIE18DTNRWW
-
 GE GIE18GCNRSA
-
GE GIE18GSNRSS
-
GE GIE18GTNRBB