GE PFE28KBLTS - Manual de uso - Página 9


28
49-60764
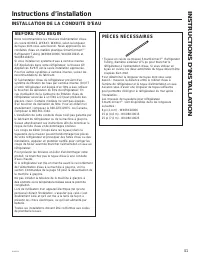
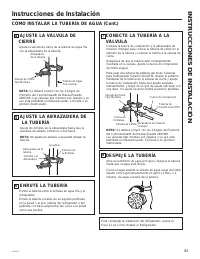
Installation Instructions
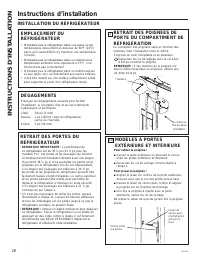
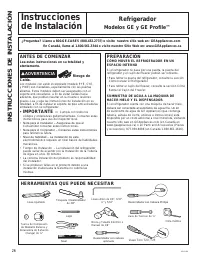
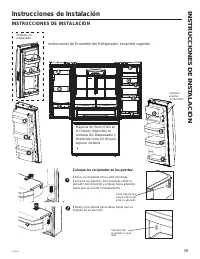
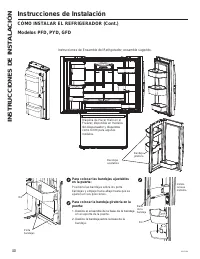
INSTALLING THE REFRIGERATOR
REFRIGERATOR LOCATION
Ŷ'RQRWLQVWDOOWKHUHIULJHUDWRUZKHUHWKH
WHPSHUDWXUHZLOOJREHORZ)&EHFDXVH
it will not run often enough to maintain proper
temperatures.
Ŷ'RQRWLQVWDOOWKHUHIULJHUDWRUZKHUHWKH
WHPSHUDWXUHZLOOJRDERYH)&EHFDXVH
it will not perform properly.
Ŷ
'RQRWLQVWDOOWKHUHIULJHUDWRULQDORFDWLRQH[SRVHG
WRZDWHUUDLQHWFRUGLUHFWVXQOLJKW
Ŷ,QVWDOOLWRQDIORRUVWURQJHQRXJKWRVXSSRUWLWIXOO\
loaded.
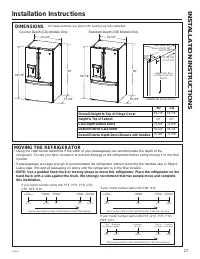
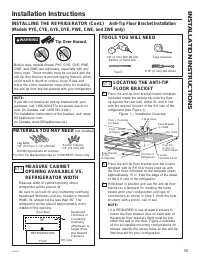
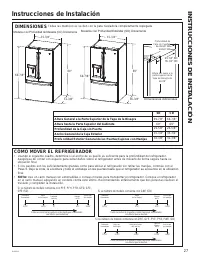
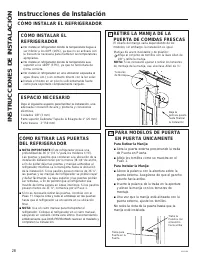
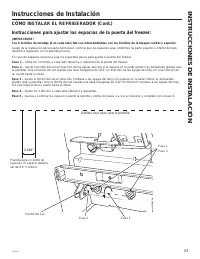
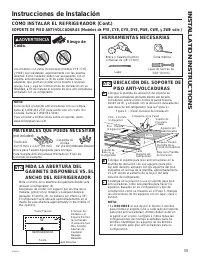
CLEARANCES
Allow the following clearances for ease of
installation, proper air circulation and plumbing and
electrical connections.
6LGHV
´PP
7RS
´PP&DELQHW+LQJH&RYHU
%DFN
´PP
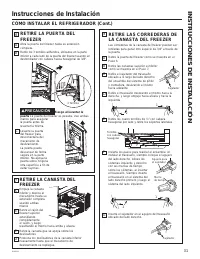
REMOVING THE REFRIGERATOR
DOORS
Ŷ
IMPORTANT NOTE:
This refrigerator is 36
1
4
´GHHS
1
4
´IRU&'PRGHOV'RRUVDQGSDVVDJHZD\V
leading to the installation location must be at least
36
1
4
´ZLGHLQRUGHUWROHDYHWKHGRRUVDQGKDQGOHV
attached to the refrigerator while transporting it into
WKHLQVWDOODWLRQORFDWLRQ,ISDVVDJHZD\VDUHOHVV
than 36
1
4
´WKHUHIULJHUDWRUGRRUVDQGKDQGOHVFDQ
easily be scratched and damaged. The top cap and
doors can be removed to allow the refrigerator to be
VDIHO\PRYHGLQGRRUV,ISDVVDJHZD\VDUHOHVVWKDQ
31
1
4
´VWDUWZLWK6WHS
Ŷ,ILWLVQRWQHFHVVDU\WRUHPRYHGRRUVVNLSWR6WHS
/HDYHWDSHDQGDOOSDFNDJLQJRQGRRUVXQWLOWKH
refrigerator is in the final location.
Ŷ
NOTE:
8VHDSDGGHGKDQGWUXFNWRPRYHWKLV
refrigerator. Place the refrigerator on the hand
truck with a side against the truck. We strongly
UHFRPPHQGWKDW7:23(23/(PRYHDQGFRPSOHWH
this installation.
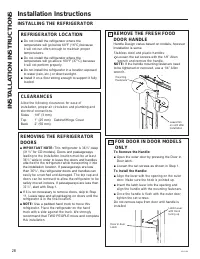
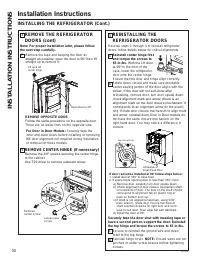
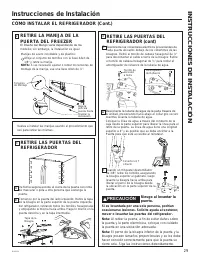
REMOVE THE FRESH FOOD
DOOR HANDLE
+DQGOH'HVLJQYDULHVEDVHGRQPRGHOVKRZHYHU
,QVWDOODWLRQLVVDPH
Stainless steel and plastic handles:
/RRVHQWKHVHWVFUHZVZLWKWKH´$OOHQ
wrench and remove the handle.
NOTE:
,IWKHKDQGOHPRXQWLQJIDVWHQHUVQHHG
WREHWLJKWHQHGRUUHPRYHGXVHD´
Allen
wrench.
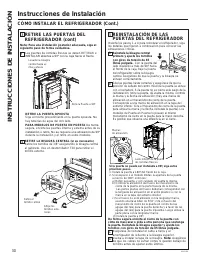
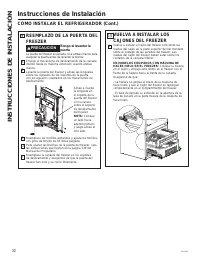
FOR DOOR IN DOOR MODELS
ONLY
To Remove the Handle:
Ŷ2SHQWKHRXWHUGRRUE\SUHVVLQJWKH'RRULQ
'RRUODWFK
Ŷ/RRVHQWKHVHWVFUHZVDVVKRZQLQ6WHS
To Install the Handle:
Ŷ
Align the lever with the opening on the outer
door. Make sure the hook is pointed up.
Ŷ,QVHUWWKHODWFKOHYHULQWRWKHRSHQLQJDQG
align the handle with the mounting fasteners.
Ŷ
Once the handle is flush with the outer door,
tighten the set screws.
'RQRWUHPRYHWDSHIURPGRRUXQWLOKDQGOHLV
installed
1
1a
Mounting
)DVWHQHUV
/HDYHILOP
on until after
installation
INST
ALLA
TION INSTRUCTIONS
'RRULQGRRU
/DWFK
/DWFK/HYHU
with Hook
facing up.
"Cargando la instrucción" significa que debes esperar hasta que el archivo se cargue y puedas leerlo en línea. Algunas instrucciones son muy grandes y el tiempo de carga depende de la velocidad de tu conexión a Internet.
Otros modelos de frigoríficos GE
-
 GE GFD28GELDS
-
 GE GFD28GYNFS
-
 GE GFE28GELDS
-
 GE GFE28GYNFS
-
 GE GIE17GSNRSS
-
 GE GIE18DTNRBB
-
GE GIE18DTNRWW
-
 GE GIE18GCNRSA
-
GE GIE18GSNRSS
-
GE GIE18GTNRBB