Husqvarna TS 38 - Manual de uso - Página 12


Índice:
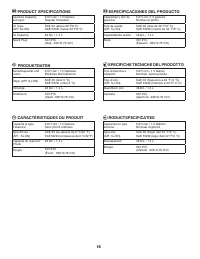
- Página 3 – Reglas De Seguridad; Prácticas de Operación Seguras para las Segadoras Conducibles; IMPORTANTE
- Página 4 – IV. MANTENIMIENTO Y ALMACENAMIENTO
- Página 18 – verlichting; Emplacement des commandes
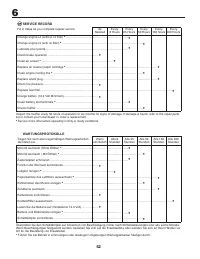
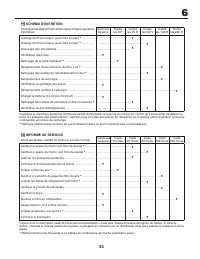
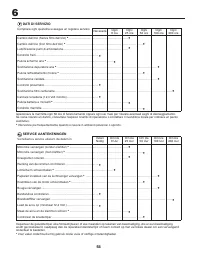
- Página 43 – INFORME DE SERVICIO
- Página 50 – Messen
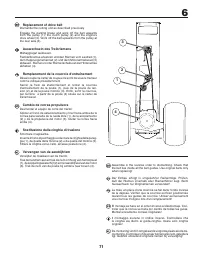
- Página 54 – De aandrijfriem van de maaiunit vervangen
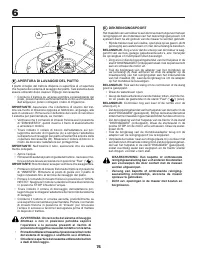
- Página 55 – Nivelar El Cortacésped; AJUSTE VISUAL DE LADO A LADO
22
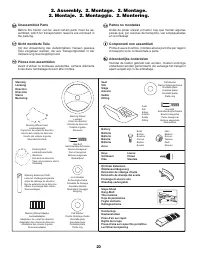
2
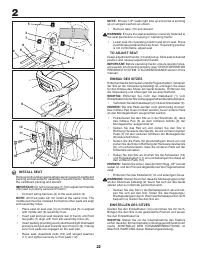
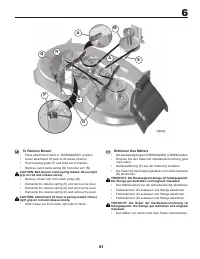
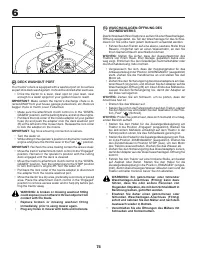
INSTALL
SEAT
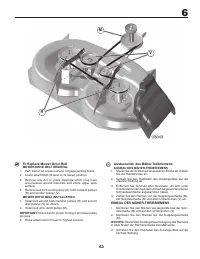
Remove bolts and winged washers se cur ing seat to cardboard
packing and set aside for as sem bly of seat to tractor. Remove
the cardboard packing and discard.
IMPORTANT:
Do not remove tape (1) from adjustment handle
until seat is properly secured to tractor.
• Connect wiring harness (2) to the seat switch (3).
NOTE:
All three pads will not install at the same time. The
middle pad must be installed first before other pads will align
with assembly holes.
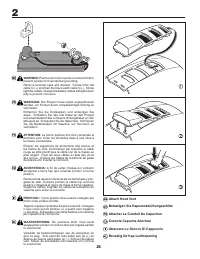
• Place seat on seat pan (4) so middle pad (5) is aligned
with middle slot (6) assembly hole.
• Insert pad and pull seat towards rear of tractor until front
two pads (7) align with front slot assembly holes (8).
•
Insert pads by providing evenly distributed light downward
pressure and pull seat towards rear of tractor (9), making
sure front pads are engaged on the seat pan.
• Raise seat. Assemble bolts (10) and winged washers
(11) and tighten securely to front pads (12).
NOTE:
Ensure “UP” reads right side up and arrow is pointing
up on winged washers as shown.
• Remove tape (13) and discard.
WARNING:
Ensure the seat assembly is securely fastened to
the seat pan before occupying or operating tractor.
• Lower seat into operating position and sit on seat. Press
clutch/brake pedal all the way down. If operating position
is not comfortable, adjust seat.
TO ADJUST SEAT
Grasp adjustment handle (14) and pull up. Slide seat to desired
position and release adjustment handle.
IMPORTANT:
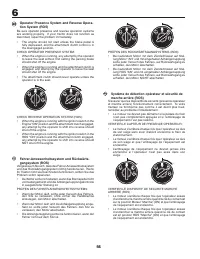
Before operating tractor, ensure operator pres-
ence switch is functioning properly (see “CHECK OPERATOR
PRESENCE SYSTEM” in the MAINTENANCE section of this
manual).
9
10
11
11
13
12
14
2
3
7
7
1
4
8
8
5
6
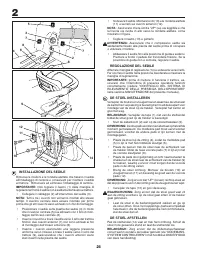
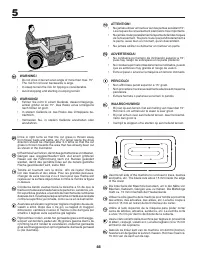
EINBAU DES SITZES
Entfernen Sie die Schrauben und die Flügelscheiben, mit denen
der Sitz an der Verpackung befestigt ist, und legen Sie diese
für den Einbau des Sitzes am Gerät beiseite. Entfernen Sie
die Verpackung und entsorgen Sie sie anschließend.
WICHTIG:
Entfernen Sie nicht das Klebeband (1) vom
Einstellhebel, bis der Sitz ordnungsgemäß am Gerät befestigt ist.
•
Verbinden Sie den Kabelbaum (2) mit dem Sitzschalter (3).
HINWEIS:
Die drei Pads werden nicht gleichzeitig montiert.
Das mittlere Pad muss montiert werden, bevor andere Pads
an den Montagelöchern ausgerichtet werden.
• Positionieren Sie den Sitz so in der Sitzschale (4), dass
das mittlere Pad (5) an dem mittleren Schlitz (6) der
Montagelöcher ausgerichtet ist.
• Setzen Sie das Pad ein und ziehen Sie den Sitz in
Richtung Heckseite des Geräts, bis die vorderen beiden
Pads (7) mit den vorderen Schlitzen der Montagelöcher
(8) übereinstimmen.
• Setzen Sie die Pads mit gleichmäßigem Druck ein und
ziehen Sie die Sitze in Richtung der Heckseite des Geräts
(9), um sicherzustellen, dass die vorderen Pads auf der
Sitzschale einrasten.
• Heben Sie den Sitz an. Drehen Sie die Schrauben (10)
und Flügelscheiben (11) ein und befestigen Sie diese an
den vorderen Pads (12).
HINWEIS:
Stellen Sie sicher, dass der Schriftzug „UP“ korrekt
lesbar ist, und der Pfeil wie abgebildet auf die Flügelscheiben
zeigt.
• Entfernen Sie das Klebeband (13) und entsorgen Sie es.
WARNUNG:
Stellen Sie sicher, dass die Sitzbaugruppe sicher
an der Sitzschale befestigt ist, bevor Sie sich auf das Gerät
setzen oder es in Betrieb genommen wird.
• Senken Sie den Sitz in die Betriebsposition ab und set-
zen Sie sich auf den Sitz. Treten Sie das Kupplungs-/
Bremspedal ganz durch. Wenn die Betriebsposition nicht
bequem ist, stellen Sie den Sitz ein.
EINSTELLEN DES SITZES
Greifen Sie den Einstellhebel (14) und ziehen Sie ihn hoch.
Bringen Sie den Sitz in die gewünschte Position und lassen
Sie den Einstellhebel los.
WICHTIG:
Stellen Sie vor der Inbetriebnahme des Traktors
sicher, dass der Totmannschalter ordnungsgemäß funktioniert
(siehe „KONTROLLE DER TOTMANNEINRICHTUNG“ im
Abschnitt WARTUNG dieser Bedienungsanleitung).
"Cargando la instrucción" significa que debes esperar hasta que el archivo se cargue y puedas leerlo en línea. Algunas instrucciones son muy grandes y el tiempo de carga depende de la velocidad de tu conexión a Internet.
Resumen
9 1. Reglas De Seguridad Prácticas de Operación Seguras para las Segadoras Conducibles IMPORTANTE : ESTA MAQUINA CORTADORA ES CAPAZ DE AMPUTAR LAS MANOS Y LOS PIES Y DE LANZAR OBJETOS. SI NO SE OBSERVAN LAS INSTRUCCIONES DE SEGURIDAD SIGUIENTES SE PUEDEN PRODUCIR LESIONES GRAVES O LA MUERTE. I. INST...
10 • Pare el motor y desenganche la transmisión a los ac- cesorios- antes de agregar combustible;- antes de quitar el recogedor del césped;- antes de haces ajustes de altura a menos que los ajustes pueden ser hechos de la posición del operador. • Reduzca los ajustes de la aceleración durante el tiem...
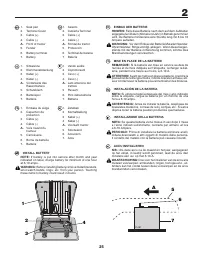
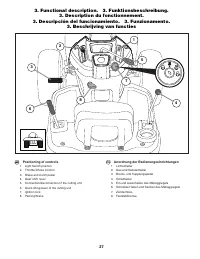
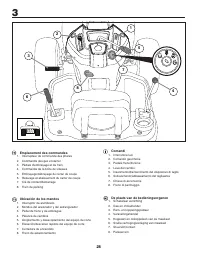
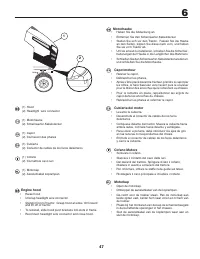
28 Comandi 1. Interruttore luci2. Comando gas/choke 3. Pedale freno/frizione4. Leva del cambio5. Inserimento/disinserimento del dispositivo di taglio6. Sollevamento/abbassamento del tagliaerba7. Chiave di accensione8. Freno di parcheggio De plaats van de bedieningsorganen 1. Schakelaar verlichting 2...