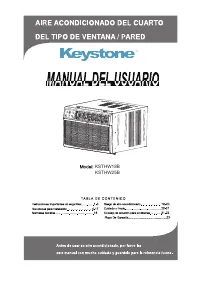
Keystone KSTHW25B - Manual de uso - Página 5


Índice:
- Página 12 – INSTRUCCIONES IMPORTANTES DE LA SEGURIDAD; Este símbolo indica la posibilidad de muerto o lesiones graves.; No la abre la unidad durante su operación.; L e a e s t e m a n u a l
- Página 13 – No lo usa para fines especiales.
- Página 14 – O p e r a c i ó n d e D i s p o s i t i vo s d e
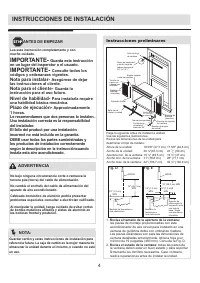
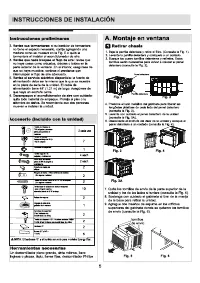
- Página 15 – INSTRUCCIONES DE INSTALACIÓN; Nota para el cliente-; Instrucciones preliminares; Revise el tamaño de la apertura de la ventana:
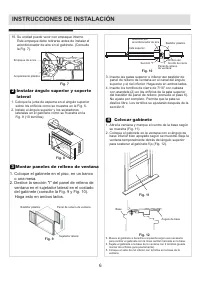
- Página 17 – Instalar ángulo superior y soporte; Colocar gabinete
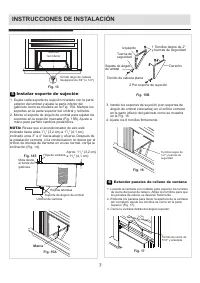
- Página 18 – Instalar sopor te de sujeción; Marca; Extender paneles de relleno de ventana
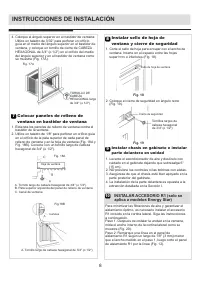
- Página 19 – Colocar paneles de relleno de; Instalar sello de hoja de; Instalar chasis en gabinete e instalar
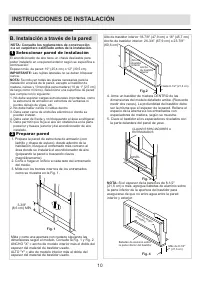
- Página 21 – B. Instalación a través de la pared; Seleccionar pared de instalación; Preparar pared
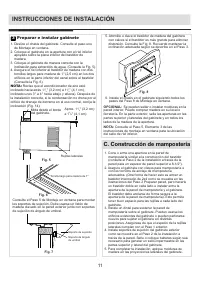
- Página 22 – C. Construcción de mampostería; Preparar e instalar gabinete
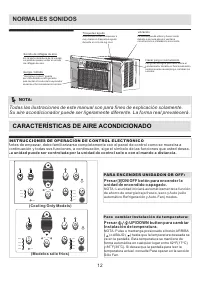
- Página 24 – CARACTERÍSTICAS DE AIRE ACONDICIONADO; PA R A A J U S TA R V E L O C I DA D D E FA N :; P a r a o p e r a r e n f u n c i ó n A u t o :; En el modo de sólo ventilador, la temperatura no está ajustado; R A S G O D E D E S C A N S O :; R A S G O D E A H O R R O D E E N E R G Í A :; S I G A R E P O R TA J E : ( e n a l g u n o s m o d e l o s ); l u z p a r p a d e a n d o
- Página 25 – P a n t a l l a s; S e n s o r d e t e m p e r a t u r a d e l e v a p o r a d o r d e e r r o r e s; Limbia de filtro de aire; C O S A S A D I C I O N A L E S Q U E D E B E S S A B E R; A i r e r e j i l l a s d i r e c c i o n a l e s; CUIDADO Y LIMPIA; Aire rejillas direccionales; Control de ventilación de aire fresco
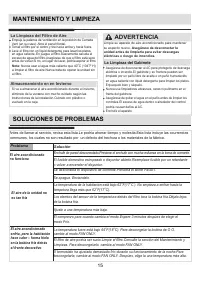
- Página 26 – MANTENIMIENTO Y LIMPIEZA; La Limpieza del Filtro de Aire; SOLUCIONES DE PROBLEMAS; Ajuste a una temperatura más baja.; ADVERTENCIA; Asegúrese de desconectar la
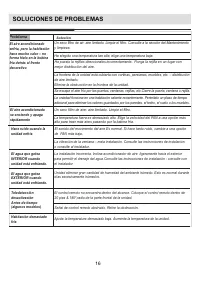
- Página 27 – Solución; Problema
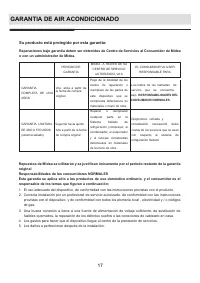
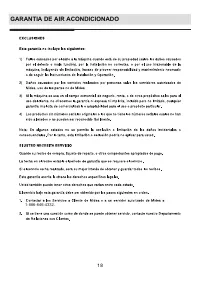
- Página 28 – Su producto está protegido por esta garantía:; GARANTIA DE AIR ACONDICIONADO
7
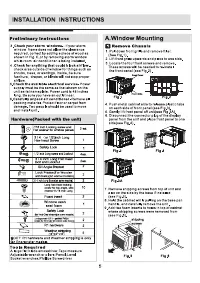
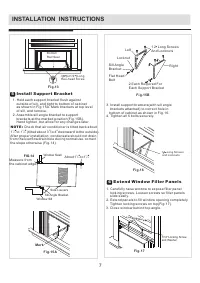
INSTALLATION INSTRUCTIONS
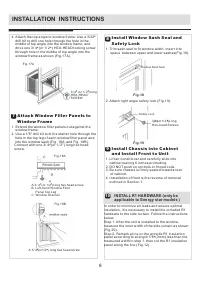
5
I n s t a l l S u p p o r t B r a c ke t
1 . H o l d e a c h s u p p o r t b r a c k e t f l u s h a g a i n s t
o u t s i d e o f s i l l , a n d t i g h t t o b o t t o m o f c a b i n e t
a s s h o w n i n F i g . 1 5 A . M a r k b r a c k e t s a t t o p l e v e l
o f s i l l , a n d r e m o v e .
2 . A s s e m b l e s i l l a n g l e b r a c k e t t o s u p p o r t
b r a c k e t s a t t h e m a r k e d p o s i t i o n ( F i g . 1 5 B ) .
H a n d t i g h t e n , b u t a l l o w f o r a n y c h a n g e s l a t e r.
B o t t o m
R a i l S e a l
1 2 L o n g S c r e w s
A n d L o c k n u t s
L e f t
R i g h t
S i l l A n g l e
B r a c k e t
F l a t H e a d
B o l t
2 E a c h R e q u i r e d F o r
E a c h S u p p o r t B r a c k e t
L o c k n u t
3 4 ( o r 1
) L o n g
H e x - h e a d S c r e w
/ 2
F i g . 1 3
F i g . 1 5 A
M a r k
F i g . 1 5 B
3 . C l o s e w i n d o w b e h i n d t o p a n g l e .
6
E x t e n d W i n d o w F i l l e r P a n e l s
1 . C a r e f u l l y r a i s e w i n d o w t o e x p o s e f i l l e r p a n e l
l o c k i n g s c r e w s . L o o s e n s c r e w s s o f i l l e r p a n e l s
s l i d e e a s i l y.
2 . E x t e n d p a n e l s t o f i l l w i n d o w o p e n i n g c o m p l e t e l y.
Ti g h t e n l o c k i n g s c r e w s o n t o p ( F i g . 1 7 ) .
3 . I n s t a l l s u p p o r t b r a c k e t s ( w i t h s i l l a n g l e
b r a c k e t s a t t a c h e d ) t o c o r r e c t h o l e i n
b o t t o m o f c a b i n e t a s s h o w n i n F i g . 1 6 .
4 . Ti g h t e n a l l 6 b o l t s s e c u r e l y.
1 2 L o n g S c r e w s
a n d L o c k n u t s
L o cking S
c r ew
7/16"Locking Screw
and Washer
F i g . 1 6
F i g . 1 7
FIG.14
5
Side Louvers
Window Sash
Window Sill
Sill Angle Bracket
1
5
A b o u t 1 / t o 1 /
4
8
M e a s u r e f r o m
t h e c a b i n e t e d g e .
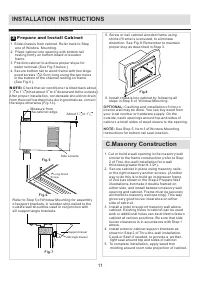
N OT E :
C h e c k t h a t a i r c o n d i t i o n e r i s t i l t e d b a c k a b o u t
1
5
O
O
1 / t o 1 / ( t i l t e d a b o u t 3 t o 4 d o w n w a r d t o t h
e o u t s i d e ) .
4
8
A f t e r p r o p e r i n s t a l l a t i o n , c o n d e n s a t e s h o u l d n o t d r a i n
f r o m t h e o v e r f l o w d r a i n h
o l e d
u r i n g n o r m a l u s e , c o r r e c t
t h e s l o p e o t h e r w i s e ( F i g . 1 4 ) .
"Cargando la instrucción" significa que debes esperar hasta que el archivo se cargue y puedas leerlo en línea. Algunas instrucciones son muy grandes y el tiempo de carga depende de la velocidad de tu conexión a Internet.
Resumen
INSTRUCCIONES IMPORTANTES DE LA SEGURIDAD Dentro de este manual podría encontrar muchos consejos ayudables diciendo cómo usa y mantener su aire acondicionado correctamente.le cuesta un poco cuidado antes, le ahorrará mucho tiempo y dinero en su aire acondicionado.Puede encontrar muchas respuestas a ...
Cuando el filtro del aire está eliminado, no la toca las partes metálicas de la unidad. Podría causar una lesion. La operación con la ventana abierta podría causar humedecimiento y remojo de muebles dentro de la casa. Cuando la unidad se va a limpiar, apague y desconecte el disyuntor. Tenga cuidado ...
N u n c a , e n n i n g ú n c a s o , c o r t e , r e m u e v e n i p a s a r p o r l a c o n e x i ó n a l a t i e r r a . E l c a b l e d e e n e r g í a c o n c o n e x i ó n a t i e r r a d e 3 p a t a s y u n d i s p o s i t i v o d e d e t e c c i ó n d e c o r r i e n t e . Varada Tipo ParedR...
Otros modelos de aire acondicionado Keystone
-
 Keystone KSTAT08-1C
-
 Keystone KSTAT08-1HC
-
 Keystone KSTAT10-1C
-
 Keystone KSTAT10-2C
-
 Keystone KSTAT10-2HC
-
 Keystone KSTAT12-1C
-
 Keystone KSTAT12-2C
-
 Keystone KSTAT12-2HC
-
 Keystone KSTAT14-2C
-
 Keystone KSTAT14-2HC