Página 2 - Símbolos de seguridad; ÍNDICE; PELIGRO DE MONÓXIDO DE CARBONO; ESTA PARRILLA SOLO SE PUEDE; ADVERTENCIA; Este producto contiene substancias químicas como; ADVERTENCIA
6 Símbolos de seguridad Los símbolos y las casillas ilustradas más adelante explican lo que significa cada encabezado. Lea y cumpla todo lo indicado en los mensajes que se encuentran en el manual. ADVERTENCIA ADVERTENCIA: Indica una situación potencialmente peligrosa que, de no evitarse, podría caus...
Página 3 - cuidadoso. No deje que las demás personas se; Sólo para uso particular. No la use para fines comerciales.; MANTENIMIENTO DE LA AHUMDOR; ahumadors y las rejillas con aceite vegetal para cocinar.; CONSEJOS PARA COCINAR; Siempre encender el fuego con la cámara de cocción y las; NUNCA; la use en
7 ADVERTENCIA ADVERTENCIA ADVERTENCIA ADVERTENCIA La mayoría de las superficies de esta unidad están calientes cuando está en uso. Sea sumamente cuidadoso. No deje que las demás personas se acerquen a la unidad. Use siempre ropa protectora para evitar lesionarse. No deje a los niños ni a las mascota...
Página 4 - CÓMO SABER CUÁNDO ESTÁ LISTO EL FUEGO; oxígeno que alimenta el fuego.; AHUMAR Y COCINAR LENTO; Seguridad con los alimentos; Temperatura interna de la carne; USDA Temperaturas Internas; Lomo de Cerdo (con 3 minutos de reposo)
8 CÓMO SABER CUÁNDO ESTÁ LISTO EL FUEGO La buena calidad del asado al carbón depende de la calidad del fuego en la ahumador. Como regla general, para saber si el carbón ya está listo para asar debe cerciorarse de que el 80 por ciento o más de los carbones tengan ceniza. Si tiene menos de esa cantida...
Página 5 - GARANTÍA LIMITADA; ALCANCE DE LA COBERTURA
9 Esta garantía es válida únicamente para las unidades adquiridas de los distribuidores autorizados. El fabricante le garantiza únicamente al consumidor- comprador original , que este producto no presentará defectos de mano de obra ni de materiales por el período indicado a continuación, contado des...
Página 7 - ASSEMBLY; pick a suitable; ARMADO
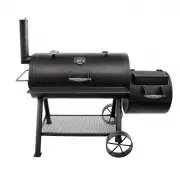
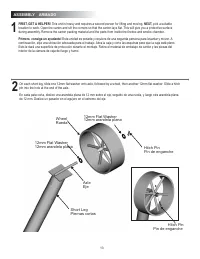
13 2 1 ASSEMBLY FIRST, GET A HELPER! This unit is heavy and requires a second person for lifting and moving. NEXT, pick a suitable location to work. Open the carton and slit the corners so that the carton lays flat. This will give you a protective surface during assembly. Remove the carton packing m...
Página 8 - Fully tighten these four bolts.; Bottom Shelf; Apriete los cuatro tornillos.; Estante inferior; No apriete los
14 3 4 Have one person hold the bottom shelf in position shown while another attaches shelf to legs using four 3/8-16×1" hex-head bolts. Fully tighten these four bolts. Smoke chamber Short Leg Leg Posts Long Leg Bottom Shelf 3/8-16x1” - Each Leg 3/8-16x1” - Each Leg Que una persona mantenga el e...
Página 9 - With the assistance of a helper; , roll the unit over the; Warming Plate
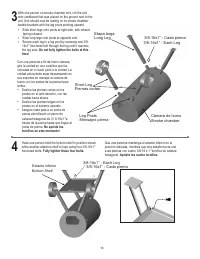
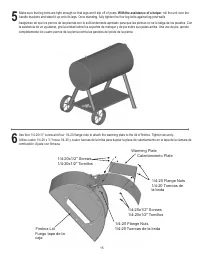
15 5 6 Make sure that leg bolts are tight enough so that legs won't slip off of posts. With the assistance of a helper , roll the unit over the handle brackets and stand it up onto its legs. Once standing, fully tighten the four leg bolts against leg post walls Use four 1/4-20×½" screw and four ...
Página 10 - With the help of an assistant; perno hexagonal; Perno hexagonal; Con la ayuda de un asistente,; /8 Arandelas de seguridad
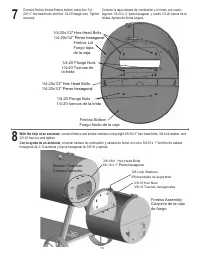
16 8 7 Connect firebox lid and firebox bottom using four 1/4-20×½" hex head bolts and four 1/4-20 flange nuts. Tighten securely. With the help of an assistant , connect firebox and smoke chamber using eight 3/8-16×1" hex head bolts, 3/8 lock washer, and 3/8-16 hex nut, and tighten. 1/4-20x1/...
Página 11 - TIGHTEN THE BOLTS; Smoke Stack; Smoke Chamber handle shown installed.; Pull Handle; Cámara de humo manejar muestra instalada.; hexagonal; APRIETE DE FORMA SEGURA!
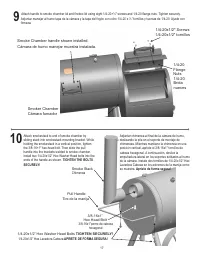
17 10 9 Attach smokestack to end of smoke chamber by sliding stack into smokestack mounting bracket. While holding the smokestack in a vertical position, tighten the 3/8-16×1" hex-head bolt. Then slide the pull handle into the brackets welded to smoke chamber. Install two 1/4-20x1/2” Hex Washer ...
Página 12 - You have completed the assembly of; Temperature Gauge; Usted ha completado el montaje de su; Medidor de temperatura
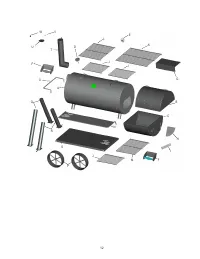
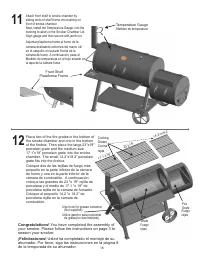
18 11 12 Place two of the fire grates in the bottom of the smoke chamber and one in the bottom of the firebox. Then place the large 23”x19” porcelain grate and the medium size 17.1”x19” porcelain grate into the smoke chamber. The small 14.2”x18.2” porcelain grate fits into the firebox. CookingGrates...