Onkyo HT-S7705B - Manual de uso - Página 7


Índice:
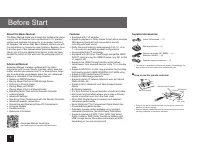
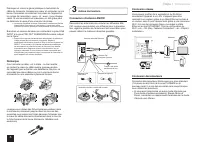
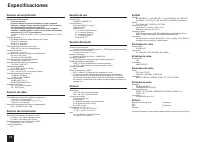
- Página 34 – Conexiones; Conexión de la TV y de los reproductores; Importante; Conexión de cable HDMI
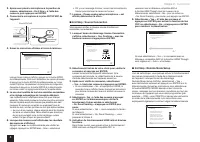
- Página 36 – Conexión de altavoces; Instrucciones sobre cómo conectar altavoces
- Página 37 – Nota; Conexión de auriculares
- Página 41 – Reproducción; Reproducción del reproductor y la TV
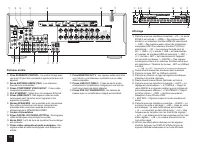
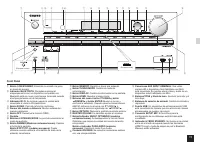
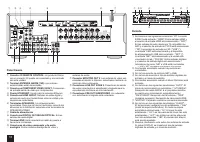
- Página 47 – Panel trasero; Pantalla
- Página 50 – DESCARGO DE RESPONSABILIDAD
- Página 51 – Declaración de Conformidad; The Americas
11
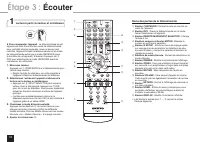
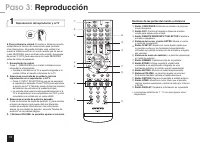
Step 3:
Playing Back
Listening modes
You can select a listening mode from various options such
as Dolby Digital, Dolby Atmos and DTS. Select the desired
mode by switching and listening actual sound in different
modes. The selectable listening modes depend on the
format of the input signals.
MOVIE/TV
: You can select a listening mode suitable for
movies and TV programs.
MUSIC
: You can select a listening mode suitable for music.
GAME
: You can select a listening mode suitable for games.
STEREO
: You can select a listening mode for stereo and all
channel stereo sources.
PURE AUDIO (main unit only) (European model)
: The
display and analog video circuits are cut off to provide purer
sound.
r
For details on the listening modes, see the Advanced
Manual.
"Direct" for playing the input signals as-is
Selecting this mode allows the input signals to be
played as they are. For example, 2 ch signals of music
CD will be played in stereo, 5.1 ch signals in 5.1 ch,
and Dolby Digital signals of blu-ray disc or DVD in the
Dolby Digital sound field according to the specified
number of channels.
Other useful functions
Playing Video and Audio from Different Sources
: It
is possible to play audio and video from different sources.
For example, you can play audio from the CD player and
video from the BD/DVD player. In this case, press BD/DVD
and then TV/CD. Then start playback on the BD/DVD player
and CD player. This function is effective when an input with
audio only has been selected (TV/CD, TUNER or BD/DVD
in the initial setup).
Adjusting Sound Quality
: It is possible to enhance
or moderate the low and high pitched ranges of front
speakers. Press TONE on the main unit several times
to select the desired setting from "Bass", "Treble" and
"Phase Matching Bass", and adjust with +/-.
r
It cannot be set if the listening mode is Pure Audio
(European model) or Direct.
"Bass"
: Allows you to enhance or moderate the low
pitched range.
"Treble"
: Allows you to enhance or moderate the high
pitched range.
"Phase Matching Bass"
: Allows you to keep the clear
midrange and effectively enhance the low pitched range.
Muting Temporarily
: Press MUTING on the remote
controller. To cancel the muting, press MUTING again, or
press VOL
j
/
l
.
Changing the Display Brightness
: Press DIMMER on
the remote controller. The display brightness changes each
time you press the button.
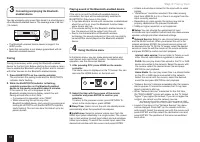
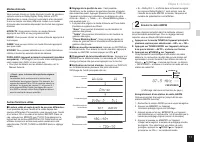
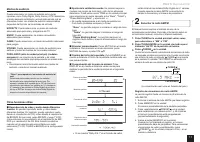
Checking the Input Format
: Press DISPLAY on the
remote controller several times to switch the display of the
main unit in order of:
Input source &
volume
Listening mode
Signal format
Sampling
frequency
Input signal
resolution
Output resolution
r
If "Dolby D 5.1" is displayed in Signal format, the
Dolby Digital 5.1 ch signals are being input. When
listening to AM/FM radio, the band, frequency and
preset number are displayed.
2
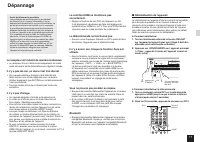
Listening to AM/FM Radio
The Basic Manual explains the method using automatic
tuning. For manual tuning, see the Advanced Manual.
1.
Press TUNER on the main unit several times to
select either "AM" or "FM".
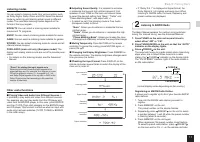
2.
Press TUNING MODE on the unit, so that the "AUTO"
indicator on the display lights.
3.
Press TUNING on the unit.
The automatic tuning to a radio station starts. Searching
stops when one is tuned. When tuned into a radio
station, the "
TUNED
" indicator on the display lights.
The "FM STEREO" indicator lights if the radio station is
an FM radio station.
TUNED
FM STEREO
AUTO
(Actual display varies depending on the country.)
Registering an AM/FM Radio Station
:
It allows you to register up to 40 of your favorite AM/FM
radio stations.
1. Tune into the AM/FM radio station you want to
register.
2. Press MEMORY on the unit.
The preset number on the display flashes.
3. Repeatedly press
PRESET
on the unit to select
a number between 1 and 40 while the preset number
is flashing (about 8 seconds).
4. Press MEMORY on the unit again.
When registered, the preset number stops flashing.
To select a preset radio station, press
PRESET
QPVJGOCKPWPKVQT%*ŨQPVJGTGOQVGEQPVTQNNGT
"Cargando la instrucción" significa que debes esperar hasta que el archivo se cargue y puedas leerlo en línea. Algunas instrucciones son muy grandes y el tiempo de carga depende de la velocidad de tu conexión a Internet.
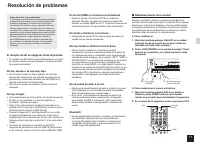
Resumen
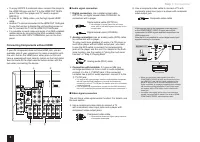
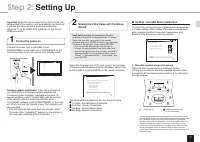
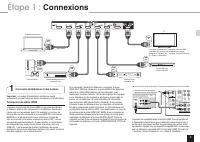
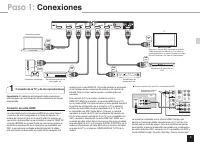
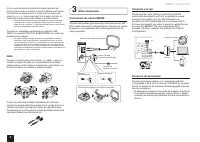
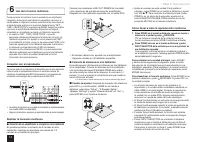
Paso 1: Conexiones 3 1 Conexión de la TV y de los reproductores Importante : El cable de alimentación debe conectarse sólo después de que todas las otras conexiones se hayan completado. Conexión de cable HDMI La unidad tiene muchos conectores HDMI en su panel trasero y cada uno de ellos corresponde ...
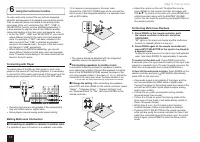
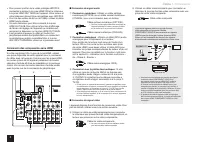
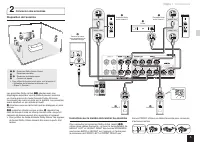
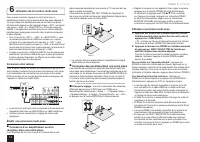
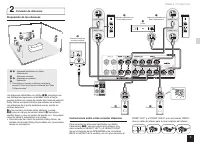
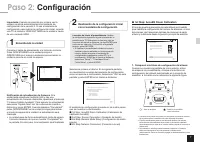
5 Paso 1: Conexiones 2 Conexión de altavoces Disposición de los altavoces # $ % & ' " " # Altavoces habilitados con Dolby (Delanteros) $ Altavoces centrales % & Altavoces envolventes ' Subwoofer r Para utilizar la función multizona, consulte la sección 6 “Uso de la función multizona”...
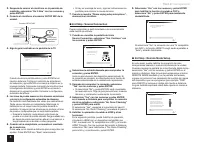
6 Paso 1: Conexiones Corte y quita la cubierta de plástico del extremo del cable del altavoz, gire el núcleo y conéctelo al terminal. Realice una conexión correcta entre las conexiones de la unidad y las conexiones del altavoz (+ a + y - a -) para cada canal. Si la conexión está mal, un sonido bajo ...