Onkyo HT-S7705B - Manual de uso - Página 9


Índice:
- Página 34 – Conexiones; Conexión de la TV y de los reproductores; Importante; Conexión de cable HDMI
- Página 36 – Conexión de altavoces; Instrucciones sobre cómo conectar altavoces
- Página 37 – Nota; Conexión de auriculares
- Página 41 – Reproducción; Reproducción del reproductor y la TV
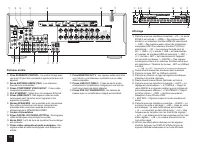
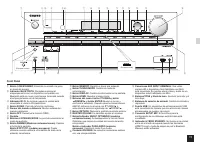
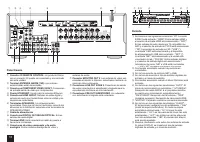
- Página 47 – Panel trasero; Pantalla
- Página 50 – DESCARGO DE RESPONSABILIDAD
- Página 51 – Declaración de Conformidad; The Americas
13
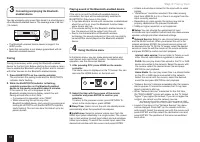
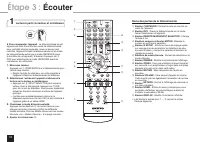
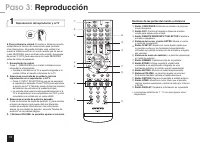
Step 3:
Playing Back
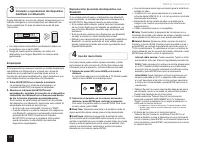
USB
: Select "USB" in the TV screen and connect a
USB storage device to the USB port on the front panel. On
the TV screen, select the desired folder or music file with
the cursors of the remote controller and press ENTER to
confirm and start playback.
r
"USB" becomes selectable after the USB function starts
up even if it cannot be selected first. It may take about a
minute to start up.
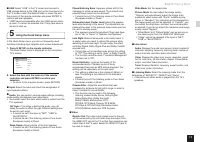
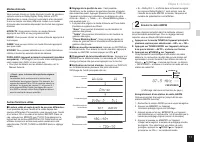
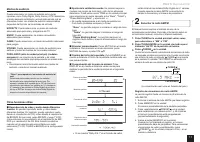
5
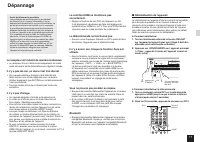
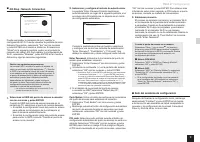
Using the Quick Setup menu
In the Quick Setup menu, you can set frequently used
functions including input selection and volume adjustment.
1.
Press Q SETUP on the remote controller.
The Quick Setup menu is displayed on the connected
TV's screen.
CBL/SAT
Input
Audio
Video
Information
Listening Mode
BD DVD
CBL/SAT
STB DVR
GAME
PC
AUX
2.
Select the item with the cursors of the remote
controller and press ENTER to confirm your
selection.
r
To return to the previous screen, press RETURN.
Input
: Select the input and check the assignment of
input selector buttons.
Audio
: You can perform various audio settings including
audio quality and speaker level adjustment.
r
You cannot select this item when audio is output from the
TV's speakers.
A/V Sync
: If the video is behind the audio, you can
delay the audio to offset the gap. Different settings can
be set for each input.
r
It cannot be set if the input is "NET", "USB" or
"BLUETOOTH".
r
It cannot be set if the listening mode is Pure Audio
(European model) or Direct.
Bass, Treble
: Adjust volume of the front speaker.
r
It cannot be set if the listening mode is Pure Audio
(European model) or Direct.
Phase Matching Bass
: Suppress phase shift in the
midrange to enhance bass sound. Thus smooth and
powerful bass sound can be obtained.
r
It cannot be set if the listening mode is Pure Audio
(European model) or Direct.
Subwoofer Level, Center Level
: Adjust the speaker
level while listening to the sound. The adjustment you
made will be reset to the previous status when you turn
the unit to standby mode.
r
The speakers cannot be adjusted if they have been
set to "No" or "None" in "Speaker Configuration".
Late Night
: Make small sounds to be easily heard. It
is useful when you need to reduce the volume while
watching a movie late night. You can enjoy the effect
on Dolby Digital, Dolby Digital Plus and Dolby TrueHD
sources only.
r
Turning the unit to standby mode will set the setting
to "Off". The setting is set to "Auto" in Dolby TrueHD.
r
This function cannot be used if "Loudness Management"
has been set to "Off".
Music Optimizer
: Improve the quality of the
compressed audio. Playback sound of lossy
compressed files such as MP3 will be improved. The
setting can be separately set to each input.
r
The setting is effective in the signals of 48 kHz or
less. The setting is not effective in the bitstream
signals.
r
It cannot be set if the listening mode is Pure Audio
(European model) or Direct.
Cinema Filter
: Adjust the soundtrack that was
processed to enhance its high pitch range, in order to
make it suitable for home theater.
r
This function can be used in the following
listening modes: Dolby Atmos, Dolby Digital,
Dolby Digital Plus, Dolby Surround,
Dolby TrueHD, Multichannel, DTS,
DTS-ES, DTS Neo:6 Cinema, DTS 96/24,
DTS Neo:6, DTS-HD High Resolution Audio,
DTS-HD Master Audio and DTS Express.
Video
:
Monitor Out
: The video input signals input to the unit
will be converted by the unit when they are output from
the HDMI OUT jack to the TV so that their resolution can
match that of the TV used. Select the HDMI OUT jack to
be used for output.
Wide Mode
: Set the aspect ratio.
Picture Mode
: You can adjust the image quality.
"Cinema" will automatically adjust the image to be
suitable to watch movie and "Game" suitable to play
game. In "Standard", the resolution will be changed but
the image quality will not be adjusted. In "Custom", you
can adjust the brightness, contrast, hue and saturation
as desired. If you do not adjust the resolution and image
quality, select "Bypass".
r
"Wide Mode" and "Picture Mode" can be set only on
the video output from the HDMI OUT MAIN jack.
r
"Video" cannot be selected if the input is "NET",
"USB" or "BLUETOOTH".
Information
:
Audio
: Displays the audio input source, format, number of
channels, sampling frequency, listening mode, number of
output channels, and other audio information.
Video
: Displays the video input source, resolution, signal
format, color tone, 3D information, Aspect, Picture Mode,
output, and other Video information.
Tuner
: Displays the band, frequency, preset number, and
other tuner (radio) information.
Listening Mode
: Select the listening mode from the
categories of "MOVIE/TV", "MUSIC" and "Game".
r
It cannot be set when audio is played from the TV's
speakers.
"Cargando la instrucción" significa que debes esperar hasta que el archivo se cargue y puedas leerlo en línea. Algunas instrucciones son muy grandes y el tiempo de carga depende de la velocidad de tu conexión a Internet.
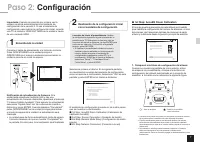
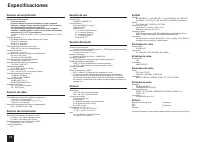
Resumen
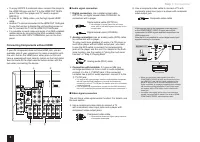
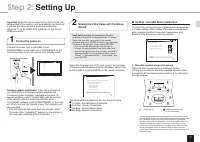
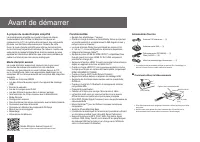
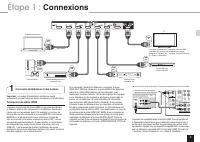
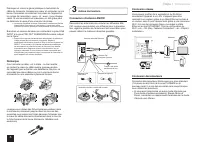
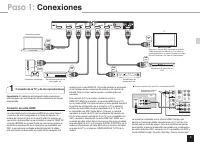
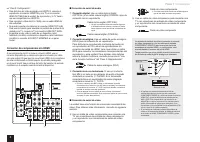
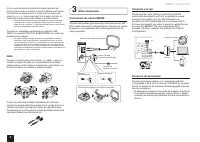
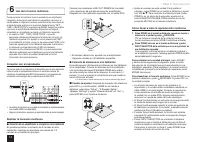
Paso 1: Conexiones 3 1 Conexión de la TV y de los reproductores Importante : El cable de alimentación debe conectarse sólo después de que todas las otras conexiones se hayan completado. Conexión de cable HDMI La unidad tiene muchos conectores HDMI en su panel trasero y cada uno de ellos corresponde ...
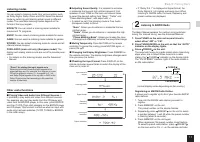
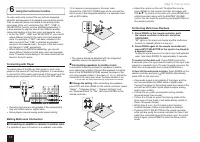
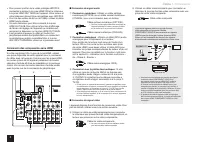
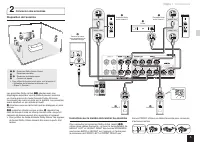
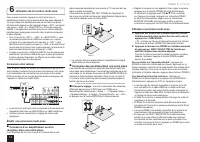
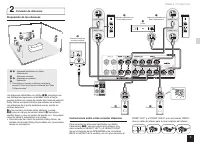
5 Paso 1: Conexiones 2 Conexión de altavoces Disposición de los altavoces # $ % & ' " " # Altavoces habilitados con Dolby (Delanteros) $ Altavoces centrales % & Altavoces envolventes ' Subwoofer r Para utilizar la función multizona, consulte la sección 6 “Uso de la función multizona”...
6 Paso 1: Conexiones Corte y quita la cubierta de plástico del extremo del cable del altavoz, gire el núcleo y conéctelo al terminal. Realice una conexión correcta entre las conexiones de la unidad y las conexiones del altavoz (+ a + y - a -) para cada canal. Si la conexión está mal, un sonido bajo ...