Philips AJ7030DG/37 - Guía rápida
Philips AJ7030DG/37 - Guía rápida, léela gratuitamente en línea en formato PDF. Esperamos que esto te ayude a resolver cualquier duda que puedas tener. Si tienes más preguntas, contáctanos a través del formulario de contacto.

Siga siempre las instrucciones de este capítulo en orden.
Instalación de las pilas
Precaución
•
Riesgo de explosión. Mantenga las pilas alejadas del calor, la luz del
sol o el fuego. Nunca tire las pilas al fuego.
•
Riesgo de explosión si la batería de sustitución no es correcta.
Sustitúyala sólo con una del mismo tipo o equivalente.
•
La pila contiene sustancias químicas, por lo que debe deshacerse de
ella correctamente.
•
Material de perclorato: es posible que requiera una manipulación
específica. Consulte www.dtsc.ca.gov/hazardouswaste/perchlorate.
Nota
•
La fuente de alimentación siempre debe ser de CA . La pila de litio
CR2032 que ya viene instalada sólo puede restablecer los ajustes de
la hora y la alarma.
Cuando utilice el equipo por primera vez:
Quite la pestaña protectora para activar la pila.
Para reemplazar la pila:
B
Conexión de la alimentación
C
Precaución
•
Riesgo de daños en el producto. Compruebe que el voltaje de la
red eléctrica se corresponde con el voltaje impreso en la par te
posterior o inferior del radio reloj.
•
Riesgo de descarga eléctrica. No desenchufe nunca el adaptador
de CA , tire siempre del enchufe desde la toma. No tire nunca del
cable.
Ajuste del reloj
1
En el modo de espera, mantenga pulsado
SET
durante
2 segundos para activar el modo de ajuste del reloj.
»
Aparece
[12H]
o
[24H]
.
2
Pulse
TUNING +/-
o
/ para seleccionar el formato de 12
o 24 horas.
3
Vuelva a pulsar
SET
para confirmar.
»
Los dígitos de la hora empezarán a parpadear.
4
Repita los pasos 2 y 3 para configurar la hora y los minutos.
Nota
•
Si el reloj no está configurado manualmente cuando se conecta
el iPhone/iPod, el radio reloj sincroniza la hora del iPhone/iPod
automáticamente.
Encendido
Pulse .
»
El radio reloj cambia a la última fuente seleccionada.
Cambio a modo de espera
Pulse para poner el radio reloj en modo de espera.
»
En el panel de visualización aparecerá el reloj (si está ajustado).
4 Reproducción desde un
iPhone/iPod
Puede disfrutar del sonido del iPhone/iPod a través de esta radio
reloj.
Modelos de iPhone/iPod compatibles
La radio reloj es compatible con estos modelos de iPod y de iPhone:
Diseñado para:
•
iPod touch (1ª, 2ª, 3ª y 4ª generación)
•
iPod classic
•
iPod con vídeo
•
iPod nano (1ª, 2ª, 3ª, 4ª, 5ª y 6ª generación)
•
iPod con pantalla en color
•
iPod mini
•
iPhone 4S
•
iPhone 4
•
iPhone 3GS
•
iPhone 3G
•
iPhone
Cómo escuchar el audio de un iPhone/iPod
1
Pulse
SOURCE
varias veces para seleccionar el modo de
iPhone/iPod.
2
Coloque el iPhone/iPod en la base.
D
3
Comience a reproducir audio del iPhone/iPod.
Cómo quitar el iPhone/iPod
Tire del iPhone/iPod para quitarlo de la base.
E
Carga del iPhone/iPod
Cuando la radio reloj está conectada a la fuente de alimentación, el
reproductor iPhone/iPod que esté colocado en la base comenzará
a cargarse.
o
Battery usage CAUTION – To prevent battery leakage which
may result in bodily injury, property damage, or damage to
the unit:
•
Install all batteries correctly, + and - as marked on the
unit.
•
Do not mix batteries (old and new or carbon and alkaline,
etc.).
•
Batteries (packed or installed) shall not be exposed to
excessive heat such as sunshine, fire or the like.
•
Remove batteries when the unit is not used for a long
time.
p
Apparatus shall not be exposed to dripping or splashing.
q
Do not place any sources of danger on the apparatus (e.g.
liquid filled objects, lighted candles).
r
This product may contain lead and mercury. Disposal of
these materials may be regulated due to environmental
considerations. For disposal or recycling information, please
contact your local authorities or the Electronic Industries
Alliance: www.eiae.org.
s
Where the plug of the Direct Plug-in Adapter is used as the
disconnect device, the disconnect device shall remain readily
operable.
Risk of swallowing coin battery
•
The product/remote control may contain a coin/button type
batter y, which can be swallowed. Keep the batter y out of
reach of children at all times! If swallowed, the batter y can
cause serious injur y or death. Severe internal burns can occur
within two hours of ingestion.
•
If you suspect that a batter y has been swallowed or placed
inside any par t of the body, seek immediate medical attention.
•
When you change the batteries, always keep all new and used
batteries out of reach of children. Ensure that the batter y
compar tment is completely secure after you replace the
batter y.
•
If the batter y compar tment cannot be completely secured,
discontinue use of the product. Keep out of reach of children
and contact the manufacturer.
Warning
•
Never remove the casing of this apparatus.
•
Never place this apparatus on other electrical equipment.
•
Keep this apparatus away from direct sunlight, naked flames or heat.
•
To reduce the risk of fire or electric shock, do not expose this
apparatus to rain or moisture.
•
Ensure that you always have easy access to the power cord, plug or
adapter to disconnect this apparatus from the power.
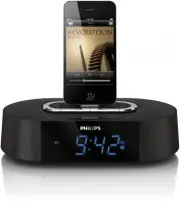
2
Your clock radio
Congratulations on your purchase, and welcome to Philips! To fully
benefit from the suppor t that Philips offers, register your product at
www.philips.com/welcome.
Introduction
With this clock radio, you can:
•
listen to FM radio;
•
enjoy audio from iPod/iPhone or an ex ternal device;
•
know the time; and
•
wake up by buzzer alarm, radio, or audio in iPod/iPhone.
What's in the box
Check and identify the contents of your package:
•
Main unit (with a batter y)
•
AC/DC power adapter
•
User manual
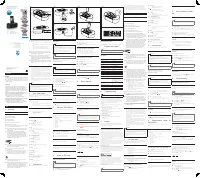
Overview of the main unit
A
a
PRESET
•
Select a preset radio station.
•
Adjust hour and minute.
b
TUNING +/-
•
Tune to a FM radio station.
•
Adjust hour and minute.
c
•
Turn on/off the clock radio.
•
Switch the clock radio to standby mode.
d
AL1/AL2
•
Set alarm.
•
View alarm settings.
•
Activate/deactivate alarm timer.
e
SNOOZE/BRIGHTNESS
•
Snooze alarm.
•
Adjust display brightness.
f
iPod/iPhone
•
Dock for iPod/iPhone.
g
VOLUME +/-
•
Adjust volume.
h
SET
•
Store radio stations automatically/manually.
•
Set clock.
i
SLEEP
•
Set sleep timer.
j
SOURCE
•
Select source.
k
Battery tray
l
AUX IN
•
Connect an ex ternal audio device.
m
AL1/2 iPhone·RADIO· BUZZ
•
Select alarm source.
n
DC 5V
•
Power supply socket.
3
Get started
Always follow the instructions in this chapter in sequence.
Canada
English:
This digital apparatus does not exceed the Class B limits for
radio noise emissions from digital apparatus as set out in the
Radio Interference Regulations of the Canadian Department of
Communications.This Class B digital apparatus complies with
Canadian ICES-003.
Français:
Cet appareil numérique n’émet pas de bruits radioélectriques
dépassant les limites applicables aux appareils numériques de Classe
B prescrites dans le Règlement sur le Brouillage Radioélectrique
édicté par le Ministère des Communications du Canada. Cet appareil
numérique de la classe B est conforme à la norme NMB-003 du
Canada.
T h i s p ro d u c t c o m p l i e s w i t h t h e F C C - R u l e s , Pa r t 1 5 .
Operation is subject to the following two conditions:
1.This device may not cause harmful interference, and
2. This device must accept any interference received,
includinginterference that may cause undesired operation.
L’appareil est conforme à la réglementation FCC, section 15.
Son utilisation est soumise à deux conditions:
1. L’appareil ne doit pas provoquer d’interférences nuisibles, et
2. L’appareil doit supporter les interférences reçues, y compris les
interférences empêchant son fonctionnement correct.
EN
1 Important
Safety
Important Safety Instructions
a
Read these instructions.
b
Keep these instructions.
c
Heed all warnings.
d
Follow all instructions.
e
Do not use this apparatus near water.
f
Clean only with dry cloth.
g
Do not block any ventilation openings. Install in accordance
with the manufacturer's instructions.
h
Do not install near any heat sources such as radiators, heat
registers, stoves, or other apparatus (including amplifiers)
that produce heat.
i
Do not defeat the safety purpose of the polarized or
grounding-type plug. A polarized plug has two blades with
one wider than the other. A grounding type plug has two
blades and a third grounding prong. The wide blade or the
third prong are provided for your safety. If the provided
plug does not fit into your outlet, consult an electrician for
replacement of the obsolete outlet.
j
Protect the power cord from being walked on or pinched,
particularly at plugs, convenience receptacles, and the point
where they exit from the apparatus.
k
Only use attachments/accessories specified by the
manufacturer.
l
Use only with the cart, stand, tripod, bracket, or table
specified by the manufacturer or sold with the apparatus.
When a cart is used, use caution when moving the cart/
apparatus combination to avoid injury from tip-over.
m
Unplug this apparatus during lightning storms or when
unused for long periods of time.
n
Refer all servicing to qualified service personnel. Servicing is
required when the apparatus has been damaged in any way,
such as power-supply cord or plug is damaged, liquid has
been spilled or objects have fallen into the apparatus, the
apparatus has been exposed to rain or moisture, does not
operate normally, or has been dropped.
»
The clock radio tunes to a station with strong reception
automatically.
3
Repeat step 2 to tune to more stations.
To tune to a station manually:
Press
TUNING +/-
repeatedly until you find optimal reception.
Store FM radio stations automatically
You can store a maximum of 20 FM radio stations.
In tuner mode, press an hold
SET
for two seconds.
»
The clock radio stores all the available FM radio stations and
broadcasts the first available station automatically.
Store FM radio stations manually
1
Tune to an FM radio station.
2
Press
SET
.
»
The preset number begins to blink.
3
Press
PRESET
/
repeatedly to select a number.
4
Press
SET
again to confirm.
5
Repeat steps 1 to 4 to store other stations.
Note
•
To remove a pre-stored station, store another station in its place.
Select a preset radio station
In tuner mode, press
PRESET
/
to select a preset number.
6
Other features
Set alarm timer
Set alarm
In standby mode, you can set two alarms to ring at different time.
Note
•
Make sure that you have set the clock correctly.
1
Press and hold
AL1
/
AL2
for two seconds to activate alarm
setting mode.
»
The hour digits and alarm icon begin to blink.
2
Press
TUNING +/-
or
/
to set the hour.
3
Press
AL1
/
AL2
to confirm.
»
The minute digits begin to blink.
4
Repeat steps 2 to 3 to set the minute and alarm volume.
G
Select alarm source
Adjust
AL1/2 iPhone·RADIO· BUZZ
control to select alarm source
for both alarms.
Note
•
When alarm time comes, the selected radio, buzzer, or iPod/iPhone
turns on.
•
You can only select the same alarm source for Alarm 1/ Alarm2.
•
If iPhone is selected as alarm source, while no iPhone/iPod is
connected, the clock radio switches to buzzer source instead.
Activate/deactivate alarm timer
1
Press
AL1
/
AL2
to view alarm settings.
2
Press
AL1
/
AL2
again to activate or deactivate the alarm timer.
»
or
is displayed if alarm timer is on and disappears if it
is off.
To stop the ringing alarm:
Press the corresponding
AL1
/
AL2
.
»
The alarm repeats ringing for the next day.
Snooze alarm
When alarm sounds, press
SNOOZE
.
»
The alarm snoozes and repeats ringing 9 minutes later.
To adjust alarm inter val (in minutes), press
SNOOZE
repeatedly.
Set sleep timer
This clock radio can switch to standby mode automatically after a
preset period.
Press
SLEEP
repeatedly to select the sleep timer period (in minutes).
»
When the sleep timer is activated, appears.
To deactivate the sleep timer, press
SLEEP
repeatedly until
[OFF]
(off ) appears.
Play audio from an external device
You can listen to audio from an ex ternal device through this clock
radio.
1
Connect the audio cable to:
•
the
AUX IN
socket.
•
the AUDIO OUT sockets of an ex ternal device.
2
Press
SOURCE
repeatedly to select AUX source.
»
is displayed.
3
Star t to play the ex ternal device (see the user manual of this
device).
15 30 60 90 120
OFF
Adjust display brightness
Press
BRIGHTNESS
repeatedly to select different brightness levels.
7
Product information
Note
•
Product information is subject to change without prior notice.
Specifications
Amplifier
Rated Output Power
2 x 3 W RMS
Tuner
Tuning Range
FM: 87.5-108 MHz
Tuning grid
100 KHz
Sensitivity: Mono, 26dB S/N
Ratio
<22 dBf
Search Selectivity
<28 dBf
Total Harmonic Distor tion
<2%
Signal to Noise Ratio
>55 dB
General information
AC/DC Power Adaptor
Brand name: Philips;
Model: ASSA1A-050200;
Input: 100-240 V~, 50/60 Hz; 0.45 A;
Output: 5 V 2 A
Operation Power
Consumption
8 W
Standby Power Consumption
<1 W
Dimensions: Main Unit
(W x H x D)
198 x 71 x 111 mm
Weight: Main Unit
0.5 kg
8 Troubleshooting
Warning
•
Never remove the casing of this device.
To keep the warranty valid, never tr y to repair the system yourself.
If you encounter problems when using this device, check the
following points before requesting ser vice. If the problem remains
unsolved, go to the Philips Web page (www.philips.com/suppor t).
When you contact Philips, make sure that the device is nearby and
the model number and serial number are available.
No power
•
Make sure that the AC power plug of the device is connected
properly.
•
Make sure that there is power at the AC outlet.
No response from the clock radio
•
Disconnect and reconnect the AC power plug, and then turn
on the clock radio again.
Poor radio reception
•
Increase the distance between the unit and your TV or VCR .
•
Fully ex tend the FM antenna.
Alarm does not work
•
Set the clock /alarm correctly.
Clock/alarm setting erased
•
Power has been interrupted or the power plug has been
disconnected.
•
Reset the clock /alarm.
9 Notice
Any changes or modifications made to this device that are not
expressly approved by Philips Consumer Lifestyle may void the user’s
authority to operate the equipment.
Disposal of your old product and batteries
Your product is designed and manufactured with high quality
materials and components, which can be recycled and reused.
Never dispose of your product with other household waste. Please
inform yourself about the local rules on the separate collection of
electrical and electronic products and batteries. The correct disposal
of these products helps prevent potentially negative consequences
on the environment and human health.
Your product contains batteries, which cannot be disposed of with
normal household waste.
Please inform yourself about the local rules on separate collection of
batteries. The correct disposal of batteries helps prevent potentially
negative consequences on the environment and human health.
Please visit www.recycle.philips.com for additional information on a
recycling center in your area.
Environmental information
All unnecessar y packaging has been omitted. We have tried to make
the packaging easy to separate into three materials: cardboard (box),
polystyrene foam (buffer) and polyethylene (bags, protective foam sheet.)
Your system consists of materials which can be recycled and reused
if disassembled by a specialized company. Please obser ve the local
regulations regarding the disposal of packaging materials, exhausted
batteries and old equipment.
“Made for iPod” and “Made for iPhone” mean that an electronic
accessor y has been designed to connect specifically to iPod or
iPhone respectively, and has been cer tified by the developer to
meet Apple per formance standards. Apple is not responsible for the
operation of this device or its compliance with safety and regulator y
standards. Please note that the use of this accessor y with iPod or
iPhone may affect wireless per formance.
iPod and iPhone are trademarks of Apple Inc., registered in the U.S.
and other countries.
Note
•
The type plate is located on the bottom of the apparatus.
2012 © Koninklijke Philips Electronics N.V. All rights reser ved.
Specifications are subject to change without notice. Trademarks
are the proper ty of Koninklijke Philips Electronics N.V. or their
respective owners. Philips reser ves the right to change products at
any time without being obliged to adjust earlier supplies accordingly.
ES
1 Importante
Seguridad
Instrucciones de seguridad importantes
a
Lea estas instrucciones.
b
Guarde estas instrucciones.
c
Preste atención a todas las advertencias.
d
Siga todas las instrucciones.
e
No use este aparato cerca del agua.
f
Utilice únicamente un paño seco para la limpieza.
g
No bloquee las aberturas de ventilación. Realice la
instalación de acuerdo con las indicaciones del fabricante.
h
No instale cerca ninguna fuente de calor como, por ejemplo,
radiadores, rejillas de calefacción, hornos u otros aparatos
que produzcan calor (incluidos los amplificadores).
i
No omita la opción de seguridad que ofrecen los enchufes
polarizados o con conexión a tierra. Un enchufe polarizado
tiene dos conectores planos, uno más ancho que el otro.
Un enchufe con conexión a tierra tiene dos conectores
planos y un tercer conector de conexión a tierra. El
conector plano más ancho y el tercer conector le ofrecen
seguridad adicional. Si el enchufe suministrado no encaja
correctamente en la toma de corriente, consulte a un
electricista para cambiar el conector obsoleto.
j
Evite que el cable de alimentación se pise o se doble, en
particular junto a los enchufes, tomas de corriente y en el
punto donde sale del aparato.
k
Use exclusivamente los dispositivos/accesorios indicados por
el fabricante.
l
Use únicamente el carrito, soporte, trípode o mesa indicados
por el fabricante o que se incluya con el aparato. Cuando
use un carrito, tenga cuidado al mover juntos el carrito y el
aparato para evitar lesiones, ya que se puede volcar.
m
Desenchufe el aparato durante las tormentas eléctricas o
cuando no lo utilice durante un periodo largo de tiempo.
n
El servicio técnico debe realizarlo siempre personal
cualificado. Se requerirá servicio de asistencia técnica cuando
el aparato sufra algún tipo de daño como, por ejemplo, que
el cable de alimentación o el enchufe estén dañados, que se
haya derramado líquido o hayan caído objetos dentro del
aparato, que éste se haya expuesto a la lluvia o humedad, que
no funcione normalmente o que se haya caído.
o
ATENCIÓN con el uso de las pilas. Para evitar fugas de las
pilas que puedan causar lesiones corporales, daños en la
propiedad o a la unidad:
•
Instale todas las pilas correctamente, siguiendo las
indicaciones de los polos + y - de la unidad.
•
No mezcle pilas (antiguas y nuevas, o de carbón y
alcalinas, etc.).
•
No exponga las pilas (batería o pilas instaladas) a
temperaturas altas como, por ejemplo, la luz del sol, el
fuego o similares.
•
Quite las pilas cuando no use la unidad durante un
periodo largo de tiempo.
p
No exponga el aparato a goteos ni salpicaduras.
q
No coloque sobre el aparato objetos que puedan suponer un
peligro (por ejemplo, objetos que contengan líquido o velas
encendidas).
r
Este producto puede contener plomo y mercurio. Es
posible que la eliminación de estos materiales se encuentre
bajo regulación debido a causas medioambientales. Para
obtener información sobre el desecho o reciclaje, póngase
en contacto con las autoridades locales o con Electronic
Industries Alliance: www.eiae.org.
s
Cuando se utiliza el enchufe del adaptador Direct Plug-in
Adapter como dispositivo de desconexión, éste debe estar
siempre disponible.
Riesgo de ingestión de la pila tipo moneda
•
La unidad/mando a distancia puede incluir una pila tipo
moneda/botón que puede ingerirse. Mantener siempre la
pila fuera del alcance de los niños. Si se ingiere, la pila puede
provocar lesiones graves o la muer te. Pueden producirse
quemaduras internas graves en un plazo de dos horas después
de la ingestión.
•
Si sospecha que ha ingerido o tiene una pila en el interior
de cualquier par te del cuerpo, consulte a un médico
inmediatamente.
•
Cuando cambie las pilas, mantenga siempre todas las pilas
nuevas y usadas fuera del alcance de los niños. Asegure que
el compar timiento de las pilas está completamente cerrado
después de cambiar la pila.
•
Si el compar timiento de las pilas no puede cerrase
completamente, deje de utilizar el producto. Manténgalo
fuera del alcance de los niños y póngase en contacto con el
fabricante.
Advertencia
•
No quite nunca la carcasa de este aparato.
•
No coloque nunca este aparato sobre otro equipo eléctrico.
•
No exponga el aparato a la luz solar directa, al calor o a las llamas.
•
Para reducir el riesgo de incendio o descarga eléctrica, no exponga
este aparato a la lluvia o humedad.
•
Asegúrese de tener siempre un fácil acceso al cable de alimentación,
al enchufe o al adaptador para desconectar el aparato de la
corriente.
2
La radio reloj
Le felicitamos por su compra y le damos la bienvenida a Philips. Para
poder beneficiarse por completo del sopor te que ofrece Philips,
registre el producto en www.philips.com/welcome.
Introducción
Con este radio reloj, podrá:
•
escuchar la radio FM;
•
disfrutar del contenido de audio del iPod/iPhone o de un
dispositivo ex terno;
•
saber la hora; y
•
desper tarse con la alarma del zumbador, la radio o música
del iPod/iPhone.
Contenido de la caja
Compruebe e identifique el contenido del paquete:
•
Unidad principal (con una pila)
•
Adaptador de alimentación de CA /CC
•
Manual de usuario
Descripción de la unidad principal
A
a
PRESET
•
Selecciona una emisora de radio presintonizada.
•
Ajusta la hora y los minutos.
b
TUNING +/-
•
Sintonice una emisora de radio FM.
•
Ajusta la hora y los minutos.
c
•
Enciende/apaga el radio reloj.
•
Cambia el radio reloj al modo de espera.
d
AL1/AL2
•
Ajusta la alarma.
•
Visualiza los ajustes de la alarma.
•
Activa y desactiva el temporizador de la alarma.
e
SNOOZE/BRIGHTNESS
•
Cómo posponer la alarma.
•
Ajusta el brillo de la pantalla.
f
iPod/iPhone
•
Base para iPod/iPhone.
g
VOLUME +/-
•
Ajustar el volumen.
h
SET
•
Almacena las emisoras de radio automáticamente o
manualmente.
•
Ajusta el reloj.
i
SLEEP
•
Ajusta el temporizador de desconexión.
j
SOURCE
•
Selecciona una fuente.
k
Bandeja de las pilas
l
AUX IN
•
Conecta un dispositivo de audio ex terno.
m
AL1/2 iPhone·RADIO· BUZZ
•
Selecciona la fuente para la alarma.
n
DC 5V
•
Toma para la fuente de alimentación.
3 Introducción
Install battery
Caution
•
Risk of explosion! Keep batteries away from heat, sunshine or fire.
Never discard batteries in fire.
•
Danger of explosion if batter y is incorrectly replaced. Replace only
with the same or equivalent type.
•
The batter y contains chemical substances, so it should be disposed
of properly.
•
Perchlorate Material - special handling may apply. See
www.dtsc.ca.gov/hazardouswaste/perchlorate.
Note
•
You can only use AC power as power supply. The pre-installed
lithium CR2032 batter y can only back up time and alarm.
For first-time use:
Remove the protective tab to activate the batter y.
To replace the battery:
B
Connect power
C
Caution
•
Risk of product damage! Ensure that the power voltage corresponds
to the voltage printed on the back or underside of the clock radio.
•
Risk of electric shock! When you unplug the AC adapter, always pull
the plug from the socket. Never pull the cord.
Set clock
1
In standby mode, press and hold
SET
for two seconds to
activate clock setting mode.
»
[12H]
or [
24H]
is displayed.
2
Press
TUNING +/-
or
/ repeatedly to select 12/24 hour
format.
3
Press
SET
again to confirm.
»
The hour digits begin to blink.
4
Repeat Steps 2 to 3 to set the hour and minute.
Note
•
If clock is not manually set, when iPhone/iPod is connected, the
clock radio synchronizes time from the iPhone/iPod automatically.
Turn on
Press .
»
The clock radio switches to the last selected source.
Switch to standby mode
Press
to switch the clock radio to standby mode.
»
The clock (if set) appears on the display panel.
4
Play from iPhone/iPod
You can enjoy audio from iPhone/iPod through this clock radio.
Compatible iPhone/iPod
The clock radio suppor ts these iPod and iPhone models:
Made for.
•
iPod touch (1st, 2nd, 3rd, and 4th generation)
•
iPod classic
•
iPod with video
•
iPod nano (1st, 2nd, 3rd, 4th, 5th, and 6th generation)
•
iPod with color display
•
iPod mini
•
iPhone 4S
•
iPhone 4
•
iPhone 3GS
•
iPhone 3G
•
iPhone
Listen to audio from iPhone/iPod
1
Press
SOURCE
repeatedly to select iPhone/iPod mode.
2
Place the iPhone/iPod in the dock.
D
3
Star t to play audio from the iPhone/iPod.
Remove the iPhone/iPod
Pull the iPhone/iPod out of the dock.
E
Charge the iPhone/iPod
When the clock radio is connected to power, the docked iPhone/
iPod star ts charging.
Adjust volume
F
5
Listen to FM radio
Tune to FM radio stations
Tip
•
Position the antenna as far as possible from T V, VCR , or other
radiation source.
•
For better reception, fully ex tend and adjust the position of the
antenna.
1
Press
SOURCE
repeatedly to select FM tuner source.
2
Press and hold
TUNING +/-
for two seconds.
d
e
k
l
b
c
a
f
g
h
m
n
j
i
A
B
D
F
G
E
C
Ajuste del volumen
F
5
Cómo escuchar la radio
FM
Sintonización de emisoras de radio FM
Consejo
•
Coloque la antena lo más lejos posible de un televisor, vídeo u otra
fuente de radiación.
•
Para mejorar la recepción, ex tienda por completo la antena y ajuste
su posición.
1
Pulse
SOURCE
varias veces para seleccionar el sintonizador
FM como fuente.
2
Mantenga pulsado
TUNING +/-
durante 2 segundos.
»
El reloj sintoniza automáticamente una emisora de recepción
fuer te.
3
Repita el paso 2 para sintonizar más emisoras.
Para sintonizar una emisora manualmente:
Pulse
TUNING +/-
varias veces hasta encontrar la recepción óptima.
Almacenamiento automático de las emisoras de
radio FM
Puede almacenar un máximo de 20 emisoras de radio FM.
En el modo de sintonizador, mantenga pulsado
SET
durante dos
segundos.
»
El radio reloj almacena todas las emisoras de radio
FM disponibles y emite la primera emisora disponible
automáticamente.
Almacenamiento manual de las emisoras de
radio FM
1
Sintonice una emisora de radio FM.
2
Pulse
SET
.
»
El número de presintonía empezará a parpadear.
3
Pulse
PRESET
/
varias veces para seleccionar un número.
4
Vuelva a pulsar
SET
para confirmar.
5
Repita del paso número 1 al 4 para almacenar otras emisoras.
Nota
•
Para eliminar una emisora programada, guarde otra emisora en su
lugar.
Selección de una emisora de radio
presintonizada
En el modo de sintonizador, pulse
PRESET
/
para seleccionar
un número de presintonía.
6
Otras funciones
Ajuste del temporizador de la alarma
Configuración de la alarma
En el modo de espera, puede configurar dos alarmas que suenen a
distintas horas.
Nota
•
Asegúrese de que ha ajustado el reloj correctamente.
1
Mantenga pulsado
AL1
/
AL2
durante 2 segundos para activar el
modo de ajuste de alarma.
»
Los dígitos de la hora y el icono de la alarma comienzan a
parpadear.
2
Pulse
TUNING +/-
o
/
para ajustar la hora.
3
Pulse
AL1
/
AL2
para confirmar.
»
Los dígitos de los minutos empezarán a parpadear.
4
Repita los pasos 2 y 3 para configurar los minutos y el volumen
de la alarma.
G
Selección de la fuente para la alarma
Ajuste el control
AL1/2 iPhone·RADIO· BUZZ
para seleccionar la
fuente de alarma para ambas alarmas.
Nota
•
Cuando llegue la hora de la alarma, la radio, el zumbador o el iPod/
iPhone seleccionados se activan.
•
Sólo puede seleccionar la misma fuente de alarma para la Alarma 1/
Alarma2.
•
Si se selecciona el iPhone como fuente de alarma, cuando no hay
ningún iPhone/iPod conectado, el radio reloj cambia a la fuente de
zumbador en su lugar.
Activación y desactivación del temporizador de alarma
1
Pulse
AL1
/
AL2
para ver los ajustes de alarma.
2
Pulse
AL1
/
AL2
otra vez para activar o desactivar el
temporizador de alarma.
»
Se muestra
o
si el temporizador de la alarma está
activado y desaparece si está desactivado.
Para detener la alarma:
Pulse el
AL1
/
AL2
correspondiente.
»
La alarma vuelve a sonar al día siguiente.
Cómo posponer la alarma
Cuando suene la alarma, pulse
SNOOZE
.
»
La alarma se pospone y vuelve a sonar 9 minutos más tarde.
Para ajustar el inter valo de alarma (en minutos), pulse
SNOOZE
varias veces.
Ajuste del temporizador
Este radio reloj puede cambiar al modo de espera de forma
automática después de un periodo predefinido.
Pulse
SLEEP
varias veces para seleccionar el periodo de
temporizador (en minutos).
»
Cuando el temporizador está activado, se muestra
.
Para desactivar el temporizador, pulse
SLEEP
varias veces hasta que
se muestre
[OFF]
(desactivado).
Reproducción de audio desde un dispositivo
externo
Puede escuchar audio de un dispositivo ex terno a través de este
radio reloj.
1
Conecte el cable de audio a:
•
la toma
AUX IN
.
•
las tomas AUDIO OUT de un dispositivo ex terno.
2
Pulse
SOURCE
repetidamente hasta seleccionar la fuente auxiliar.
»
Aparece
.
15 30 60 90 120
off
Philips Consumer Lifestyle
A division of Philips Electronics North America Corporation
P.O. Box 10313
Stamford, CT 06904
Phone: 1-888-PHILIPS (744-5477)
Meet Philips at the Internet
http://www.philips.com/welcome
All registered and unregistered trademarks are property of
their respective owners.
© 2012 Koninklijke Philips Electronics N.V.
All rights reserved.
AJ7030DG_37_QSG_V1.0
AJ7030DG
www.philips.com/welcome
Always there to help you
Register your product and get support at
EN
FR
ES
Question?
Contact
Philips
User Manual
Manual del usuario
Mode d’emploi
"Cargando la instrucción" significa que debes esperar hasta que el archivo se cargue y puedas leerlo en línea. Algunas instrucciones son muy grandes y el tiempo de carga depende de la velocidad de tu conexión a Internet.