Professional Series PS-DF329 - Manual de uso - Página 9
Note: Add 3 minutes to the preparation time when you start frying while the Hot-air fryer is still
cold.
Cleaning
Clean the appliance after every use.
The pan and the non-stick coating basket. Do not use metal kitchen utensils or
abrasive cleaning materials to clean them, as this may damage the non-stick coating.
1. Remove the mains plug from the wall socket and let the appliance cool down.
Note: Remove the pan to let the Hot-air fryer cool down more quickly.
2. Wipe the outside of the appliance with a moist cloth.
3. Clean the pan, separator and basket with hot water, some washing-up liquid and a
non-abrasive sponge.
You can use degreasing liquid to remove any remaining dirt.
Note: The pan and basket are dishwasher-proof.
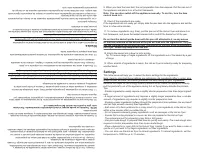
Tip: If dirt is stuck to the basket or the bottom of the pan, fill the pan with hot water with some
washing-up liquid. Put the basket in the pan and let the pan and the basket soak for approxi-
mately 10 minutes.
4. Clean the inside of the appliance with hot water and non-abrasive sponge.
5. Clean the heating element with a cleaning brush to remove any food residues.
1. Proceda a desenchufar y espere hasta que el electrodoméstico se enfríe.
NOTA: Retire la bandeja para que el electrodoméstico se enfríe más rápidamente.
2. Limpie la parte externa del electrodoméstico con un paño húmedo.
3. Limpie la bandeja, el separador de la canastilla con agua caliente. Se puede utilizar líquido
lavavajillas y una esponja no abrasiva.
Se puede utilizar algún tipo de líquido anti grasa para retirar cualquier resto.
Consejo: Si la suciedad se encontrara adherida la parte inferior de la bandeja o de la
canastilla, de la bandeja con agua caliente y con un poco de líquido lavavajillas. Coloque la
canastilla dentro de la bandeja y déjelas remojando por aproximadamente diez minutos.
4. Limpie la parte interna del electrodoméstico con agua caliente y una esponja no abrasiva.
5. Limpie el componente de calentamiento con una escobilla para retirar cualquier residuo de
alimentos.
Almacenamiento
1. Desenchufe el electrodoméstico y déjelo enfriar.
2. Asegúrese de que toda las piezas se encuentren limpias y secas.
Medio ambiente
No deseche el electrodoméstico junto con los desperdicios caseros una vez que ya no es se
encuentre funcionando. Póngase en contacto con un centro de recolección oficial para su
reciclaje. Esto ayudará a conservar el medio ambiente.
Garantía y servicio técnico
Si se requiriera de servicio técnico o información o si tuviera cualquier tipo de problema,
póngase en contacto con su centro de servicio técnico ha autorizado.
Solución de problemas
Storage
1. Unplug the appliance and let it cool down.
2. Make sure all parts are clean and dry.
Environment
Do not throw away the appliance with the normal household waste when it is exhausted,,
but hand it in at an official collection point for recycling. By doing this, you help to preserve
the environment.
Guarantee and service
If you need service or information or if you have a problem, please contact your local
authorized service centre.
Troubleshooting
Problem
Possible cause
Solution
The Hot-air fryer
does not work
The appliance is not
plugged in.
Put the mains plug in an earthed wall socket.
You have not set the
timer.
Turn the timer knob to the required preparation
time to switch on the appliance.
The ingredients
fried with the air
fryer are not done.
The amount of
ingredients in the
basket is too big.
Put smaller batches of ingredients in the basket.
Smaller batches are fried more evenly.
The set temperature is
too low.
Turn the temperature control knob to the required
temperature setting (see section ‘settings’ in
chapter ‘Using the appliance’).
The preparation time is
too short.
Turn the timer knob to the required preparation
time (see section ‘Settings’ in chapter’ Using the
appliance’).
The ingredients
are fried unevenly
in the air fryer.
Certain types of
ingredients need to be
shaken halfway through
the preparation time.
Ingredients that lie on top of or across each other
(e.g. fries) need to be shaken halfway through the
preparation time. See section ‘Settings’ in chapter
‘Using the appliance’.
Fried snacks are
not crispy when
they come out of
the air fryer.
You used a type of
snacks meant to be
prepared in a traditional
deep fryer.
Use oven snacks or lightly brush some oil onto the
snacks for a crispier result.
I cannot slide the
pan into the
appliance properly.
There are too much
ingredients in the
basket.
Do not fill the basket beyond the MAX indication.
The basket is not
placed in the pan
correctly.
Push the basket down into the pan until you hear a
click.
White smoke
comes out of the
appliance.
You are preparing
greasy ingredients.
When you fry greasy ingredients in the air fryer, a
large amount of oil will leak into the pan. The oil
produces white smoke and the pan may heat up
more than usual. This does not affect the appliance
or the end result.
The pan still contains
grease residues from
previous use.
White smoke is caused by grease heating up in the
pan. Make sure you clean the pan properly after
each use.
Fresh fries are
fried unevenly in
the air fryer.
You did not use the right
potato type.
Use fresh potatoes and make sure they stay firm
during frying.
You did not rinse the
potato sticks properly
before you fried them.
Rinse the potato sticks properly to remove starch
from the outside of the sticks.
Fresh fries are not
crispy when they
come out of the air
fryer.
The crispiness of the
fries depends on the
amount of oil and water
in the fries.
Make sure you dry the potato sticks properly
before you add the oil.
Cut the potato sticks smaller for a crispier result.
Add slightly more oil for a crispier result.
Problema
Posible causa
Solución
El electrodoméstico
no funciona
Los ingredientes
fritos no se
encuentran listos
Los ingredientes
fritos no se
encuentran parejos
Los bocadillos fritos
no se encuentran
crocantes.
No se puede retirar la
bandeja del
electrodoméstico
adecuadamente.
El electrodoméstico no
se encuentra enchufado
No se ha programado
el temporizador.
La cantidad de ingredientes
a la canastilla es
demasiado grande.
La temperatura programada
es demasiado baja.
Algunos tipos de
ingredientes deben
sacudirse a la mitad del
tiempo de preparación.
El tío de preparación
es demasiado corto.
Hay demasiados
ingredientes a la
canastilla.
Se ha utilizado un tipo
de bocadillos que deben
prepararse en una
freidora convencional.
Proceda a enchufar al tomacorriente.
Gire la perilla del temporizador según el tiempo de
preparación requerido para encender el electrodoméstico
Ponga a cantidades más pequeñas de ingredientes
en la canastilla. Las cantidades más pequeñas se fríen
de manera más pareja.
Gire la perilla de control de temperatura según la
temperatura requerida (véase la sección de niveles en
el capítulo Uso del electrodoméstico).
Gire la perilla del temporizador según el tiempo
requerido (véase la sección de niveles en el capítulo
Uso del electrodoméstico).
Utilice bocadillos para el horno o aplique una
ligera capa de aceite para lograr un
resultado más tocante.
No llene la canastilla más allá del indicador MAX.
Algunos ingredientes que se encuentran apilados o uno
encima de otro (por ejemplo las papas fritas) debe
sacudirse la mitad del tiempo de preparación. Véase la
sección niveles en el capítulo Uso del electrodoméstico.
"Cargando la instrucción" significa que debes esperar hasta que el archivo se cargue y puedas leerlo en línea. Algunas instrucciones son muy grandes y el tiempo de carga depende de la velocidad de tu conexión a Internet.