Smeg MF11AV2 - Manual de uso - Página 5


6
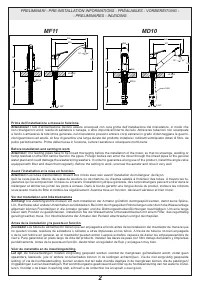
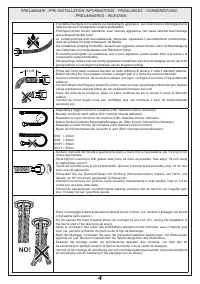
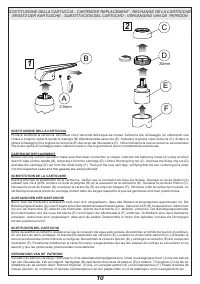
INSTALLAZIONE
Prima di inserire il monocomando nel foro del lavello assicurarsi che la guarnizione di base sia ben posizionata nella propria
sede e che i flessibili di alimentazione siano ben avvitati al corpo del rubinetto. Sistemare il monocomando sul foro del lavello
orientando la bocca di erogazione verso la vasca del lavello.
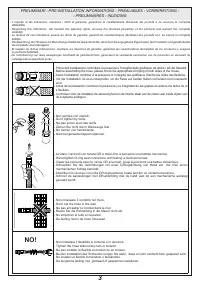
Inserire quindi il kit di fissaggio nella sequenza indicata e rispettivamente:
· la guarnizione sagomata e la flangia nel caso si installi il monocomando su un lavello di spessore 3- 4 cm;
· la guarnizione sagomata, la flangia triangolare in plastica e la flangia nel caso si installi il monocomando su un lavello in
acciaio inox di spessore 1-2 mm.
Serrare a fondo l’apposito tirante o dado filettato.
Nel caso il rubinetto sia un monocomando con doccetta estraibile collegare il flessibile al tubetto di uscita interponendo la
guarnizione di tenuta. Fissare il contrappeso di piombo sul tubo del flessibile ad una distanza di 400 mm dall’attacco del tubetto
di uscita.
Procedere al collegamento dei flessibili alla rete di alimentazione.
Nel caso il rubinetto sia un monocomando con doccetta estraibile avvitare la doccetta al tubo flessibile interponendo la
guarnizione di tenuta e verificare che il flessibile scorra in maniera lineare.
INSTALLATION
Before inserting the single lever group in the hole of the sink, make sure that the base gasket is properly positioned in its seat
and that the flexible hoses are well tightened to the body of the tap.
Place the single lever group in the hole of the sink, orienting the spout toward the sink tank.
Insert the fixing kit with the indicated sequence, and respectively:
· the shaped gasket and flange in case the single lever group is installed on a sink having thickness of 3- 4 cm;
· the shaped gasket, the triangular plastic flange and the flange in case of a stainless steel sink having thickness of 1-2 mm.
Tighten well the tie rod or the threaded nut.
In case the tap is a single lever group with extractable shower, connect the flexible hose to the outlet pipe interposing the
gasket. Fix the lead counterweight to the flexible hose at a distance of approx. 400 mm from the connection to the outlet pipe.
Proceed connecting the flexible hoses to the plumbing.
In case the tap is a single lever group with extractable shower, tighten the shower to the hose interposing the gasket and confirm
the hose can slide smoothly through the passage hole.
INSTALLATION
Avant d’insérer le monocommande dans le trou de l’évier, il faut s’assurer que le joint de base est bien placé dans son
emplacement et que les flexibles d’alimentation sont bien vissés au corps du robinet. Il faut placer le monocommande sur le
trou de l’évier en orientant la bouche de distribution vers le bac de l’évier.
Insérer donc le kit de fixage dans la séquence indiquée et respectivement:
· le joint façonné et la bride si on installe le monocommande sur un évier d’une épaisseur de 3- 4 cm;
· le joint façonné, la bride triangulaire en plastique et la bride dans le cas d’un évier en acier inox d’une épaisseur de 1-2 mm.
Serrer à fond le tirant ou l’écrou fileté.
Si le robinet est un monocommande avec la douchette détachable, il faut relier le flexible au tuyau de sortie en interposant le
joint d’étanchéité. Il faut fixer le contrepoids de plomb sur le tuyau du flexible à une distance de 400 mm du raccord du tuyau
de sortie.
Procéder à la liaison des flexibles au réseau d’alimentation.
Si le robinet est un monocommande avec la douchette détachable, il faut visser la douchette au tuyau flexible en interposant le
joint d’étanchéité et il faut vérifier que le flexible glisse de façon linéaire.
INSTALLATION
Bevor Sie die Einhebel-Mischbatterie in die Bohrung des Spülbeckens einführen, vergewissern Sie sich, dass die Basisdichtung
perfekt in ihrem Sitz positioniert ist und das die Versorgungsschläuche gut am Armaturenkörper festgeschraubt sind. Die
Einhebel-Mischbatterie auf der Bohrung des Spülbeckens positionieren, wobei der Auslauf in Richtung des Spülbeckens
orientiert sein muß.
Anschließend den Befestigungssatz in der angegebenen Reihenfolge einführen, und zwar:
· die geformte Dichtung und den Flansch, falls man die Einhebel-Mischbatterie auf einem Spülbecken mit einer Dicke von 3- 4
cm installiert;
· die geformte Dichtung, den dreieckigen Kunststoffflansch und den Flansch, falls man diese auf einem Inoxstahl-Spülbecken
mit einer Dicke von 1-2 mm installiert.
Die eigens dafür vorgesehene Zugstange oder die gestrehlte Schraubenmutter bis zum Anschlag festziehen.
Falls es sich bei der Armatur um eine Einhebel-Mischbatterie mit herausziehbarer Handbrause handelt, schließt man Den
Schlauch an dem Rohrausgang an, wobei man die Dichtung dazwischen einlegt. Das Gegengewicht aus Blei in einem Abstand
von 400 mm vom Anschluss des Ausgangsrohr an dem Schlauch fixieren.
Dann schließt man die Schläuche an das Versorgungsnetz an.
Falls es sich bei der Armatur um eine Einhebel-Mischbatterie mit herausziehbarer Handbrause handelt, schraubt man die
Handbrause an dem Schlauch fest, wobei man die Dichtung dazwischen einlegt und sich vergewissert, dass der Schlauch
linear verläuft.
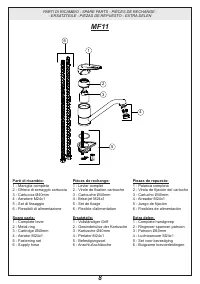
INSTALLAZIONE - INSTALLATION - INSTALLATION - INSTALLATION - INSTALACIÓN -
INSTALLATIE
dimensioni in mm - measures in mm - dimensions en mm - Maß im mm - medidas en mm - maatregelen in mm
"Cargando la instrucción" significa que debes esperar hasta que el archivo se cargue y puedas leerlo en línea. Algunas instrucciones son muy grandes y el tiempo de carga depende de la velocidad de tu conexión a Internet.
Otros modelos de grifos Smeg
-
 Smeg MD10CR2
-
 Smeg MF11CR2
-
 Smeg MTS15-CR
-
 Smeg MX16