Whirlpool WOEC7030PZ - Manual de uso
Horno Whirlpool WOEC7030PZ - Manual de uso, léela gratuitamente en línea en formato PDF. Esperamos que esto te ayude a resolver cualquier duda que puedas tener. Si tienes más preguntas, contáctanos a través del formulario de contacto.


W11655510A
IMPORTANT:
Save for local electrical inspector's use.
IMPORTANT :
À conserver pour consultation par l'inspecteur local des installations électriques.
IMPORTANT:
Guarde para tener a disposición del inspector de electricidad local.
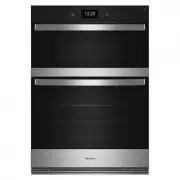
BUILT-IN ELECTRIC MICROWAVE/OVEN
COMBINATION OWNER’S MANUAL
MANUEL D’UTILISATION DU ENSEMBLE FOUR À
MICRO-ONDES ENCASTRÉ
MANUAL DEL PROPIETARIO COMBINACIÓN DE
HORNO/MICROONDAS ELÉCTRICO INTEGRADO
Table of Contents/Table des matières/Índice
BUILT-IN MICROWAVE/OVEN
COMBO SAFETY
. . . . . . . . . . . . . . . . . . . . . . . . . . . . . . 2
Built-In Microwave/Oven
Combination Safety . . . . . . . . . . . . . . . . . . . . . . . . . 2
MICROWAVE OVEN MAINTENANCE
AND CARE
. . . . . . . . . . . . . . . . . . . . . . . . . . . . . . . . . . . . . . 5
General Cleaning. . . . . . . . . . . . . . . . . . . . . . . . . . . . 5
Self-Cleaning Cycle. . . . . . . . . . . . . . . . . . . . . . . . . 6
Steam Clean (on some models) . . . . . . . . . 7
INSTALLATION INSTRUCTIONS
. . . . . . . . . 8
REQUIREMENTS
. . . . . . . . . . . . . . . . . . . . . . . . . . . . . . 8
Tools and Parts . . . . . . . . . . . . . . . . . . . . . . . . . . . . . . 8
Location Requirements . . . . . . . . . . . . . . . . . . . . 8
Electrical Requirements . . . . . . . . . . . . . . . . . 10
INSTALLATIONS
. . . . . . . . . . . . . . . . . . . . . . . . . . . . 11
Prepare Built-In Oven . . . . . . . . . . . . . . . . . . . . 11
Remove Oven Door(s) . . . . . . . . . . . . . . . . . . . 11
Make Electrical Connection . . . . . . . . . . . . . 12
Install Oven . . . . . . . . . . . . . . . . . . . . . . . . . . . . . . . . . 13
Install Deflector Kit . . . . . . . . . . . . . . . . . . . . . . . . 15
Replace Oven Door(s) . . . . . . . . . . . . . . . . . . . 16
Complete Installation . . . . . . . . . . . . . . . . . . . . . 17
SÉCURITÉ DE L’ENSEMBLE FOUR
ÉLECTRIQUE/FOUR À MICRO-
ONDES ENCASTRÉ
. . . . . . . . . . . . . . . . . . . . . . . . 18
Sécurité de l’ensemble four
électrique/four à micro-ondes
encastré . . . . . . . . . . . . . . . . . . . . . . . . . . . . . . . . . . . . . 18
ENTRETIEN ET RÉPARATION DU
FOUR À MICRO-ONDES
. . . . . . . . . . . . . . . . . . 22
Nettoyage général . . . . . . . . . . . . . . . . . . . . . . . . 22
Programme d’autonettoyage . . . . . . . . . . . 24
Steam Clean (nettoyage à la vapeur)
(sur certains modèles) . . . . . . . . . . . . . . . . . . . 25
INSTRUCTIONS D’INSTALLATION
. . . . 25
SPÉCIFICATIONS
. . . . . . . . . . . . . . . . . . . . . . . . . . . 25
Outils et pièces. . . . . . . . . . . . . . . . . . . . . . . . . . . . . 25
Exigences d’emplacement . . . . . . . . . . . . . . 26
Spécifications électriques . . . . . . . . . . . . . . . 27
INSTALLATION
. . . . . . . . . . . . . . . . . . . . . . . . . . . . . . 28
Préparer le four encastré . . . . . . . . . . . . . . . . 28
Enlever la/les porte(s) du four . . . . . . . . . . 28
Raccordement électrique. . . . . . . . . . . . . . . . 29
Installation du four. . . . . . . . . . . . . . . . . . . . . . . . . 31
Installation de l’ensemble de
déflecteurs . . . . . . . . . . . . . . . . . . . . . . . . . . . . . . . . . . 33
Réinstallation de la/des porte(s) du
four . . . . . . . . . . . . . . . . . . . . . . . . . . . . . . . . . . . . . . . . . . . . 34
Achever l’installation . . . . . . . . . . . . . . . . . . . . . . 35
SEGURIDAD DE LA COMBINACIÓN
DE HORNO MICROONDAS/HORNO
INTEGRADO
. . . . . . . . . . . . . . . . . . . . . . . . . . . . . . . . . . 36
Seguridad de la combinación de
horno microondas/horno integrado . . . 36
MICROWAVE OVEN MAINTENANCE
AND CARE
. . . . . . . . . . . . . . . . . . . . . . . . . . . . . . . . . . . . 40
Limpieza general . . . . . . . . . . . . . . . . . . . . . . . . . . 40
Ciclo de autolimpieza. . . . . . . . . . . . . . . . . . . . . 42
Steam Clean (Limpieza con vapor)
(en algunos modelos) . . . . . . . . . . . . . . . . . . . . 43
INSTRUCCIONES DE
INSTALACIÓN
. . . . . . . . . . . . . . . . . . . . . . . . . . . . . . . . 43
REQUISITOS
. . . . . . . . . . . . . . . . . . . . . . . . . . . . . . . . . 43
Herramientas y piezas . . . . . . . . . . . . . . . . . . . 43
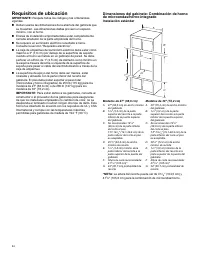
Requisitos de ubicación . . . . . . . . . . . . . . . . . 44
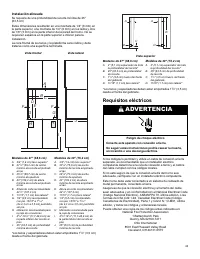
Requisitos eléctricos . . . . . . . . . . . . . . . . . . . . . 45
INSTALACIONES
. . . . . . . . . . . . . . . . . . . . . . . . . . . . 46
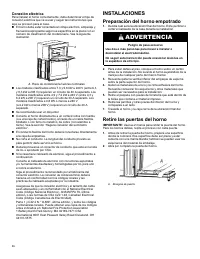
Preparación del horno empotrado . . . . 46
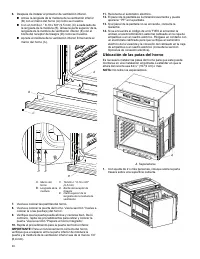
Retire las puertas del horno . . . . . . . . . . . . 46
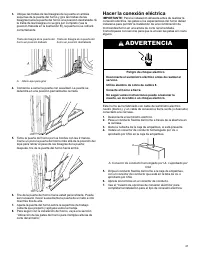
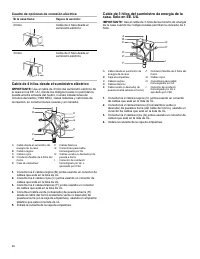
Hacer la conexión eléctrica . . . . . . . . . . . . . 47
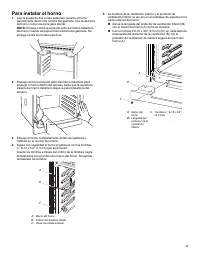
Para instalar el horno. . . . . . . . . . . . . . . . . . . . . 49
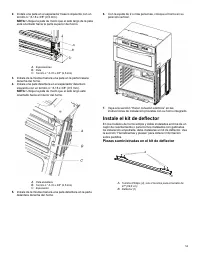
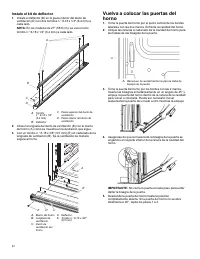
Instale el kit de deflector . . . . . . . . . . . . . . . . . 51
Vuelva a colocar las puertas del
horno . . . . . . . . . . . . . . . . . . . . . . . . . . . . . . . . . . . . . . . . . 52
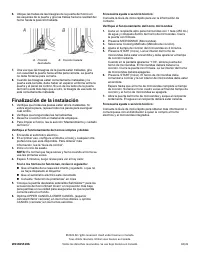
Finalización de la instalación . . . . . . . . . . . 53
"Cargando la instrucción" significa que debes esperar hasta que el archivo se cargue y puedas leerlo en línea. Algunas instrucciones son muy grandes y el tiempo de carga depende de la velocidad de tu conexión a Internet.