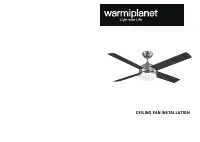
Yardreeze LWDO0505 - Manual de uso - Página 2


SAFETY TIPS.
WARNING : To reduce the risk of electrical shock, turn off the electricity to the fan at the main fuse box or circuit panel before you begin the fan installation or before
servicing the fan or installing accessories.
1.
READ ALL INSTRUCTIONS AND SAFETY INFORMATION CAREFULLY BEFORE INSTALLING YOUR FAN AND SAVE THESE INSTRUCTIONS.
CAUTION : To avoid personal injury, the use of gloves may be necessary while handling fan parts with sharp edges.
2.
Make sure all electrical connections comply with Local Codes or Ordinances, the National Electrical Code, and ANSI/NFPA 70-1999. If you are unfamiliar
with electrical wiring or if the house/building wires are different colors than those referred to in the instructions,
please use a qualified electrician.
3.
Make sure you have a location selected for your fan that allows clear space for the blades to rotate, and at least seven (7) feet (2.13 meters) of clearance
between the floor and the fan blade tips. The fan should be mounted so that the tips of the blades are at least thirty (30) inches (76 centimeters) from walls or
other upright structures.
4.
The outlet box and ceiling support joist used must be securely mounted, and capable of supporting at least 35 pounds (16 kilograms). The box must be
supported directly by the building structure. Use only CETL or CUL in Canada or ETL or UL in USA listed outlet boxes marked "FOR FAN SUPPORT."
WARNING : To reduce the risk of fire, electrical shock, or personal injury, mount to the outlet box marked "Acceptable for Fan Support of 15.9 kg (35 lb) or less," and
use the mounting screws provided with the outlet box. Most outlet boxes commonly used for the support of lighting fixtures are not acceptable for fan support and
may need to be replaced. Consult a qualified electrician if in doubt.
WARNING : To reduce the risk of fire, electrical shock, or personal injury, wire connectors provided with this fan are designed to accept only one 12 gauge house
wire and two lead wires from the fan. If your house wire is larger than 12 gauge or there is more than one house wire to connect to the corresponding fan lead wires,
consult an electrician for the proper size wire connectors to use.
5.
Electrical diagrams are for reference only.
6.
After installation is complete, check that all connections are absolutely secure.
7.
After making electrical connections, spliced conductors should be turned upward and pushed carefully up into the outlet box. The wires should be spread apart
with the grounded conductor and the equipment-grounding conductor on opposite sides of the outlet box.
WARNING : To reduce the risk of fire or electrical shock, do not use this fan with any solid state speed control device or control fan speed with a full range dimmer
switch. [Using a full range dimmer switch to control fan speed will cause a loud humming noise from fan.] (Note: This fan is suitable for use with remote control.)
8.
Do not operate the reverse switch until fan has come to a complete stop. [Note: If using remote control with reverse capability, reverse fan blade direction only
when on LOW speed.]
9.
Do not insert anything between the fan blades while they are rotating.
WARNING : To reduce the risk of personal injury, do not bend the blade arms during assembly or after installation. Do not insert objects into the path of the blades.
WARNING : To avoid personal injury or damage to the fan and other items, be cautious when working around or cleaning the fan.
10.
Do not use water or detergents when cleaning the fan or fan blades. A dry dust cloth or lightly dampened cloth will be suitable for most cleaning.
WARNING: To reduce the risk of personal injury, use only parts provided with this fan. The use of parts OTHER than those provided with this fan will void the
warranty.
WARNING: This fan MUST be installed with the safety cable provided with the fan. Failure to use the safety cable provided may result in personal injury, damage to
the fan or damage to other property.
CAUTION: Do NOT tamper with or attempt to repair LED component of fixture. The light source is designed for this specific application and should not be serviced by
untrained personnel. If any servicing is required, call our customer service department.
NOTE: This equipment has been tested and found to comply with the limits for a Class B digital device, pursuant to Part 15 of the FCC Rules. These limits are
designed to provide reasonable protection against harmful interference in a residential installation. This equipment generates, uses and can radiate radio frequency
energy and, if not installed and used in accordance with the instructions, may cause harmful interference to radio communications. However, there is no guarantee
that interference will not occur in a particular installation. If this equipment does cause harmful interference to radio or television reception, which can be determined
by turning the equipment off and on, the user is encouraged to try to correct the interference by one or more of the following measures:
* Reorient or relocate the receiving antenna.
* Increase the separation between the equipment and receiver.
* Connect the equipment into an outlet on a circuit different from that to which the receiver is connected.
Consult the dealer or an experienced radio/TV technician for help.
The LED light kit complies with Part 15 of the FCC Rules. Operation is subject to the following two conditions: (1) this LED light kit may not cause harmful
interference, (2) this LED light kit must accept any interference received, including interference that may cause undesired operation.
NOTE : The important safety precautions and instructions appearing in the manual are not meant to cover all possible conditions and situations that may occur. It
must be understood that common sense and caution are necessary factors in the installation and operation of this fan.
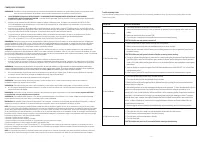
Guía de resolución de problemas
Si tiene dificultades para hacer funcionar su nuevo ventilador de techo, puede deberse a un montaje, instalación o cableado incorrectos. Si experimenta algún fallo,
consulte esta Guía de resolución de problemas.
PROBLEMA
SUGGESTED REMEDY
Si el ventilador no arranca:
1. Compruebe los fusibles o disyuntores del circuito principal y de los circuitos derivados.
2. Asegúrese de que el interruptor de avance/retroceso esté firmemente en la posición inferior o superior.
El ventilador no funcionará cuando el interruptor esté en la posición medio
3. Asegúrese de que el mando de pared está en "ON".
4. Compruebe las conexiones del cable de línea al ventilador y las conexiones del cable del interruptor en la
carcasa del interruptor.
PRECAUCIÓN: Asegúrese de que la alimentación principal está desconectada.
Si el ventilador hace ruido:
1. Asegúrese de que todos los tornillos de la carcasa del motor estén bien apretados (no demasiado).
2. Asegúrese de que los tornillos que fijan el soporte de las aspas del ventilador al motor estén bien apretados.
3. Asegúrese de que los conectores de los cables de la carcasa del interruptor no chocan entre sí ni contra la
pared interior de la carcasa del interruptor. interior de la carcasa del interruptor.
PRECAUCIÓN: Asegúrese de que la alimentación principal está desconectada antes de acceder a
la carcasa del interruptor.
4. Si utiliza un kit opcional de luz de ventilador de techo, asegúrese de que los tornillos que fijan el cristal estén
apretados con los dedos.Asegúrese de que la bombilla esté apretada en el casquillo y no toque la(s)
pantalla(s) de cristal.Si persiste la vibración del cristal, retire el cristal e instale una banda de goma de 1/4 pulg.
de ancho en el cuello del cristal para que actúe como aislante.Vuelva a colocar el cristal y apriete los tornillos
contra la banda de goma. goma elástica.
5. Algunos motores de ventilador son sensibles a las señales de los controles de velocidad variable de
estado sólido. de estado sólido.
6. La mayoría de los ruidos asociados con un ventilador nuevo desaparecerán después de este período.
-
Si el ventilador
se tambalea:
1. Compruebe que todas las cuchillas estén firmemente atornilladas en los soportes de las cuchillas
2. Compruebe que todos los soportes de las cuchillas estén bien apretados al motor.
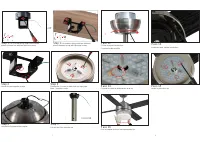
3. Asegúrese de que la campana y el soporte de suspensión estén bien apretados a la caja de conexiones del
techo y que la caja de conexiones esté firmemente a la vigueta del techo.
4. La mayoría de los problemas de bamboleo del ventilador se deben a que las aspas no están al mismo nivel.
Para comprobar los niveles de las aspas, seleccione un punto en el techo por encima de la punta de cualquiera
de las aspas. Mida la distancia desde el techo hasta la punta de las aspas, con una precisión de 1/8 de pulgada.
con una precisión de 1/8 de pulgada. Gire las lamas hasta que la siguiente lama se encuentre en la posición de
medición. Repita la medición para cada lama. Si no todos los niveles de las lamas son iguales, puede ajustar los
niveles de las lamas mediante el siguiente procedimiento. Para ajustar unacuchilla hacia abajo, inserte una
arandela (no suministrada) entre la cuchilla y el soporte de la cuchilla en el tornillo más cercano almotor.
Para ajustar la punta de una cuchilla hacia arriba, inserte una arandela (no suministrada) entre la cuchilla y
el soporte de la cuchilla en los dos tornillos más alejados del motor. tornillos más alejados del motor
5. Intercambiar dos cuchillas adyacentes podría redistribuir el peso y posiblemente conseguir un funcionamiento
más suave.
Si la luz no funciona:
1. Compruebe el cable azul del ventilador para asegurarse de que está conectado al cable azul del receptor.
2. Compruebe si hay cables sueltos o desconectados en la carcasa del interruptor del ventilador.
3. Compruebe si hay cables sueltos o desconectados en el kit de luces.
4. Check for faulty light.
PRECAUCIÓN: Asegúrese de que el circuito principal esté apagado antes de entrar en la carcasa
del interruptor.
1
10
"Cargando la instrucción" significa que debes esperar hasta que el archivo se cargue y puedas leerlo en línea. Algunas instrucciones son muy grandes y el tiempo de carga depende de la velocidad de tu conexión a Internet.