Bosch BGS4USITAU - Manual de uso - Página 44

 2
2
 3
3
 4
4
 5
5
 6
6
 7
7
 8
8
 9
9
 10
10
 11
11
 12
12
 13
13
 14
14
 15
15
 16
16
 17
17
 18
18
 19
19
 20
20
 21
21
 22
22
 23
23
 24
24
 25
25
 26
26
 27
27
 28
28
 29
29
 30
30
 31
31
 32
32
 33
33
 34
34
 35
35
 36
36
 37
37
 38
38
 39
39
 40
40
 41
41
 42
42
 43
43
 44
44
 45
45
 46
46
 47
47
 48
48
 49
49
 50
50
 51
51
 52
52
 53
53
 54
54
 55
55
 56
56
 57
57
 58
58
 59
59
 60
60
 61
61
 62
62
 63
63
 64
64
 65
65
 66
66
 67
67
 68
68
 69
69
 70
70
 71
71
 72
72
 73
73
 74
74
 75
75
 76
76
 77
77
 78
78
 79
79
 80
80
 81
81
 82
82
 83
83
 84
84
 85
85
 86
86
 87
87
 88
88
 89
89
 90
90
 91
91
 92
92
 93
93
 94
94
 95
95
 96
96
 97
97
 98
98
 99
99
 100
100
 101
101
 102
102
 103
103
 104
104
 105
105
 106
106
 107
107
 108
108
 109
109
 110
110
 111
111
 112
112
 113
113
 114
114
 115
115
 116
116
 117
117
 118
118
 119
119
 120
120
 121
121
 122
122
 123
123
 124
124
 125
125
 126
126
 127
127
 128
128
 129
129
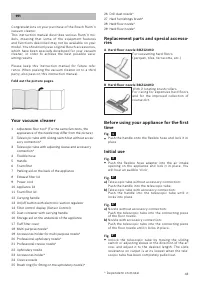
44
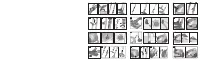
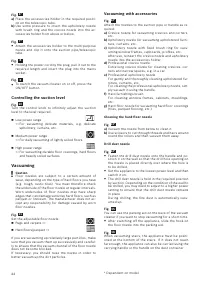
Fig.
6*
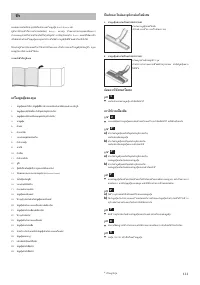
a)
Place the accessories holder in the required positi-
on on the telescopic tube.
b)
Use some pressure to inser t the upholster y nozzle
with brush ring and the crevice nozzle into the ac-
cessories holder from above or below.
Fig.
7*
Attach the accessories holder to the multi-purpose
nozzle and clip it onto the suction pipe/telescopic
tube.
Fig.
8
Holding the power cord by the plug, pull it out to the
required length and inser t the plug into the mains
socket.
Fig.
9
To switch the vacuum cleaner on or off, press the
ON/OFF button.
Controlling the suction level
Fig.
10
Turn the control knob to infinitely adjust the suction
level to the level required.
Low power range
>
= For vacuuming delicate materials, e.g. delicate
upholstery, curtains, etc.
Medium power range
>
= For daily vacuuming of lightly soiled floors.
High power range
>
= For vacuuming durable floor coverings, hard floors
and heavily soiled surfaces.
Vacuuming
!
Caution
Floor nozzles are subject to a cer tain amount of
wear, depending on the type of hard floors you have
(e.g. rough, rustic tiles). You must therefore check
the underside of the floor nozzle at regular inter vals.
Worn undersides of floor nozzles may have sharp
edges that can damage sensitive hard floors, such as
parquet or linoleum. The manufacturer does not ac-
cept any responsibility for damage caused by worn
floor nozzles.
Fig.
11
Set the adjustable floor nozzle:
Rugs and carpets =>
Hard floors/parquet =>
If you are vacuuming up relatively large par ticles, make
sure that you vacuum them up successively and careful-
ly to ensure that the vacuum channel of the floor nozzle
does not become blocked.
If necessar y, you should raise the nozzle in order to
better vacuum up the dir t par ticles.
* Dependent on model
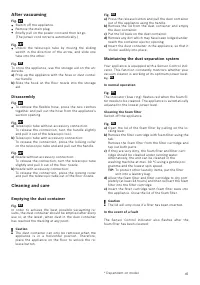
Vacuuming with accessories
Fig.
12*
Attach the nozzles to the suction pipe or handle as re -
quired:
a)
Crevice nozzle for vacuuming crevices and corners,
etc.
b)
Upholster y nozzle for vacuuming upholstered furni-
ture, cur tains, etc.
c)
Upholster y nozzle with fixed brush ring for vacu-
uming window frames, cupboards, profiles, etc.
After use, reinser t the crevice nozzle and upholster y
nozzle into the accessories holder.
d)
Professional crevice nozzle
E xtra-long crevice nozzle for cleaning crevices, cor-
ners and narrow spaces, e.g. in a car.
e)
Professional upholster y nozzle
For gently and thoroughly cleaning upholstered fur-
niture, cur tains, etc.
For cleaning the professional upholster y nozzle, sim-
ply vacuum it using the handle.
f)
Hard furnishings brush
For cleaning window frames, cabinets, mouldings,
etc.
g)
Hard-floor nozzle for vacuuming hard floor coverings
(tiles, parquet flooring, etc.)
Cleaning the hard-floor nozzle
Fig.
13*
a)
Vacuum the nozzle from below to clean it.
b)
Use scissors to cut through threads and hairs wound
round the rollers and then vacuum them away.
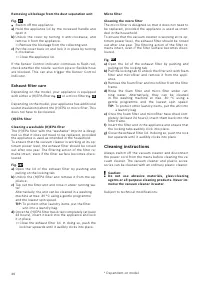
Drill dust nozzle
Fig.
14*
Fasten the drill dust nozzle onto the handle and po-
sition it on the wall so that the drill hole opening on
the nozzle is placed directly over where the hole is
to be drilled.
Set the appliance to the lowest power level and then
switch it on.
The drill dust nozzle is held in the required position
by suction. Depending on the condition of the wall to
be drilled, you may need to adjust to a higher power
setting to ensure that the drill dust nozzle remains
in place.
During drilling, the fine dust is automatically vacu-
umed up.
Fig.
15
You can use the parking aid on the back of the vacuum
cleaner if you want to stop vacuuming for a shor t time.
After switching off the appliance, slide the hook on
the floor nozzle into the parking aid.
Fig.
16
When vacuuming stairs, the appliance must be positi-
oned at the bottom of the stairs. If it does not reach
far enough, the appliance can also be carried using the
carr ying handle or the handle on the dust container.
"Cargando la instrucción" significa que debes esperar hasta que el archivo se cargue y puedas leerlo en línea. Algunas instrucciones son muy grandes y el tiempo de carga depende de la velocidad de tu conexión a Internet.
Otros modelos de aspiradoras Bosch
-
 Bosch BBH MOVE1
-
 Bosch BBH MOVE2
-
 Bosch BBH MOVE5
-
 Bosch BBH MOVE6
-
 Bosch BBHMOVE4AU
-
 Bosch BBS1224AU
-
 Bosch BBS611LAG
-
 Bosch BCH6L2561 Athlet 25.2V
-
 Bosch BCS611P4A
-
 Bosch BCS711WAU