Bosch BGS4USITAU - Manual de uso - Página 45

 2
2
 3
3
 4
4
 5
5
 6
6
 7
7
 8
8
 9
9
 10
10
 11
11
 12
12
 13
13
 14
14
 15
15
 16
16
 17
17
 18
18
 19
19
 20
20
 21
21
 22
22
 23
23
 24
24
 25
25
 26
26
 27
27
 28
28
 29
29
 30
30
 31
31
 32
32
 33
33
 34
34
 35
35
 36
36
 37
37
 38
38
 39
39
 40
40
 41
41
 42
42
 43
43
 44
44
 45
45
 46
46
 47
47
 48
48
 49
49
 50
50
 51
51
 52
52
 53
53
 54
54
 55
55
 56
56
 57
57
 58
58
 59
59
 60
60
 61
61
 62
62
 63
63
 64
64
 65
65
 66
66
 67
67
 68
68
 69
69
 70
70
 71
71
 72
72
 73
73
 74
74
 75
75
 76
76
 77
77
 78
78
 79
79
 80
80
 81
81
 82
82
 83
83
 84
84
 85
85
 86
86
 87
87
 88
88
 89
89
 90
90
 91
91
 92
92
 93
93
 94
94
 95
95
 96
96
 97
97
 98
98
 99
99
 100
100
 101
101
 102
102
 103
103
 104
104
 105
105
 106
106
 107
107
 108
108
 109
109
 110
110
 111
111
 112
112
 113
113
 114
114
 115
115
 116
116
 117
117
 118
118
 119
119
 120
120
 121
121
 122
122
 123
123
 124
124
 125
125
 126
126
 127
127
 128
128
 129
129
45
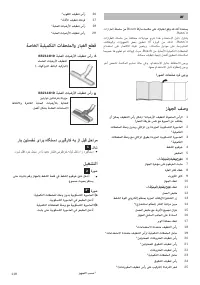
After vacuuming
Fig.
17
Switch off the appliance.
Remove the main plug.
Briefly pull on the power cord and then let go.
(The power cord retracts automatically.)
Fig.
18*
Unlock the telescopic tube by moving the sliding
switch in the direction of the arrow, and slide one
tube into the other.
Fig.
19
To store the appliance, use the storage aid on the un-
derside.
a)
Prop up the appliance with the hose or dust contai-
ner handle.
b)
Slide the hook on the floor nozzle into the storage
aid.
Disassembly
Fig.
20
To remove the flexible hose, press the two catches
together and pull out the hose from the appliance's
suction opening.
Fig.
21*
a)
Telescopic tube without accessor y connection:
To release the connection, turn the handle slightly
and pull it out of the telescopic tool.
b)
Telescopic tube with accessor y connection:
To release the connection, press the locking collar
on the telescopic tube and and pull out the handle.
Fig.
22*
a)
Nozzle without accessor y connection:
To release the connection, turn the telescopic tube
slightly and pull it out of the floor nozzle.
b)
Nozzle with accessor y connection:
To release the connection, press the locking collar
and pull the telescopic tube out of the floor nozzle.
Cleaning and care
Emptying the dust container
Fig.
23
In order to achieve the best possible vacuuming re -
sults, the dust container should be emptied after ever y
use or, at the latest, when dust in the dust container
has reached the marking at any point.
!
Caution
The dust container can only be removed when the
appliance is in a horizontal position. Therefore,
place the appliance on the floor to unlock the re -
lease button.
* Dependent on model
Fig.
24
a)
Press the release button and pull the dust container
out of the appliance using the handle.
b)
Remove the lid from the dust container and empty
the dust container.
c)
Put the lid back on the dust container.
d)
Remove any dir t which may have been lodged under-
neath the container ejector opening.
e)
Inser t the dust container in the appliance, so that it
'clicks' audibly into place.
Maintaining the dust separation system
Your appliance is equipped with a Sensor Control indi-
cator. This function constantly monitors whether your
vacuum cleaner is working at its optimum power level.
Fig.
25
In normal operation
Fig.
25
The indicator (blue ring) flashes red when the foam fil-
ter needs to be cleaned. The appliance is automatically
adjusted to the lowest power level.
Cleaning the foam filter
Switch off the appliance.
Fig.
26
a)
Open the lid of the foam filter by pulling on the lo -
cking lever.
b)
Remove the filter car tridge with foam filter using the
tab.
Remove the foam filter from the filter car tridge and
tap out both par ts.
c)
If they are ver y dir ty, the foam filter and filter car t-
ridge should be cleaned under running water.
Alternatively, the unit can be cleaned in the
washing machine at ma x. 3 0 °C using a gentle pro -
gramme and the lowest spin speed.
TIP:
To protect other laundr y items, put the filter
unit into a laundr y bag.
d)
Allow the foam filter and filter car tridge to dr y com-
pletely (at least 24 hours) and then reinser t the foam
filter into the filter car tridge.
e)
Inser t the filter car tridge with foam filter back into
the appliance. Close the lid of the foam filter.
!
Caution
The lid will only close if a filter has been inser ted.
In the event of a fault
The Sensor Control indicator also flashes after the
foam filter has been cleaned:
"Cargando la instrucción" significa que debes esperar hasta que el archivo se cargue y puedas leerlo en línea. Algunas instrucciones son muy grandes y el tiempo de carga depende de la velocidad de tu conexión a Internet.
Otros modelos de aspiradoras Bosch
-
 Bosch BBH MOVE1
-
 Bosch BBH MOVE2
-
 Bosch BBH MOVE5
-
 Bosch BBH MOVE6
-
 Bosch BBHMOVE4AU
-
 Bosch BBS1224AU
-
 Bosch BBS611LAG
-
 Bosch BCH6L2561 Athlet 25.2V
-
 Bosch BCS611P4A
-
 Bosch BCS711WAU