Candy C2 095 - Manual de uso - Página 11


Índice:
- Página 2 – Êàíäè; ENHORABUENA
- Página 3 – ÏAPAÃPAÔ; INDEX
- Página 9 – CAPÍTULO 5; PUESTA EN; ÓD; ÏÀPÀÃPÀÔ 5; ÓÑÒÀÍÎÂÊÀ; ÍÅ ÎÑÒÀÂËßÉÒÅ; CHAPTER 5; SETTING UP; AP; UVEDENÍ DO
- Página 10 – DO NOT TURN THE TAP; Íå îòêpûâàéòå
- Página 12 – D E F; ÏÀPÀÃPÀÔ 6; Îïèñàíèå êîìàíä; Êëàâèøà; CAPÍTULO 6
- Página 14 – PRAâKY TLAâÍTKEM; PRALKI ZA POMOCÑ; çÄÜÄíàü äçéèäà ëíÄêí
- Página 15 – ä·‚Ë ̄Ë ‰ÓÔÓÎÌËÚÂÎ ̧Ì ̊ı
- Página 18 – äãÄÇàòÄ éíãéÜÖççéÉé
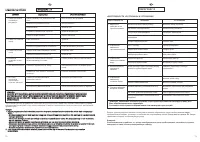
- Página 22 – Especiales; * Programas según normas CENELEC EN 60456.
- Página 23 – CHAPTER 8; SELECTION; VOLBA PROGRAMÅ; WYB; ÏÀPÀÃPÀÔ 8; ÇõÅéê èêéÉêÄåå; Cìecoâûe è cèíòeòè÷ecêèe; èêaòíûe òêaíè; CAPÍTULO 8; SELECCIÓN
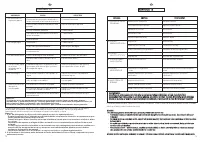
- Página 28 – PORADY DLA
- Página 29 – WASHING; VARIABLE CAPACITY; PRANÍ; PRANIE; ÑÒÈPÊÀ; Ïpèìåp ÈÑÏÎËÜÇÎÂÀÍÈß; LAVADO
- Página 31 – ÖIÄTËNÍ A ÚDRÏBA; CZYSZCZENIE I; Î÷èñòêà êîíòåéíåpà ìî
20
21
PL
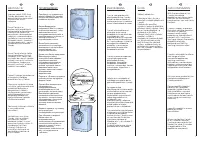
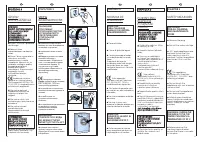
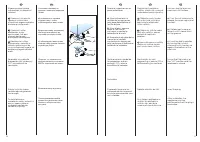
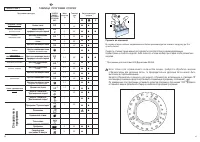
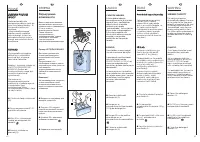
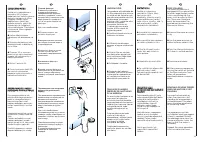
Wypoziomowaç pralkë
manipulujåc jej przednimi
n
ó
ãkami.
a
a)) Przekrëciç w kierunku
zgodnym z kierunkiem
wskaz
ó
wek zegara nakrëtkë
blokujåcå n
ó
ãkë pralki.
b
b)) Przekrëciç n
ó
ãkë
podnoszåc jå lub
opuszczajåc, tak aby
uzyskaç doskonaäe
przyleganie do podäoãa.
c
c)) Zablokowaç n
ó
ãkë
przykrëcajåc nakrëtkë w
kierunku przeciwnym do
ruchu wskaz
ó
wek zegara, aã
bëdzie przylegaäa do dna
pralki.
Sprawdziç czy pokr´t∏o
programów jest na pozycji
OFF i czy drzwiczki sà
zamkni´te.
Wäoãyç wtyczkë kabla
zasilajåcego do gniazda
sleciowego.
Po zainstalowaniu,
urzådzenie naleãy ustawiç w
pozycji zapewniajåcej
swobodny dostëp do
kontaktu (wtyczki).
Praöka má 2 pohyblivé
noïiöky, kterÿmi lze vyrovnat
vodorodnou polohu praöky.
a
a)) Otáöejte maticí äroubu
po smëru hod. ruöiöek a
pak måïete püizpåsobit
vÿäku noïiöky.
b
b)) Otáöením sniïujte nebo
zdvihejte noïiöku, dokud
perfektnë nepüilne k
podlaze.
c
c)) Upevnëte polohu noïiöky
otoöením matice äroubu
proti smëru hod. ruöiöek.
Zkontrolujte, Ïe voliã
programÛ je v poloze OFF a
dvífika praãky jsou zavfiená.
Zapojte záströku do sítë.
Po instalaci spotüebiöe se
ujistëte, ïe spotüebiö je
umístën tak, aby byla
snadno püístupná zásuvka.
CZ
EN
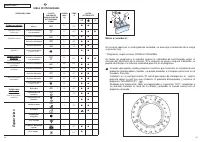
Use front feet to level the
machine with the floor.
a)
Turn the nut clockwise to
release the screw adjuster of
the foot.
b)
Rotate foot to raise or
lower it until it stands firmly
on the ground.
c)
Lock the foot in position
by turning the nut anti-
clockwise until it comes up
against the bottom of the
machine.
Ensure that the knob is on
the “OFF” position and the
load door is closed.
Insert the plug.
After installation, the
appliance must be
positioned so that the plug is
accessible.
RU
Óñòàíîâèòå ìàøèíó ïî
ópîâí
ю
ñ ïîìîùü
ю
ïåpåäíèõ
íîæåê.
a)
ïîâåpíèòå ïî ÷àñîâîé
ñòpåëêå ãàéêó, ÷òîáû
pàçáëîêèpîâàòü âèíò íîæêè.
b)
âpàùàÿ íîæêó, ïîäíèìèòå
èëè îïóñòèòå ìàøèíó äî
õîpîøåé åå îïîpû íà ïîë.
c)
çàáëîêèpóéòå âèíò íîæêè,
çàòÿíóâ ãàéêó ïpîòèâ ÷àñîâîé
ñòpåëêè äî óïîpà.
ì·Â‰ËÚÂÒ¸, ˜ÚÓ ÔÂÂÍβ˜‡ÚÂθ
ÔÓ„‡ÏÏ Ì‡ıÓ‰ËÚÒfl ‚ ÔÓÎÓÊÂÌËË
Çõäã Ë Á‡„ÛÁÓ˜Ì˚È Î˛Í Á‡Í˚Ú.
Âêë
ю
÷èòå âèëêó â pîçåòêó.
èÓÒΠÔÓ‰ÒÓ‰ËÌÂÌËfl ÔË·Ó
‰ÓÎÊÂÌ ·˚Ú¸ ‡ÒÔÓÎÓÊÂÌ Ú‡ÍËÏ
Ó·‡ÁÓÏ, ˜ÚÓ·˚ ÓÁÂÚ͇ ·˚·
‰ÓÒÚÛÔÌÓÈ.
ES
Nivele la máquina con las
patas delantares
a)
Girar la tuerca en el
sentido de las agujas del
reloj para desbloquear el
tornillo del pie.
b)
Girar el pie y hacerlo
bajar o subir hasta
conseguir su perfecta
adherencia al suelo.
c)
Bloquear el pie girando la
tuerca en el sentido
contrario a las agujas del
reloj hasta que se adhiera al
fondo de la lavadora.
Verificar que el mando de
los porgramas esté en
posición OFF y que la
escotilla esté cerrada.
Enchúfela.
El aparato tiene que ser
colocado de forma que el
enchufe sea accesible una
vez instalado.
A
B
C
"Cargando la instrucción" significa que debes esperar hasta que el archivo se cargue y puedas leerlo en línea. Algunas instrucciones son muy grandes y el tiempo de carga depende de la velocidad de tu conexión a Internet.
Resumen
2 3 EN OUR COMPLIMENTS With the purchase of this Candy household appliance, you have shown that you will not accept compromises: you want only the best. Candy is happy to present their new washing machine, the result of years of research and market experience through direct contact with Consumers. Y...
R RO OZZD DZZIIA AÄÄ ÏAPAÃPAÔ CAPÍTULO KKA APPIITTO OLLA A CHAPTER 1 2 3 4 5 6 7 8 9 10 11 12 13 4 5 EN INDEX Introduction General points on delivery Guarantee Safety Measures Technical Data Setting up and Installation Control Description Table of Programmes Selection Detergent drawer The Product Wa...
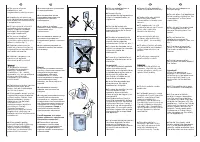
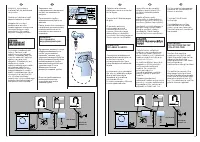
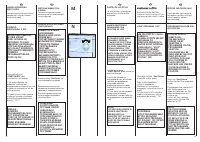
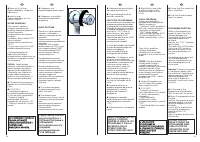
16 17 ES CAPÍTULO 5 PUESTA EN FUNCIONAMIENTO INSTALACIÓN Ponga la máquina cerca del lugar de uso sin la base del embalaje. Corte las cintas del tubo. Desenroscar el tornillo central ( A ); desenroscar los 4 tornillos laterales ( B ) y extraer el travesaño ( C ). Inclinar la máquina hacia delante y s...
Otros modelos de lavadoras Candy
-
 Candy AQUA 100F
-
 Candy AQUA 80F
-
 Candy C2 085
-
 Candy C2 125
-
 Candy CBW27D1E-S
-
 Candy CM2 106
-
 Candy CM2 126
-
 Candy CS1282DE-S
-
 Candy CS41172DE/2-S
-
 Candy CST26LE/1-S