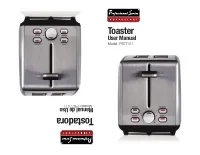
PART DESCRIPTION; BEFORE USING FOR THE FIRST TIME; DESCRIPCIÓN DE LAS P ARTES - Continental PS77411 - Manual de uso - Página 4
Índice:
- Página 3 – IMPORTANT; IM
- Página 4 – PART DESCRIPTION; BEFORE USING FOR THE FIRST TIME; DESCRIPCIÓN DE LAS P ARTES
- Página 5 – INSTRUCCIONES P ARA; AUTOMATIC CENTERING GUIDES
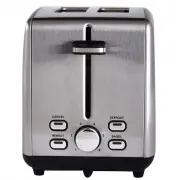
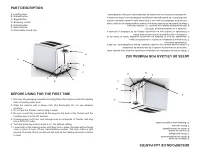
PART DESCRIPTION
A. Loading lever
B. Reheat button
C. Bagel button
D. Browning control
E. Defrost button
F. Cancel button
G. Removable crumb tray
BEFORE USING FOR THE FIRST TIME
1. Remove all packaging materials including those that may be inside the toasting
slots or toasting lever slots.
2. Wipe the exterior with a damp cloth. Dry thoroughly. Do not use abrasive
cleaners.
3. Do not put the Toaster, cord or plug in water.
4. Be sure crumb tray is pushed all the way into the back of the Toaster and the
toasting lever is in the UP position.
5. Unwrap power cord from cord storage area on underside of Toaster and plug
into a 120V AC outlet.
6. Turn the browning selector knob to (1), the lightest setting.
7. Lower both of the toasting levers until they lock in place. Operate without bread
once or twice to burn off any manufacturing residue. You may notice a light
amount of smoke; this is normal and will stop as the heating elements continue
to heat.
G
F
B
C
E
A
D
DESCRIPCIÓN DE LAS P ARTES
A. Palanca de carga
B. Botón de recalentamiento
C. Botón para Bagel
D. Control de dorado
E. Botón de descongelado
F . Botón cancelar
G. Bandeja para migas removible
ANTES DE UTILIZAR POR PRIMERA VEZ
1. Retire todos los materiales
de empaque incluyendo
aquellos que puedan
estar
dentro de las ranuras de tostado o de las ranuras de la palanca.
2. Limpi
e la parte
exterior con un paño húmedo. Seque completamente. No utilice
limpiadores abrasivos.
3. No coloque la
tostadora, el cordón ni el enchufe en agua.
4. Asegúrese de
que la bandeja se encuentre insertada hasta el
fondo de la
tostadora y que la palanca se encuentre hacia arriba.
5. Desenrolle
el cordón
que se encuentra
debajo de
la tostadora y proceda
a
enchufar a un tomacorriente de 120V AC.
6. Gire la perilla
de dorado a la posición (1), el nivel más leve.
7. Baje
las palancas de
tostado hasta que queden
enganchadas en
su lugar. Haga
funcionar la tostadora sin pan una o dos veces para quemar cualquier residuo
de fabricación. Se podría percibir una ligera cantidad de humo. Esto
es normal y
se detendrá conforme los elemen
tos de calentamiento
continúen calentándose.
G
F
B
C
E
A
D
"Cargando la instrucción" significa que debes esperar hasta que el archivo se cargue y puedas leerlo en línea. Algunas instrucciones son muy grandes y el tiempo de carga depende de la velocidad de tu conexión a Internet.
Resumen
IMPORTANT CATION HOT SURFACES: This appliance generates heat and escaping steam during use. Proper precautions must be taken to prevent the risk of burns, fires, or other injury to persons or damage to property. 1. A person who has not read and understood all operating, toasting, and safety instruct...
PART DESCRIPTION A. Loading lever B. Reheat button C. Bagel button D. Browning control E. Defrost button F. Cancel button G. Removable crumb tray BEFORE USING FOR THE FIRST TIME 1. Remove all packaging materials including those that may be inside the toasting slots or toasting lever slots. 2. Wipe t...
GUÍAS DE CENTRADO AUT OMÁTICO 1. Al momento de bajar las pala ncas de tostado, se cierran las guías de centrado que mantienen el pan o alimentos a tostar de forma centrada den las ranuras de tostado. NOT A: Las palancas de tostado no quedarán enganchadas a menos que la tostadora se encuentre enchuf...