Gardner Bender CS61200P - Manual de uso

Instrumento de medición Gardner Bender CS61200P - Manual de uso, léela gratuitamente en línea en formato PDF. Esperamos que esto te ayude a resolver cualquier duda que puedas tener. Si tienes más preguntas, contáctanos a través del formulario de contacto.
Breaker Finder
™
Circuit Breaker Locator
• Read this owners manual thoroughly before use and save.
SPERRY
INSTRUMENTS
The CS61200 Breaker Finder is used to quickly and easily locate the breaker or fuse
protecting a specific electrical circuit. It uses a plug-in transmitting device and receiver to
trace outlets, switches and lighting fixtures. The plug-in transmitter also includes an
integrated outlet tester to assure the circuit is wired properly. The transmitter and receiver
snap together for compact storage.
SPECIFICATIONS
•
Receptacle Transmitter Operating Range: 90 to 120 VAC; 60 Hz
•
Indicators: Audible and Visual
•
Operating environment:
32°- 104°F (0°- 40°C) 80% RH max., 50% RH above 30°C
Altitude up to 2000 meters. Indoor use.
Pollution degree 2. Accordance with IED-664
•
Battery: Receiver operates from one 9 Volt
•
Cleaning: Remove grease and grime with clean, dry cloth
READ FIRST: IMPORTANT SAFETY INFORMATION
READ ALL OPERATING INSTRUCTIONS BEFORE USE. Use extreme caution
when checking electrical circuits to avoid injury due to electrical shock. Sperry
Instruments assumes basic knowledge of electricity on the part of the user and is not
responsible for any injury or damages due to improper use of this tester.
OBSERVE and follow all standard industry safety rules and local electrical codes. When
necessary call a qualified electrician to troubleshoot and repair the defective electrical circuit.
SAFETY SYMBOLS
Refer to this manual before using this tester.
The tester is protected throughout by double insulation or reinforced insulation.
SAFETY WARNINGS
This instrument has been designed, manufactured and tested according to IEC61010: Safety
requirements for Electronic Measuring apparatus, and delivered in the best condition after
passing inspection. This instruction manual contains warnings and safety rules which must
be observed by the user to ensure safe operation of the instrument and retain it in safe
condition. Therefore, read through these operating instructions before using the instrument.
is reserved for conditions and actions that are likely to cause serious or fatal injury.
is reserved for conditions and actions that can cause serious or fatal injury.
is reserved for conditions and actions that can cause injury or instrument damage.
• Read through and understand the instructions contained in this manual before
using the instrument.
• Keep the manual at hand to enable quick reference whenever necessary.
• The instrument is to be used only in its intended applications.
• Understand and follow all the safety instructions contained in the manual.
• Failure to follow the above instructions may cause injury, instrument damage and/or
damage to equipment under test.
• Never attempt to make measurement if any abnormal conditions, such as broken case and
exposed metal parts are found on the instrument.
• Do not install substitute parts or make any modification to the instrument.
• Verify proper operation on a known source before use or taking action as a result of the
indication of the instrument.
• Do not attempt to make measurement in the presence of flammable gasses. Otherwise, the
use of the instrument may cause sparking, which can lead to an explosion.
• Never attempt to use the instrument if its surface or your hand is wet.
• Never open the battery cover during a measurement.
• The instrument is to be used only in its intended applications or conditions. Otherwise,
safety functions equipped with the instrument do not work, and instrument damage or
serious personal injury may be caused.
• Do not expose the instrument to direct sun, high temperature and humidity or dewfall.
• Altitude 2000 m or less. Appropriate operating temperature is within 0 °C and 40 °C.
• This instrument isn’t dust and water proofed. Keep away from dust and water.
• Be sure to power off the instrument after use. When the instrument will not be in use for
a long period, place it in storage after removing the batteries.
• Cleaning: Use a cloth dipped in water or neutral detergent for cleaning the instrument.
Do not use abrasives or solvents otherwise instrument may get damaged, deformed
or discolored.
The Symbol
indicated on the instrument means that the user must refer to the related
parts in the manual for safe operation of the instrument. It is essential to read the
instructions wherever the
symbol appears in the manual.
Marks listed in the table below are used on this instrument.
!
DANGER
!
WARNING
!
WARNING
!
DANGER
User must refer to the manual.
Instrument with double or reinforced insulation.
OPERATION
Using the plug-in transmitter and hand-held receiver, quickly and safely detect the proper
breaker or fuse protecting a specific outlet, wall switch or lighting fixture.
Note: A separate
accessory, CS61200AS, is required to trace switches and lighting fixtures.
Locating Electrical Outlets
1. Detach transmitter from receiver housing and plug
into outlet.
2. Verify transmitter is sending a signal by viewing the
Green “Transmit” L.E.D. on the top of the unit.
3. The transmitter also includes an outlet wiring tester.
For operation of this feature please review and follow
the directions at the end of the manual.
4. Verify receiver has a fresh 9-volt battery and
operating properly by viewing the L.E.D.(s) on
the front of the receiver.
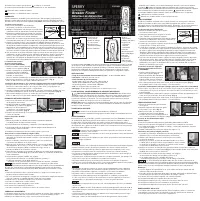
5. Using the “wand” on the receiver, as shown in
Fig. 1, trace the breakers or fuses to
detect the transmitting signal. The orientation of the wand is critical in order to pick up
the transmitting signal. Place the wand as shown for proper operation.
Note: Due to the proximity of other electrical wiring it is possible for the receiver to
indicate a signal on multiple breakers. To locate the proper breaker it may be necessary
to listen for the loudest beeping and watch for the highest L.E.D. indication to identify the
proper breaker.
6. Once the proper breaker is located, continue to hold the receiver wand against the
breaker and switch the breaker off. This will remove power to the remote transmitter and
the receiver will stop producing a response. As an additional precaution verify the power
is off by viewing the status of the green L.E.D. on the transmitter. It will not be illuminated
if the power is off.
Locating Lighting Fixture Circuits
(requires accessory part #
CS61200AS)
1. Remove light bulb and insert the
yellow screw in receptacle.
(Fig. 3)
2. Plug the transmitter into the adapter
and verify power is on by viewing
the green L.E.D. on the transmitter.
Note: Power must be on for the
transmitter to work. (Fig. 3)
3. Go to breaker panel and locate the circuit using the receiver
(Fig. 2)
as discussed in the previous "Operation" section.
Locating Switches and Other Wiring (requires accessory part # CS61200AS)
1. Attach the black alligator clip to the hot (black) wire and the white alligator clip to the
neutral wire (white). If a neutral wire is not present clip the white lead to a ground wire
or metal box.
2. Screw in the yellow receptacle adapter and plug in the transmitter. Verify the power is
on by viewing the green L.E.D. on the transmitter.
(Fig. 4)
3. Go to the breaker panel and locate the circuit using the receiver
(Fig. 2)
as discussed in the previous "Operation" section.
OUTLET TESTER
1. Detach the outlet tester from the
receiver housing.
2. Plug the unit into any 120 VAC 3-wire outlet.
(Fig. 5)
3. Observe the L.E.D.s and match with the
status chart located on the housing.
(Fig. 6)
4. Rewire outlet (if necessary) until the tester
indicates a correct wiring status.
GFCI Test Function
Operation:
1. Plug the tester into any 120 Volt standard or GFCI outlet.
2. View the indicators on the tester and match with the chart on the tester.
3. If the tester indicates a wiring problem then turn off all power to the outlet and repair wiring.
4. Restore power to the outlet and repeat steps 1-3.
To Test GFCI Protected Outlets:
1. Consult the GFCI manufacturer’s installation instructions to determine
that the GFCI is installed in accordance with the manufacturer’s
specifications.
2. Check for correct wiring of receptacle and all remotely connected
receptacles on the branch circuit.
3. Operate the test button on the GFCI installed in the circuit. The GFCI
must trip. If it does not — do not use the circuit — consult an
electrician. If the GFCI does trip, reset the GFCI. Then, insert the
GFCI tester into the receptacle to be tested.
4. Activate the test button on the GFCI tester for a minimum of 6 seconds when testing the
GFCI condition
(Fig. 7). Visible indication on the GFCI tester must cease when tripped.
5. If the tester fails to trip the GFCI, it suggests:
a) a wiring problem with a totally operable GFCI, or
b) proper wiring with a faulty GFCI.
Consult with an electrician to check the condition of the wiring and GFCI.
When testing GFCIs installed in 2- wire systems (no ground wire available), the
tester may give a false indication that the GFCI is not functioning properly. If this occurs,
recheck the operation of the GFCI using the test and reset buttons. The GFCI button test
function will demonstrate proper operation.
Note:
1. All appliances or equipment on the circuit being tested should be unplugged to help
avoid erroneous readings.
2. Not a comprehensive diagnostic instrument but a simple instrument to detect nearly
all probable common improper wiring conditions.
3. Refer all indicated problems to a qualified electrician.
4. Will not indicate quality of ground.
5. Will not detect two hot wires in a circuit.
6. Will not detect a combination of defects.
7. Will not indicate a reversal of grounded and grounding conductors.
REPLACING THE BATTERIES
The receiver unit operates from a standard 9 Volt battery. To replace, remove the battery
door cover located on the back, with a small screwdriver. Replace with new battery and
then shut the battery door.
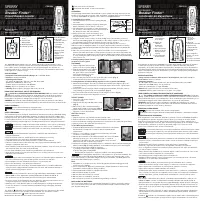
1. On-OFF Button
2. 10 Visual
Indication L.E.D.s
3. Over-Molded
Soft Grips
• Patented
Sensing Probe
• Magnetic back
• Snap Together
Edges
• Operates from
9 Volt Battery
(included)
1. 3-Prong Outlet
Tester
2. Color-Coded
Wiring Status
3. GFCI Test Button.
4. Transmit on L.E.D.
Transmitter
Milwaukee, WI 53209
1-800-645-5398
www.sperryinstruments.com
CS61200
1
2
3
4
3
2
1
Fig. 1
Fig. 2
Fig. 3
Fig. 4
Fig. 5
Fig. 6
Fig. 7
Receiver
Breaker Finder
™
Localizador de disyuntores
SPERRY
INSTRUMENTS
El localizador de disyuntores CS61200 se usa para ubicar rápida y fácilmente el disyuntor
o fusible que protege un circuito eléctrico específico. Utiliza un dispositivo transmisor
enchufable y un receptor para rastrear tomacorrientes, interruptores y luces. El transmisor
enchufable también incluye un probador de tomacorriente integrado para asegurar que se
cablee correctamente el circuito. El transmisor y el receptor encajan juntos para guardarse
de manera compacta.
ESPECIFICACIONES
•
Rango de funcionamiento del transmisor del receptáculo: 90 a 120 V CA; 60 Hz
•
Indicadores: Sonoros y visuales
•
Ambiente operativo:
0°- 40°C 80% de humedad relativa máx., 50% de humedad relativa sobre 30°C
Altitud de hasta 2000 metros. Uso en interiores.
Grado de contaminación 2. Según IED-664
•
Batería: El receptor funciona con una batería de 9 voltios
•
Limpieza: Retire la grasa y la mugre con un paño seco y limpio
LEER PRIMERO: INFORMACIÓN IMPORTANTE DE SEGURIDAD
LEA TODAS LAS INSTRUCCIONES OPERATIVAS ANTES DEL USO. Tenga sumo
cuidado al revisar los circuitos eléctricos para evitar lesiones debido a choques eléctricos.
Sperry Instruments supone el conocimiento básico de la electricidad por parte del usuario y no es
responsable de ninguna lesión ni daños debido al uso incorrecto de este probador.
OBSERVE y siga todas las reglas estándar de seguridad de la industria y los códigos
eléctricos locales. Cuando sea necesario llame a un electricista capacitado para resolver
problemas y reparar el circuito eléctrico defectuoso.
SÍMBOLOS DE SEGURIDAD
Consulte este manual antes de usar este probador.
El probador está protegido totalmente mediante doble aislamiento o aislamiento reforzado.
ADVERTENCIAS DE SEGURIDAD
Este instrumento ha sido diseñado, fabricado y probado conforme a IEC61010: Requisitos
de seguridad para aparatos electrónicos de medición, y se entrega en el mejor estado
después de pasar la inspección. Este manual de instrucciones contiene advertencias y
reglas de seguridad que el usuario debe observar para garantizar el funcionamiento seguro
del instrumento y mantener su estado sin presentar peligro. Por lo tanto, lea estas
instrucciones operativas antes de usar el instrumento.
se reserva para condiciones y acciones que probablemente causen lesiones serias o fatales.
se reserva para condiciones y acciones que pueden causar lesiones serias o fatales.
se reserva para condiciones y acciones que pueden causar lesiones o daño al instrumento.
• Lea totalmente y en detalle las instrucciones contenidas en este manual antes de usar el instrumento.
• Conserve a mano el manual para poder usarlo a modo de referencia rápida siempre que
sea necesario.
• El instrumento debe usarse solamente en las aplicaciones contempladas.
• Entienda y siga todas las instrucciones de seguridad contenidas en el manual.
• Si no se siguen las instrucciones anteriores puede causar lesiones, daño al instrumento
y/o daño al equipo a prueba.
• Nunca intente tomar medidas si se encuentra alguna condición anormal, tal como la caja
rota o piezas metálicas expuestas en el instrumento.
• No sustituya piezas ni haga modificaciones al instrumento.
• Verifique el funcionamiento correcto en una fuente conocida antes de usar o de actuar
basándose en lo que indique el instrumento.
• No intente tomar medidas en la presencia de gases inflamables. De lo contrario,
el uso del instrumento puede causar chispas, lo cual puede ocasionar una explosión.
• Nunca intente usar el instrumento si está mojada la superficie o la mano.
• Nunca abra la tapa de la batería durante una medición.
• El instrumento debe usarse solamente en las aplicaciones o condiciones contempladas.
De lo contrario, las funciones de seguridad con las cuales se ha equipado el instrumento
quedan inoperantes, y puede causarse daño al instrumento o lesiones físicas serias.
• No exponga el instrumento al sol directo, a alta temperatura ni humedad o caída de rocío.
• Altitud de 2000 m o menor. La temperatura operativa adecuada está entre 0°C y 40 °C.
• Este instrumento no es a prueba de polvo ni agua. Manténgalo alejado del polvo y del agua.
• Confirme que se haya apagado el instrumento después del uso. Cuando el instrumento no
vaya a estar en uso por un tiempo largo, póngalo en almacenamiento después de extraerle
las baterías.
• Limpieza: Use un paño sumergido en agua o detergente neutro para limpiar el instrumento.
No use abrasivos ni solventes, de lo contrario el instrumento puede dañarse, deformarse
o decolorarse.
El símbolo
indicado en el instrumento significa que el usuario debe consultar las partes
relacionadas en el manual para operar de manera segura el instrumento. Es esencial leer
!
DANGER
!
WARNING
!
WARNING
!
DANGER
1. Botón de
encendido y
apagado
2. 10 L.E.D.
indicadores visuales
3. Agarre suave,
sobremoldeado
• Sonda detectora
patentada
• Dorso magnético
• Bordes con encaje
de unión
• Funciona con batería
de 9 voltios (incluida)
1. Probador de
tomacorrientes
de 3 clavijas
2. Estado de
cableado
identificado
con colores
3. Botón de prueba
GFCI [circuito de
falla por puesta
a tierra]
4. L.E.D. indicador
de transmisión
Transmisor
Milwaukee, WI 53209
1-800-645-5398
www.sperryinstruments.com
CS61200
1
2
3
4
3
2
1
Receptor
• Lea este manual del propietario totalmente antes del uso y ahorre.
"Cargando la instrucción" significa que debes esperar hasta que el archivo se cargue y puedas leerlo en línea. Algunas instrucciones son muy grandes y el tiempo de carga depende de la velocidad de tu conexión a Internet.