GE GFD65ESPVDS - Manual de uso
Secadora GE GFD65ESPVDS - Manual de uso, léela gratuitamente en línea en formato PDF. Esperamos que esto te ayude a resolver cualquier duda que puedas tener. Si tienes más preguntas, contáctanos a través del formulario de contacto.


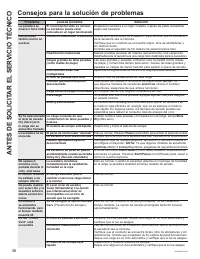
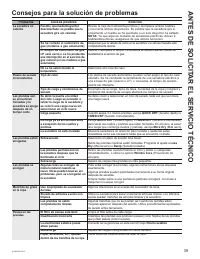
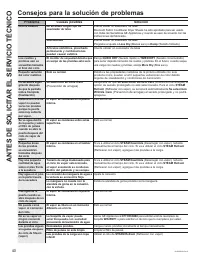

32
49-3000206 Rev 6
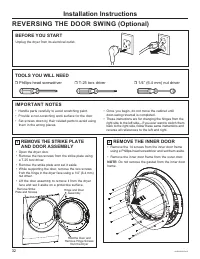
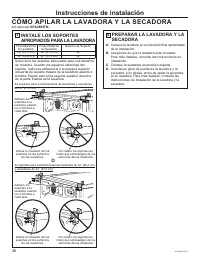
Installation Instructions
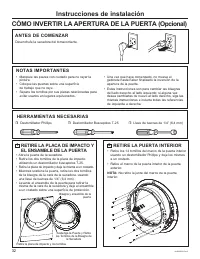
REVERSING THE DOOR SWING (Optional)
IMPORTANT NOTES
• Handle parts carefully to avoid scratching paint.
• Provide a non-scratching work surface for the door.
• Set screws down by their related parts to avoid using
them in the wrong places.
•
Once you begin, do not move the cabinet until
door-swing reversal is completed.
•
These instructions are for changing the hinges from the
right side to the left side—if you ever want to switch them
back to the right side, follow these same instructions and
reverse all references to the left and right.
REMOVE THE STRIKE PLATE
AND DOOR ASSEMBLY
•
Open the dryer door.
•
Remove the two screws from the strike plate using
a T-25 torx driver.
•
Remove the strike plate and set it aside.
•
While supporting the door, remove the two screws
from the hinge in the dryer face using a 1/4” (6.4 mm)
nut driver.
•
Lift the door assembly to remove it from the dryer
face and set it aside on a protective surface.
1
Phillips-head screwdriver
T-25 torx driver
1/4” (6.4 mm) nut driver
TOOLS YOU WILL NEED
BEFORE YOU START
Unplug the dryer from its electrical outlet.
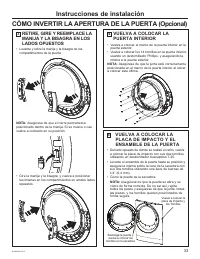
REMOVE THE INNER DOOR
•
Remove the 14 screws from the inner door frame
using a Phillips-head screwdriver and set them aside.
•
Remove the inner door frame from the outer door.
NOTE:
Do not remove the gasket from the inner door
frame.
2
Hold the Door and
Remove Hinge Screws
from the Dryer
Remove Strike
Plate and Screws
Hinge and Door
Assembly
"Cargando la instrucción" significa que debes esperar hasta que el archivo se cargue y puedas leerlo en línea. Algunas instrucciones son muy grandes y el tiempo de carga depende de la velocidad de tu conexión a Internet.