FILTER FEATURES; CONSEJOS PARA IDENTIFICAR PROBLEMAS - Lasko 6101 - Manual de uso - Página 2
Índice:
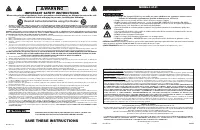
- Página 1 – IMPORTANT SAFETY INSTRUCTIONS; Read all instructions before using this Heater.; SAVE THESE INSTRUCTIONS; MANTENIMIENTO
- Página 2 – FILTER FEATURES; CONSEJOS PARA IDENTIFICAR PROBLEMAS
- Página 3 – CARACTERÍSTICAS DEL FILTRO
- Página 4 – MAINTENANCE; Lea todas las instrucciones antes de usar este Calentador.; INSTRUCCIONES IMPORTANTES DE SEGURIDAD; CONSERVE ESTAS INSTRUCCIONES
- Página 5 – INSTRUCCIONES IMPORTANTES -; LEA Y GUARDE ESTAS INSTRUCCIONES; Este Calentador es para uso residencial únicamente.; NOTES
Rev. E 1/12
10
6101ES
Rev. E 1/12
3
6101ES
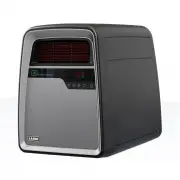
MODEL 6101
Figure 1
Filter
FILTER FEATURES
(Figure 3)
1. Push down on the two tabs to remove cover.
2. Clean the filter with a vacuum equipped with a brush attachment every
two weeks; this will help to maintain the optimum filter performance.
Vacuum with a brush
attachment.
Figure 2
OPERATION
1. Carefully remove the Heater from the plastic bag and the carton.
2. Place the Heater on a firm and level surface.
CAUTION:
Plastic or rubber wheels may stick to furniture surfaces and/
or hardwood floors. The unit may leave a residue that could darken, stain
or leave permanent blemishes on the finish of certain furniture surfaces,
including wood surfaces, and/or hardwood floors.
3. Plug the cord set into a 120 volt outlet.
Be sure that the plug fits tightly into outlet.
When plugs fit loosely into receptacles, they may slip par-
tially or completely out of the receptacle with only the slight
movement of the attached cord. Receptacles in this condi-
tion may overheat and pose a serious fire hazard; if covered
by a curtain or drape, the fire hazard is even greater.
4. When the Heater is initially plugged in, there will be a ‘beep’ and the
Power Light
will come on indicating that there is power to the unit.
The
Power Light
will remain lit until the Heater is unplugged from the
electrical outlet.
5. Turn the Heater ON by pressing the Power Button ( ).
Note:
The Heater
“fan” has a 20-second delay before turning on. The purpose of the
Delay Start Function is to allow the Infrared Quartz Element to heat
up before the fan begins to circulate the airflow.
6. Upon turning the Heater on, the unit will be in HIGH heat (1500 Watts).
7. Press the ( ) button for LOW heat.
8. To turn the Heater OFF, press the Power Button ( ).
Note:
The Heater
“fan” will run for 60 seconds before turning off completely. The Fan
will continue to circulate the airflow after the power is turned off to
circulate the warm air from the Infrared Heater cooling the unit dow
n.
Unplug the Heater from the electrical outlet.
Timer Function
(Figure 1)
The timer function may be activated when the Heater display is in any func-
tion or speed. This function allows you to set the length of time the Heater
will run before turning itself off, from 1 hour to 8 hours. Pressing the
Timer
Button
( ) will increase the length of time by 1 hour each time this button
is pressed. After the display reflects 8 hours, pressing the
Timer Button
( ) once more will reset the Heater to run continuously. The Heater will
turn off when the set time has elapsed. The unit can be turned back on by
pressing the
Power Button
( ).
AUTOMATIC TEMPERATURE CONTROL
(Figure 2)
The automatic temperature function will only operate on "High" heat .
You cannot set the temperature automatically when the unit is in the
low heat mode.
1. To set the room at a specific temperature press the ( ) or ( ) buttons to
the desired temperature.
2. When you reach the temperature at which you want to set the unit, the
set temperature will flash several times and then the display will return
to indicate the current room temperature and will gradually change as
the room temperature changes. NOTE: the temperature display does not
indicate the temperature of the heated air being emitted by the heater.
3. Once the room temperature reaches 2 degrees above the set tem-
perature, the Heater will shut off. Once the room temperature reaches
1 degree below the set temperature, the Heater will turn back on and
continue to cycle off and on to maintain the set temperature.
4. This function will cancel if the ( ) button is pressed. The Heater will
now be in High heat and run continuously.
NOTE: It is normal for the Heater “fan” to run for approximately 30 seconds
when the Heater shuts off after reaching the set temperature. Press the
( ) and ( ) buttons at the same time to change the display to ° Celsius.
Press the same two buttons together again to change the display back to
° Fahrenheit.
MODELO 6101
CONTROL REMOTO:
Todas las funciones realizadas con el Control Remoto operan del mismo modo que los controles manuales, excepto que usted no puede cambiar de
°F a °C con el control remoto.
(Figura 4)
1. Instale las dos baterías “AAA” (no incluidas).
2. No mezcle baterías viejas y nuevas. No mezcle baterías alcalinas, estándar (carbono-zinc) o recargables (níquel-cadmio).
3. NO SE DESHÁGA DE BATERÍAS EN EL FUEGO. BATERÍAS PUEDEN ESTALLAR O PUEDEN SALIRSE.
Figura 4
Vista Delantara
Vista Posterior
Si usted pierde su mando a distancia, por favor Cliente de llamada Serive para ordenar un reaplacement en 1-800 -233-0268, de lunes a viernes, entre
las 8 a.m. y las 5 p.m. (Horario Estándar del Este de los Estados Unidos).
CONSEJOS PARA IDENTIFICAR PROBLEMAS
Si su Calentador se apaga inesperadamente o no funciona, es probable que la función de seguridad descrita anteriormente se haya activado para impedir
el sobrecalentamiento.
1. Cerciórese de que el cable eléctrico esté enchufado en un tomacorriente en buen estado.
2. Revise su posición del Termostato. El Calentador podría estar apagado porque alcanzó la temperatura deseada.
3. El calentador portátil tiene un ventilador que seguirá funcionando aún cuando se apague el interruptor de encendido. Este ventilador va a seguir
funcionando para enfriar el calentador portátil. Una vez que el ventilador deje de funcionar, usted puede desenchufar el calentador portátil.
4. Si su Calentador opera durante varios minutos y se apaga repetidamente, es posible que el mismo requiera limpieza. Ver la sección de Mantenimiento
abajo.
Si tiene algún problema que no pueda resolverse con los pasos indicados más arriba, contacte a Asistencia Técnica al 1-800-233-0268, de lunes a viernes,
entre las 8am y las 5pm (Horario Estándar del Este de los Estados Unidos).
FUNCIÓN DE SEGURIDAD
1. Se incorpora un protector para sobrecargas térmicas a fin de impedir el sobrecalentamiento.
2.
Si se alcanza una temperatura de sobrecalentamiento,
el Calentador se apaga automáticamente. Sólo podrá reanudar su funcionamiento
una vez que se reinicie la unidad.
Para Reiniciar el Calentador:
1. Desenchufe el Calentador y espere 10 minutos para que la unidad se enfríe.
2. Después de 10 minutos, enchufe el Calentador nuevamente y siga la INSTRUCCIÓN DE FUNCIONAMIENTO que se describe en este
manual de instrucciones.
Save-Smart™
Press ( ) to activate the Save-Smart™ Function.
1. Set the thermostat to desired temperature using the +/-
buttons (Note: The default Save-Smart™ temperature is 72 º F)
2. When you reach the temperature at which you want to
set the unit, the set temperature will flash several times
and then the display will return to indicate the current
room temperature and will gradually change as the
room temperature changes.
3. When the air temperature is less than the set temperature,
the heater will run in HIGH heat.
4. Once the thermostat reaches the set temperature the heater
will automatically switch to LOW heat to save energy.
5. When the air temperature reaches 4º above the set temperature,
the heater will turn off. The Heater will cycle off and on in the LOW
mode to maintain the set temperature.
All this happens automatically with Lasko Save-Smart™ Technology.
To deactivate the Save-Smart™ function, press Save-Smart™
again or ( ) for continuous high/low heat.
Display reflects High Heat and Automatic
Temperature Control Function
Figure 3
Timer Function
in Low Heat
Timer Function in High Heat and
Automatic Temperature Control
"Do not remove filter"
"Cargando la instrucción" significa que debes esperar hasta que el archivo se cargue y puedas leerlo en línea. Algunas instrucciones son muy grandes y el tiempo de carga depende de la velocidad de tu conexión a Internet.
Resumen
Rev. E 1/12 2 6101ES Rev. E 1/12 11 6101ES 1. ALWAYS PLUG HEATERS DIRECTLY INTO A WALL OUTLET/RECEPTACLE. NEVER USE WITH AN EXTENSION CORD. DO NOT PLUG HEATER INTO ANY OTHER CORD CONNECTED DEVICE, SUCH AS A POWER STRIP, SURGE PROTECTOR, MULTIPLE OUTLET ADAPTER, CORD REEL OR OUTLET-TYPE AIR FRESHENE...
Rev. E 1/12 10 6101ES Rev. E 1/12 3 6101ES MODEL 6101 Figure 1 Filter FILTER FEATURES (Figure 3) 1. Push down on the two tabs to remove cover.2. Clean the filter with a vacuum equipped with a brush attachment every two weeks; this will help to maintain the optimum filter performance. Vacuum with a ...
Rev. E 1/12 4 6101ES MODEL 6101 REMOTE CONTROL: (Figure 4) All the functions performed with the Remote Control work identically to the manual controls except changing °F to °C. 1. Install two “AAA” batteries (not included).2. Do not mix old and new batteries. Do not mix alkaline, standard (carbon-zi...
Otros modelos de calentadores Lasko
-
 Lasko 101
-
 Lasko 5160
-
 Lasko 5309
-
 Lasko 5397
-
 Lasko 5409
-
 Lasko 5538
-
 Lasko 5572
-
 Lasko 5624
-
 Lasko 5775
-
 Lasko 5790