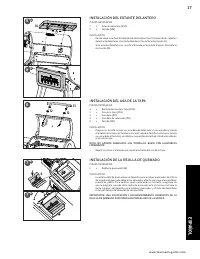
INSTALACIÓN DEL ESTANTE DELANTERO; INSTALACIÓN DE LA REJILLA DE QUEMADO - Louisiana Grills 10639 - Manual de uso - Página 7


Índice:
- Página 4 – ESP; REQUISITOS ELÉCTRICOS; AVISO DE COPYRIGHT
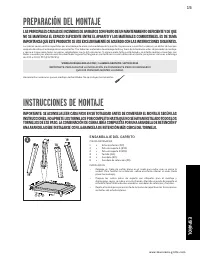
- Página 5 – ENSAMBLAJE DEL CARRITO; INSTRUCCIONES DE MONTAJE; PREPARACIÓN DEL MONTAJE
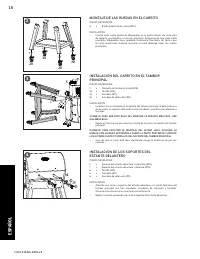
- Página 6 – MONTAJE DE LAS RUEDAS EN EL CARRITO
- Página 7 – INSTALACIÓN DEL ESTANTE DELANTERO; INSTALACIÓN DE LA REJILLA DE QUEMADO
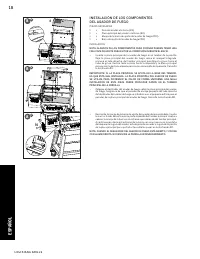
- Página 8 – INSTALACIÓN DE LOS COMPONENTES
- Página 9 – INSTALACIÓN DE LOS COMPONENTES DE COCINA; COLOCACIÓN DEL RECOGEGRASA; CONEXIÓN A UNA FUENTE DE ALIMENTACIÓN
- Página 10 – IMPORTANT
w w w. l o u i s i a n a - g r i l l s .c o m
1 7
ESP
AÑOL
ESP
AÑOL
E
2x
C D
2x 2x
E
C
D
6.ATTACHING THE LID HANDLE
1x Lid Handle (#10)
2x Lid Handle Bezel (#9)
2x 1/4-20x3/4" Screw (#E)
2x 1/4
washer
(#C)
2x 1/4
spring washer
(#D)
From inside the barrel lid, insert one screw so that it protrudes to the outside.
Add a bezel on the screw, then hand-tighten the screw (from the inside) into
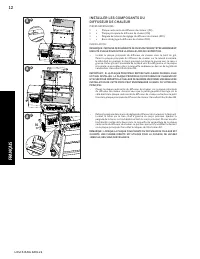
7.POSITIONING THE BURN GRATE
1x Burn Grate (#11)
Proper placement and maintenance of the burn grate is vital to the use of the unit. Insert the
burn grate into the burn pot. The hole in the burn grate should align and be open for the igniter
to light the pellets. To verify proper positioning, ensure the curved lip of the burn grate is flush
with the top of the burn pot, and the notched side should sit flush, under the fuel deflector.
6
2x
B
B
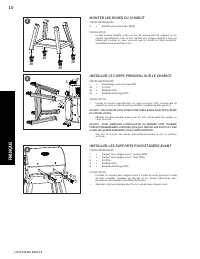
5.INSTALLING THE FRONT SHELF BRACKETS
1x Front Shelf (#8)
2x Screw (#B)
From underneath, insert the screw (from the outside) into the front shelf bracket and the front
shelf.
Repeat the installation for the other side of the front shelf.
2x
B
B
5.INSTALLING THE FRONT SHELF BRACKETS
1x Front Shelf (#8)
2x Screw (#B)
From underneath, insert the screw (from the outside) into the front shelf bracket and the front
shelf.
Repeat the installation for the other side of the front shelf.
INSTALACIÓN DEL ESTANTE DELANTERO
PIEZAS NECESARIAS:
1
x
Estante delantero (#14)
2
x
Tornillo (#B)
INSTALACIÓN:
•
Desde abajo, inserte el tornillo (desde dentro) para fijar firmemente los soportes
del estante delanteros al estante delantero. Consulte la ilustración 5A.
•
Si el estante delantero no se está utilizando, este puede bajarse. Consulte la
ilustración 5B.
INSTALACIÓN DEL ASA DE LA TAPA
PIEZAS NECESARIAS:
2
x
Remate del asa de la tapa (#12)
1
x
Asa de la tapa (#13)
2
x
Arandela (#C)
2
x
Arandela de retención (#D)
2
x
Tornillo (#E)
INSTALACIÓN:
•
Prepare un tornillo, añada una arandela de retención y una arandela y, desde
el interior de la tapa del tambor principal, saque el tornillo hacia fuera. Añada
una arandela al tornillo y apriételo a mano (desde dentro) introduciéndolo en
el asa de la tapa.
NOTA: NO APRIETE DEMASIADO LOS TORNILLOS. BASTA CON AJUSTARLOS
FIRMEMENTE.
•
Repita la misma instalación para el otro extremo del asa de la tapa.
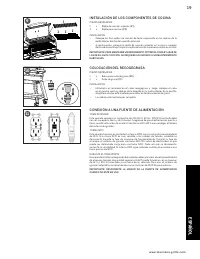
INSTALACIÓN DE LA REJILLA DE QUEMADO
PIEZAS NECESARIAS:
1
x
Rejilla de quemado (#6)
INSTALACIÓN:
•
Inserte la rejilla de quemado en el depósito para residuos quemados. El orificio
de la rejilla de quemado debe estar alineada y abierta para que el encendedor
prenda los pélets. Para verificar que la colocación es correcta, asegúrese de
que la lengüeta curvada de la rejilla de quemado esté al mismo nivel que la
parte superior del depósito para residuos quemados y el lado dentado debe
estar por debajo del detector de combustible.
IMPORTANTE: UNA COLOCACIÓN Y UN MANTENIMIENTO CORRECTOS DE LA
REJILLA DE QUEMADO SON CRUCIALES PARA EL USO DE LA UNIDAD.
5
B
7
A
7
B
5
A
6
12
12
13
14
"Cargando la instrucción" significa que debes esperar hasta que el archivo se cargue y puedas leerlo en línea. Algunas instrucciones son muy grandes y el tiempo de carga depende de la velocidad de tu conexión a Internet.
Resumen
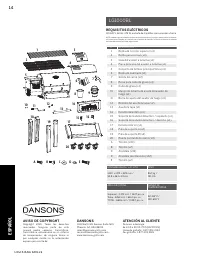
LO U I S I A N A G R I L L S 1 4 ESPAÑOL ESP AÑOL ENSAMBLADA (An. × Al. × Pr.) PESO 1340 x 1172 x 823 mm / 52,8 x 46,1 x 32,4 in 86,7 kg / 191,1 lb ÁREA DE COCINA RANGO DE TEMPERATURAS Superior - 2,372 cm² / 367,7 pu. cu.Tolva - 4264 cm² / 661,0 pu. cu.TOTAL - 6636 cm² / 1028,7 pu. cu. 82-315°C / 18...
w w w. l o u i s i a n a - g r i l l s .c o m 1 5 ESPAÑOL ESP AÑOL ENSAMBLAJE DEL CARRITO PIEZAS NECESARIAS:1 x Estante inferior (#17) 2 x Pata de soporte A (#18) 2 x Pata de soporte B (#19) 8 x Tornillo (#A) 8 x Arandela (#C) 8 x Arandela de retención (#D) INSTALACIÓN: • Coloque un trozo de cartó...
LO U I S I A N A G R I L L S 1 6 ESPAÑOL ESP AÑOL MONTAJE DE LAS RUEDAS EN EL CARRITO PIEZAS NECESARIAS:4 x Rueda pivotante de cierre (#20) INSTALACIÓN: • Inserte cada rueda pivotante bloqueable en la parte inferior de cada pata de soporte, ajustándola a mano en el orificio. Asegúrese de que cada r...
Otros modelos de parrillas Louisiana Grills
-
 Louisiana Grills 10638
-
 Louisiana Grills 10640