RESOLUCIÓN DE PROBLEMAS; PROCEDIMIENTO DE ENCENDIDO; Uso intermitente; TERMOSTATO - Mr. Heater HS8060PPNG - Manual de uso - Página 11

Índice:
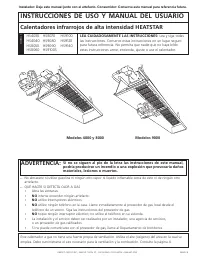
- Página 6 – INSTRUCCIONES DE USO Y MANUAL DEL USUARIO; LEA CUIDADOSAMENTE L AS INSTRUCCIONES:; Lea y siga todas; Calentadores infrarrojos de alta intensidad HEATSTAR; Si no se siguen al pie de la letra las instrucciones de este manual,; Abralasventanas
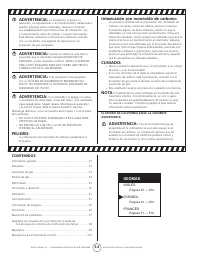
- Página 7 – CONTENIDOS; Intoxicación con monóxido de carbono:; IDIOMAS; INGLÉS
- Página 8 – INFORMACIÓN GENERAL
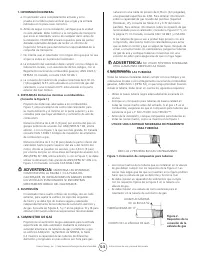
- Página 9 – Figura 3. Instalación típica de las tuberías; FIGURA 1
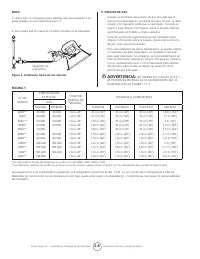
- Página 10 – TERMOSTATO Y UBIC ACIÓN; FIGURA 2
- Página 11 – RESOLUCIÓN DE PROBLEMAS; PROCEDIMIENTO DE ENCENDIDO; Uso intermitente; TERMOSTATO
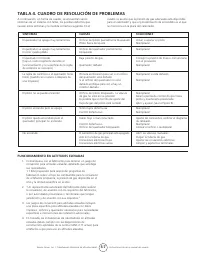
- Página 12 – TABL A 4. CUADRO DE RESOLUCIÓN DE PROBLEMAS; FUNCIONAMIENTO EN ALTITUDES ELEVADAS; SÍNTOMAS
- Página 13 – DIAGRAMA DE CONEXIÓN DE L A CORRIENTE DE L A VARILL A DE L A LL AMA; MEDIOS PARA DEMOSTRAR UN ÁREA DE CONEXIÓN; Figura 3
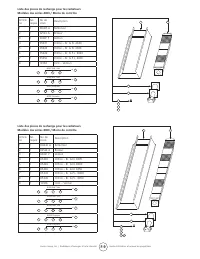
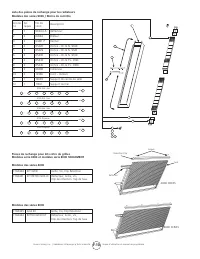
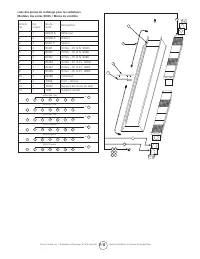
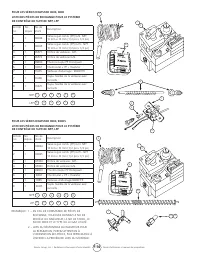
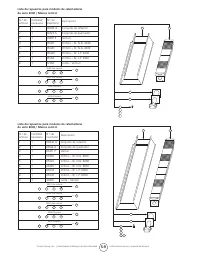
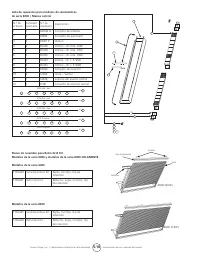
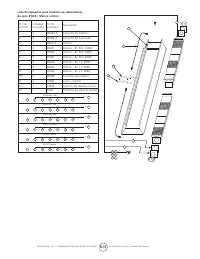
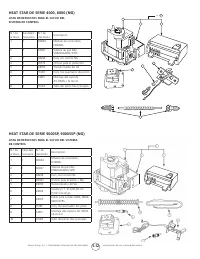
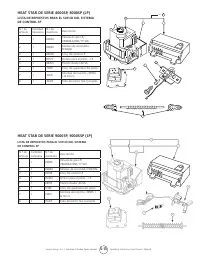
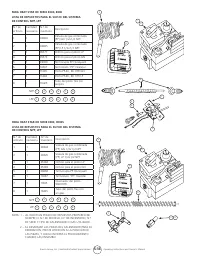
- Página 17 – LISTA DE REPUESTOS PARA EL SUFIJO DEL; LISTA DE REPUESTOS PARA EL SUFIJO DEL SISTEMA
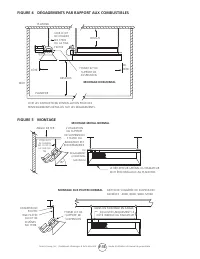
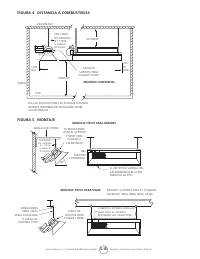
- Página 20 – MONTAJE TÍPICO PARA VIGAS; FIGURA 4; MONTAJE HORIZONTAL; DISTANCIA A COMBUSTIBLES; MONTAJE TÍPICO PARA PAREDES; MONTAJE
- Página 21 – USESOLAMENTEREPUESTOSDELFABRICANTE.EL; SI DESEA OBTENER INFORMACIÓN ACERC A DE REPARACIONES
S-6
EnercoGroup,Inc.|Calentadoresinfrarrojosdealtaintensidad
Instruccionesdeusoymanualdelusuario
Figura 5.
Controles del
termostato
14. INSTRUCCIONES DE MANTENIMIENTO
PARA EL OPERADOR
1. RESOLUCIÓN DE PROBLEMAS
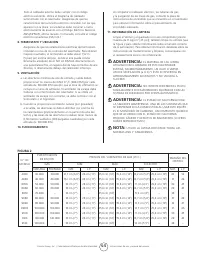
a. LaTabla4indicalosproblemasquepuedenaparecerenel
sistema durante el uso o mantenimiento del calentador.
b. ParaobtenermásinformaciónconsulteelBoletíndecampode
Honeywelladjuntoenlacajadelcalentador.
c. Enelcasodequenoobtengaresultadosdespuésdellevar
acabotodaslassolucionesdelalista,comuníqueseconel
distribuidordeMr.Heater,oconeldepartamentodeservicio
alclientedelafábricaal1-866-447-2194.
2. AJUSTE DE L A LL AMA DEL PILOTO
La llama del piloto debe cubrir
entre10y13mm(3/8y
½pulgadas)delapuntadela
termocupla o del generador.
Paraajustarlallamadelpiloto:
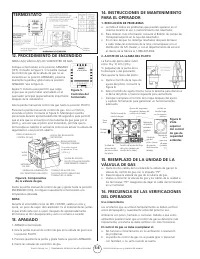
12. PROCEDIMIENTO DE ENCENDIDO
ABRALA(S)VÁLVULA(S)DESUMINISTRODEGAS.
ColoqueeltermostatoenlaposiciónAPAGADO
(OFF).ConsultelaFigura5.Silaperillamanual
decontroldegasdelaválvuladegasnose
encuentraenlaposiciónAPAGADO,presione
levementelaperillaygírelahacialaposición
APAGADO.Vealafigura6.
Espere5minutosparapermitirquesalga
elgasquesepudohaberacumuladoenel
quemadorprincipal(especialmenteimportante
despuésdelainstalación).
GirelaperillamanualdecontroldegashastalaposiciónPILOTO.
Presionelaperillamanualdecontroldegas.Conunfósforo,
enciendaelpiloto.ConsultelaFigura6.Mantengalaperilla
presionadaduranteaproximadamente30segundosparapermitir
queelairequeseencuentraenlastuberíasdegaspaseporel
pilotoy,unavezqueelpilotoestéencendido,permitaquela
termocuplasecalientelosuficientecomoparaactivarlaválvulade
seguridadenunaposiciónabierta.
Sueltelaperillamanualdecontroldegasygírelahastalaposición
ENCENDIDO(ON).Configurenuevamenteeltermostatoala
temperatura deseada.
NOTA:
DuranteelencendidoinicialdeMR.HEATER,saldráunolory,
quizá,unpocodevapordelcalentador.Eselmaterialdelasjuntas
elqueemiteesteolorovapor.Despuésdeaproximadamente
20minutoselolordesapareceráyestonovolveráasuceder.
13. APAGADO
1.APAGUEeltermostato.
2.Girelaperillamanualdecontroldegasenlaválvuladegashacia
laposiciónPILOTO.
3.PresionelevementelaperillaygírelahastalaposiciónAPAGADO.
4.Cierrelasválvulasdesuministrodegas.
a. Quiteeltornillodelatapade
ajuste del piloto. Consulte la
Figura8.
b. Gireeltornillodeajusteinternohacialaderechaparadisminuir
lallamadelpilotoohacialaizquierdaparaaumentarla.
c. Siemprereemplaceeltornillodelatapadespuésdelajuste
ysujételofirmementeparagarantizarunfuncionamiento
adecuado.
Perilla manual de
control de gas
Llave
Boss
Entrada
de gas
Unidadde
alimentación
del termostato
del piloto
Ajustedelregulador
depresión(debajodel
tornillodelatapa)
Instaleun
tornillo largo
enlaesquina
externa
Regulador
depresión
estándar
(modelo
“A”)
Regulador
de la
apertura
de paso
(modelo
“C”)
Salida de
gas del
piloto(toma
depresión
directamente
debajo)
Tornillodeajustedelflujo
delpiloto(debajodel
tornillodelatapa)
Figura 8.
Vista
superior
del control
de gas de
capacidad
estándar.
15. REEMPL AZO DE L A UNIDAD DE L A
VÁLVUL A DE GAS
a. Quitelosdoscablesdelaunidaddelaválvuladegasenla
válvuladecontroldegasconlaetiqueta“PP”.
b. Desenrosquelaválvuladegasdelatuberíadegas.
c. Vuelvaaconectarlaválvuladegasyloscablesdelaunidada
losterminales“PP.”Asegúresededejarelcabledeltermostato
en un terminal.
16. FRECUENCIA DE L AS VERIFIC ACIONES
DEL OPERADOR
Uso intermitente
Losartefactosqueseutilizantemporalmentesedebenverificar
antesdelapagadoynuevamenteantesdelpróximouso.
Ambienteconpolvo,húmedoocorrosivo.Debidoaqueestos
ambientespuedenhacerqueelcontroldegassedeterioremás
rápidamente,elsistemasedebeverificarconmásfrecuencia.
El control de gas se debe reemplazar si:
a. Nofuncionacorrectamenteenlaverificaciónoresolución
de problemas.
b. La perilla de control de gas no se puede girar o presionar
con facilidad, o no salta cuando se suelta.
TERMOSTATO
PERILLAMANUALDE
CONTROLDEGAS
LLAVE
BOSS
ENTRADA
DEGAS
AJUSTEDELREGULADOR
DEPRESIÓN
REGULADORDE
PRESIÓNESTÁNDAR
(Lapresiónentrante
noexcedelos33cm
[13"W.C.])
SALIDADEGASDEL
PILOTO(TOMADEPRESIÓN
DIRECTAMENTEDEBAJO)
TORNILLODEAJUSTEDEL
FLUJODELPILOTO(DEBAJODEL
TORNILLODELATAPA)
UNIDADDEALIMENTACIÓN
DELTERMOSTATODELPILOTO
Figura 6. Componentes
de la válvula de gas
"Cargando la instrucción" significa que debes esperar hasta que el archivo se cargue y puedas leerlo en línea. Algunas instrucciones son muy grandes y el tiempo de carga depende de la velocidad de tu conexión a Internet.
Resumen
LANGUAGES INSTRUCCIONES DE USO Y MANUAL DEL USUARIO LEA CUIDADOSAMENTE L AS INSTRUCCIONES: Lea y siga todas lasinstrucciones.Conserveestasinstruccionesenunlugarseguroparafuturareferencia.Nopermitaquenadiequenohayaleído estas instrucciones arme, encienda, ajuste o use el calentado...
S-2 EnercoGroup,Inc.|Calentadoresinfrarrojosdealtaintensidad Instruccionesdeusoymanualdelusuario CONTENIDOS Informacióngeneral .................................................................. S3 Distancias ................................................................................
S-3 EnercoGroup,Inc.|Calentadoresinfrarrojosdealtaintensidad Instruccionesdeusoymanualdelusuario 1. INFORMACIÓN GENERAL a. Elcalentadorvienecompletamentearmadoyselopruebaenlafábricaparaverificarqueelgasylaentrada indicados en la placa sean correctos. b. Antesdeseg...
Otros modelos de calentadores Mr. Heater
-
 Mr. Heater 2 x MH-F215100
-
 Mr. Heater 2 x MH-F270500
-
 Mr. Heater 3 x MH-F215100
-
 Mr. Heater 3 x MH-F232000
-
 Mr. Heater 6 x MH-F215100
-
 Mr. Heater F209150
-
 Mr. Heater F209250
-
 Mr. Heater F209350
-
 Mr. Heater F232020
-
 Mr. Heater F232035