Onkyo HT-S7705B - Manual de uso - Página 4


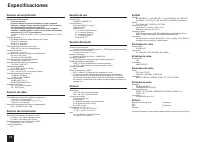

Índice:
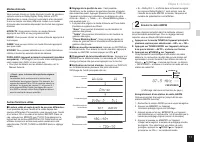
- Página 34 – Conexiones; Conexión de la TV y de los reproductores; Importante; Conexión de cable HDMI
- Página 36 – Conexión de altavoces; Instrucciones sobre cómo conectar altavoces
- Página 37 – Nota; Conexión de auriculares
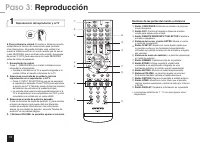
- Página 41 – Reproducción; Reproducción del reproductor y la TV
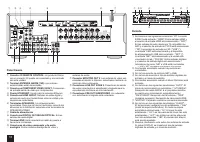
- Página 47 – Panel trasero; Pantalla
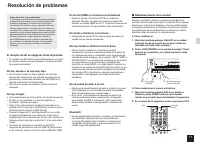
- Página 50 – DESCARGO DE RESPONSABILIDAD
- Página 51 – Declaración de Conformidad; The Americas
7
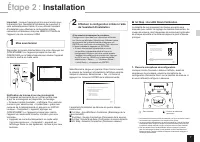
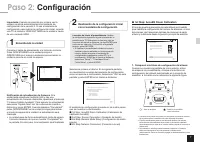
Step 2:
Setting Up
Important
: When the unit is turned on for the first time, the
setup wizard of the section 2 will automatically be launched.
If you use the setup wizard to make the initial setup,
connect a TV to the HDMI OUT MAIN jack of the unit via
HDMI connection.
1
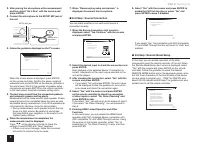
Turning the power on
Connect the power cord to the outlet. Press
z
ON/STANDBY on the main unit or
z
RECEIVER on the
remote controller to turn the unit on or to standby mode.
Initial Setup
Language Select
English
Deutsch
Français
Español
Italiano
Nederlands
Svenska
HOME Exit
Firmware update notification
: If the unit is connected
via LAN and there is firmware update available, the
"Firmware Update Available" message will appear. To
execute updating, select "Update Now" with the cursors
of the remote controller and press ENTER. When
"Completed!" appears, press
z
ON/STANDBY on the main
unit to turn the unit into standby mode. Then updating will
be completed.
r
The unit automatically turns itself into standby mode
|OKPWVGUCHVGT%QORNGVGFCRRGCTUQPVJGFKURNC[+P
this case also, updating will be completed.
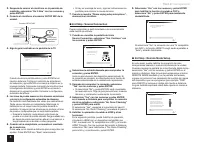
2
Making the Initial Setup with the Setup
Wizard
Read before starting the procedure
:
Set up by
answering the guidance displayed on the TV screen.
Select the item with the cursors of the remote
controller and press ENTER to confirm your selection.
To return to the previous screen, press RETURN.
r
If you terminate the procedure on the way or
change the setting made in the initial setup and
want to call up the setup wizard again, press RCV
and then HOME on the remote controller, select
"Setup" - "7.Hardware Setup" - "Initial Setup", and
press ENTER.
Select the language first. In the next screen, the summary
of the setup wizard as below will be displayed. Select "Yes"
in this screen and press ENTER on the remote controller.
Welcome to initial setup. Have you connected all the speakers and devices?
Before starting, please connect speakers and sources.
Now, would you like to start initial setup?
1st Step : AccuEQ Room Calibration
2nd Step : Source Connection
3rd Step : Remote Mode Setup
4th Step : Network Connection
Yes
No
Initial Setup
E x i t
HOME
The setup wizard proceeds in the four steps as below.
1st Step : AccuEQ Room Calibration
2nd Step : Source Connection
3rd Step : Remote Mode Setup
4th Step : Network Connection
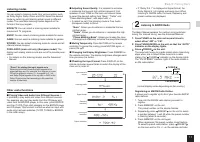
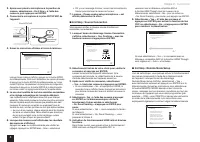
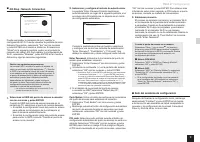
1st Step : AccuEQ Room Calibration
The test tone coming from each speaker will be measured
to enable setting of the number of speakers, volume level,
each speaker's optimum crossover frequencies, and
distance from the primary listening position.
Initial Setup
AccuEQ Room Calibration
This step you can automatically calibrate
your room to get correct surround sound.
Would you like to cailbrate your room now
or later?
Do it Now
Do it Later
HOME Exit
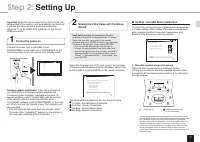
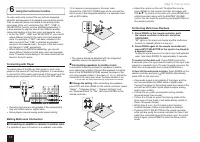
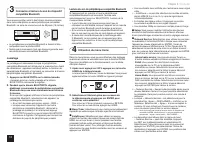
1.
Place the speaker setup microphone.
When the start screen above is displayed, before
starting the procedure, place the supplied speaker setup
microphone at the measurement position
by referring to
the figure below.
TV
:
:
Listening area
Measurement position
with microphone
¼
Correct measurement will not be possible if the microphone is held
by hand. Measurement is not possible if headphones are being used.
¼
The subwoofer sound may not be detected since it is extremely
low frequencies. Set the subwoofer volume to around the half of its
maximum volume and make its frequency to the maximum level.
¼
A loud test tone will be heard during measurement. Measurement
may be interrupted if there is ambient noise or radio frequency
interference. Close the window and turn off the home appliance and
fluorescent light.
"Cargando la instrucción" significa que debes esperar hasta que el archivo se cargue y puedas leerlo en línea. Algunas instrucciones son muy grandes y el tiempo de carga depende de la velocidad de tu conexión a Internet.
Resumen
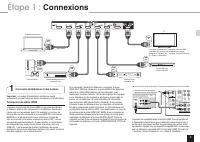
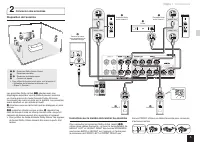
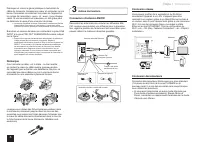
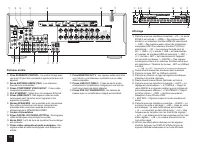
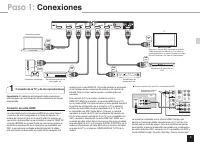
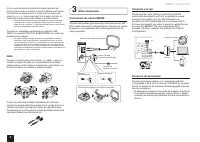
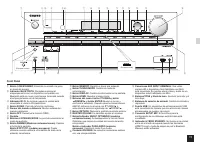
Paso 1: Conexiones 3 1 Conexión de la TV y de los reproductores Importante : El cable de alimentación debe conectarse sólo después de que todas las otras conexiones se hayan completado. Conexión de cable HDMI La unidad tiene muchos conectores HDMI en su panel trasero y cada uno de ellos corresponde ...
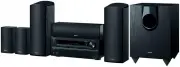
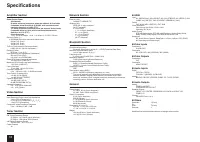
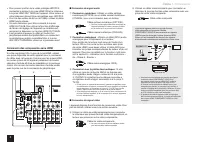
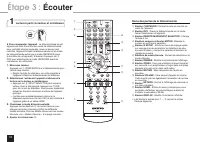
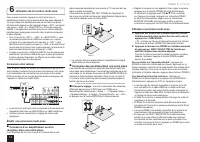
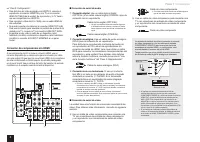
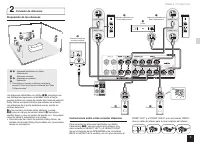
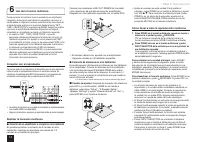
5 Paso 1: Conexiones 2 Conexión de altavoces Disposición de los altavoces # $ % & ' " " # Altavoces habilitados con Dolby (Delanteros) $ Altavoces centrales % & Altavoces envolventes ' Subwoofer r Para utilizar la función multizona, consulte la sección 6 “Uso de la función multizona”...
6 Paso 1: Conexiones Corte y quita la cubierta de plástico del extremo del cable del altavoz, gire el núcleo y conéctelo al terminal. Realice una conexión correcta entre las conexiones de la unidad y las conexiones del altavoz (+ a + y - a -) para cada canal. Si la conexión está mal, un sonido bajo ...