OPERATING INSTRUCTIONS; GARANTÍA LIMIT; PrimoWat - Primo 601258-C - Manual de uso - Página 2

DISPENSING COLD WATER
1.
Water will take approximately 1 hour after initial set up to become
completely chilled.
2.
Press drinking glass or container against the paddle beneath the blue
circle to dispense cold water. Release to stop dispensing.
DISPENSING HOT WATER
1.
Water will take approximately 12 minutes after initial set up to reach
its hottest temperature. Heating light will stop flashing once the water
has been fully heated.
2.
This water dispenser is equipped with a child-resistant feature in
order to prevent inadvertent dispensing. To enable dispensing of hot
water, press the red lock button, then press mug or container against
the paddle directly beneath the red lock button. Release to stop
dispensing.
CAUTION:
This unit dispenses water at temperatures that can cause severe burns. Avoid direct
contact with hot water. Keep children and pets away from the unit while dispensing. Never allow
children to dispense hot water without proper and direct supervision. Disable the heating feature
by switching the heating convenience switch on the back of the unit to the off position or unplug the
unit. Product is intended for water dispensing only. Do not use with other liquids.
PREPARING SINGLE-SERVE BEVERAGES
1.
Press gray button to eject the brewer cup drawer and remove it
completely from the dispenser.
2.
Insert K-Cup
®
pod of your choice (sold separately) and press it firmly
into place until the needle has fully punctured the bottom of the pod,
and the top of the pod is level with the top of the drawer.
CAUTION: Keep fingers away from the inside of the
drawer as the needle is very sharp.
3.
Slide drawer into the dispenser and press until it clicks.
Serving size buttons will light up green.
4.
Press the button for your desired serving size –
6 ounces, 8 ounces or 10 ounces.
5.
If you haven’t made a serving selection within 5 seconds, the serving
size buttons will shut off to prevent inadvertent dispensing of hot water.
To reactivate the serving selection buttons, simply remove and reinsert
the brewer cup drawer and make your selection.
6.
After brewing, eject the drawer by pushing the gray button directly
above the drawer opening, carefully remove and discard the empty
K-Cup
®
pod and return the drawer to the dispenser.
7.
Approximately three 6 ounce servings or two 8-10 ounce servings
may be brewed consecutively. The red heating light will flash when
water is heating.
K-Cup
®
is a registered trademark of Keurig Green Mountain, Inc. Use of the K-Cup
®
trademark does not imply any affiliation with or endorsement by Keurig Green
Mountain, Inc.
© 2017 Primo Water Corporation
LIMITED WARRANTY
Primo Water Corporation, (“Vendor”) warrants to the original purchaser of this dispenser, and to
no other person, that if this dispenser is assembled and operated in accordance with the printed
instructions accompanying it, then for a period of one (1) year from the date of purchase, all parts
in such dispenser shall be free from defects in material and workmanship. Vendor may require
reasonable proof of your date of purchase from an authorized retailer or distributor. Therefore,
you should retain your sales slip or invoice. The Limited Warranty shall be limited to repair or
replacement of parts which prove defective under normal use and service and which Vendor shall
determine in its reasonable discretion upon examination to be defective. Before returning any
parts, you should contact Vendor’s Customer Service Department using the contact information
listed below. If Vendor confirms, after examination, a defect covered by this Limited Warranty in any
returned part, and if Vendor approves claim, Vendor will replace such defective part without charge.
If you return defective parts, transportation charges must be prepaid by you. Vendor will return
replacement parts to original purchaser, freight or postage prepaid. For units purchased outside
of the continental US (limited to Hawaii, Alaska, and Puerto Rico), dispensers determined to be
defective by the Vendor should be returned or exchanged at the original point of purchase within the
warranty period.
The Limited Warranty does not cover any failures or operating difficulties due to accident, abuse,
misuse, alteration, misapplication, improper installation or improper maintenance or service by
you or any third party, or failure to perform normal and routine maintenance on the dispenser, as
set out in the User’s Manual. In addition, the Limited Warranty does not cover damage to the finish
after purchase, including without limitation scratches, dents, discoloration or rust.
The Limited Warranty is in lieu of all other express warranties. Vendor disclaims all warranties
for products that are purchased from sellers other than authorized retailers or distributors.
AFTER THE PERIOD OF THE ONE (1) YEAR EXPRESS WARRANTY, VENDOR DISCLAIMS ANY AND
ALL IMPLIED WARRANTIES, INCLUDING WITHOUT LIMITATION THE IMPLIED WARRANTIES OF
MERCHANTABILITY AND FITNESS FOR A PARTICULAR PURPOSE. FURTHER, VENDOR SHALL
HAVE NO LIABILITY WHATSOEVER TO PURCHASER OR ANY THIRD PARTY FOR ANY SPECIAL,
INDIRECT, PUNITIVE, INCIDENTAL, OR CONSEQUENTIAL DAMAGES. Vendor assumes no
responsibility for any defects caused by third parties. This Limited Warranty gives the purchaser
specific legal rights; a purchaser may have other rights depending upon where he or she lives.
Some jurisdictions do not allow exclusions or limitation of special, incidental or consequential
damages, or limitations on how long a warranty lasts, so the above exclusions and limitations may
not apply to you.
OPERATING INSTRUCTIONS
USING THE REUSABLE COFFEE FILTER
1.
Twist the coffee filter lid counter-clockwise to remove.
2.
Add your favorite coffee grounds (sold separately) up to the fill line
above the filter screen.
3.
Replace the coffee filter lid and twist clockwise to tighten.
4.
Align the indentation on the bottom of the reusable coffee filter with
the needle inside the brewer cup drawer.
5.
Slide the brewer cup drawer into the dispenser and press
until it clicks.
NOTE: Fine grounds, tea leaves, cocoa and other powdered beverages are not
recommended as they may clog the filter screen.
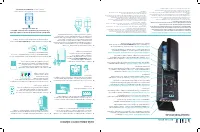
REPLACING THE BOTTLE
When your bottle is empty, the empty bottle light will flash. To prevent
freeze-up or over-heating, the dispenser will not heat or cool water when
the bottle light is flashing. Replace the bottle as soon as possible to
re-enable cooling and heating.
1.
Open dispenser cabinet door and slide empty
bottle out of cabinet.
2.
Remove probe assembly from the empty bottle
and place it on the probe hanger.
3.
Set empty bottle aside.
4.
Remove the entire plastic cap from the new bottle.
5.
Place probe into the new bottle and slide the collar down until it
clicks into place. Press on the top of the probe until the tube touches
the bottom of the bottle. For 3-gallon bottles, squeeze the tabs on the
top of the probe assembly to separate the probe cap from the collar
and press the collar securely over the bottle opening.
6.
Slide the bottle into the cabinet and close the door.
CLEANING & MAINTENANCE
For best taste, performance and hygiene, clean your cabinet, controls,
bottle probe and spout each time you replace your water bottle. Use a
clean, soft cloth, and food-grade sanitizer or bleach.
Empty and clean drip tray as needed. Remove and clean brewer cup
drawer regularly. (Keep fingers clear of needle inside drawer.) Drip tray
and brewer cup drawer are dishwasher safe.
Clean the cold reservoir at least once every 3 months.
Visit PrimoWater.com for detailed cleaning instructions.
For warranty information, additional assistance, or instructional videos for maintaining or operating your dispenser, visit
our customer support page at PrimoWater.com or call us at 1-866-429-7566. Our US-based customer service team would
be happy to help!
Primo Water Corporation, 101 N. Cherry St. Suite 501, Winston-Salem, NC 27101
PARA DISPENSAR A
GUA FRÍA
1.
El agua demorará apr
oximadament
e 1 hora después de la ins
talación inicial
para que es
té compl
etament
e fría.
2.
Presione un v
aso o cont
enedor contr
a la palet
a debajo del círcul
o azul para
dispensar agua fría. Deje de presionar par
a dejar de dispensar .
PARA DISPENSAR A
GUA CALIENTE
1.
El agua demorará apr
oximadament
e 12 minutos después de la ins
talación
inicial para al
canzar la t
emperatur
a más calient
e. La luz indicador
a de
cal
entamient
o dejará de parpadear cuando el agua esté c
aliente.
2.
Este dispensador de agua es
tá equipado con un dispositiv
o de prot
ección
para niños c
on el fin de evit
ar que dispense agua involunt
ariamente. P
ara
dispensar agua calient
e, presione el botón de segur
o rojo, luego pr
esione la
taza o c
ontendor c
ontra la pal
eta dir
ectament
e debajo del botón de seguro
rojo. Deje de pr
esionar para dejar de dispensar
.
PRECAUCIÓN:
Esta unidad dispensa agua a t
emperatur
as que pueden causar quemadur
as grav
es.
Evite el c
ontact
o direct
o con el agua c
aliente. Mant
enga a los niños y masc
otas al
ejados de la
unidad mientras es
té dispensando. Nunca permit
a que los niños dispensen agua c
aliente sin la
adecuada y direct
a supervisión. Desactive la función de c
alent
amiento de agua c
oloc
ando en la
posición OFF (desactivado) el c
onvenient
e interrupt
or de de cal
entamient
o situado en la parte
traser
a de la unidad, o desenchufe la unidad. Es
te pr
oducto es
tá diseñado para dispensar agua
solamente. No l
o use con otr
os líquidos.
PARA PREP
ARAR BEBIDAS INDIVIDUALES
1.
Presione el botón gris par
a expulsar el r
eceptácul
o de vasit
os filtrant
es y
retír
elo c
omplet
amente del dispensador
.
2.
Inserte la unidad K-Cup
®
de su elec
ción (vendidas por separ
ado) y
presiónela firmement
e en su lugar hasta que la aguja hay
a perfor
ado
compl
etament
e la base de la unidad y la parte superior es
té
nivelada c
on la parte superior del r
eceptácul
o.
PRECAUCIÓN: Mant
enga los dedos l
ejos del interior
del rec
eptáculo y
a que la aguja es muy filosa.
3.
Deslice el r
eceptácul
o dentro del dispensador y pr
esione hasta escuchar
clic. Los botones de medida se enc
enderán de col
or ver
de.
4.
Presione el botón de medida deseada, 6 onzas, 8 onzas o 10 onzas.
5.
Si no hace una sel
ección en 5 segundos, l
os botones de medida se
apagarán para e
vitar que se dispense agua c
aliente inv
oluntariament
e.
Par
a reactiv
ar los bot
ones de selec
ción de medida, simplement
e retir
e y
vuelva a insert
ar el rec
eptáculo del v
asito filtr
ante y haga la sel
ección.
6.
Después del filtrado, e
xpulse el rec
eptáculo pr
esionando el botón
gris situado direct
amente arriba de la abertur
a del rec
eptáculo,
cuidadosamente r
etire y deseche la unidad K-Cup
®
y col
oque el rec
eptáculo
nuevament
e en el dispensador .
7.
Aproximadament
e tres t
azas de 6 onzas o dos tazas de 8 a 10 onzas pueden
filtrar
se consecutiv
amente. La luz r
oja de cal
entamient
o parpadeará
cuando el agua está c
alentándose.
K-Cup
®
es una marca c
omercial r
egistr
ada de Keurig Green Mount
ain, Inc. El uso de
la marca c
omercial K-Cup
®
no implica afiliación alguna o r
espaldo de Keurig Green.
© 2017 Primo Wat
er Corporation
GARANTÍA LIMIT
ADA
Primo W at
er Corporation (“Pr
oveedor”) gar
antiza al compr
ador original de este dispensador, y a ninguna
otra per
sona, que si este dispensador es ins
talado y oper
ado tal c
omo lo indic
an las instruc
ciones
impresas que l
o acompañan, t
odas las partes que f
orman parte de dicho dispensador es
tarán libr
es de
defect
os tant
o de material
es como de f
abricación, por un período de un (1) año a partir de la f
echa de
compr
a. El prov
eedor puede solicitar pruebas r
azonables de su f
echa de compr
a a un vendedor minoris
ta
o distribuidor aut
orizado. Por l
o tant
o, debe conserv
ar su compr
obante de c
ompra o f
actura. La Gar
antía
limitada se limit
ará a la repar
ación o reemplazo de las part
es, que se demuestr
e que son defectuosas
durant
e el uso y servicio normal, lo cual será det
erminado por el Prov
eedor a su razonabl
e discreción
luego de haberlas examinado y c
onfirmado que son defectuosas.
Antes de de
vol
ver una part
e, debe comunic
arse c
on el Departament
o de atención al client
e del Prov
eedor
a trav
és de la información de c
ontact
o mencionada más abajo. Si el Prov
eedor confirma, luego de una
verific
ación, un defect
o cubierto por es
ta Gar
antía limitada en alguna part
e devuelt
a, y dicho Prov
eedor
acept
a el reclamo, el Pr
oveedor r
eemplazará la parte def
ectuosa sin car
go. Si usted de
vuel ve una part
e
defectuosa, l
os cos
tos de tr
ansporte deben ser pagados pr
eviament
e por usted. El Pr
oveedor de
vol
verá
las partes de r
epuesto al c
omprador original c
on los c
ostos de flet
e y envío pagados previament
e. Par
a
las unidades compr
adas fuera del t
erritorio c
ontinental de l
os EE. UU. (limitado a Hawái, Alaska y
Puerto Ric
o), los dispensador
es que el Prov
eedor determine que es
tán defectuosos deben de
vol
ver
se o
cambiar
se en el punto de c
ompra original dentr
o del período de garantía.
La Garantía limit
ada no cubre ninguna f
alla ni dificultad en el funcionamient
o a causa de ac
cidente,
abuso, mal uso, alter
ación, aplicación inapr
opiada, instalación inc
orrect
a o mantenimient
o o servicio
inadecuado por parte de us
ted o de cualquier otr
a persona, o si no se r
ealiza el mantenimient
o normal de
rutina del dispensador según lo indic
a el Manual para el usuario. Asimismo, la Gar
antía limitada no cubr
e
daños en el acabado, entr
e otros r
ayones, muesc
as, pérdida de c
olor u o
xidación luego de la compr
a.
La Garantía limit
ada sustituy
e cualquier otra gar
antía expr
esa. El Prov
eedor no rec
onocerá ninguna
garantía de pr
oductos c
omprados a Pr
oveedor
es que no sean vendedor
es minoristas o dis
tribuidores
autorizados. FINALIZADO EL PERÍODO DE LA G
ARANTÍA EXPRESA DE UN (1) AÑO, EL PROVEEDOR NO
RECONOCERÁ NINGUNA GARANTÍA IMPLÍCIT
A, INCLUID
A ENTRE OTRAS LAS G
ARANTÍAS IMPLÍCIT AS
DE COMERCIALIDAD E IDONEID
AD CON UN FIN EN P ARTICULAR. ASIMISMO, EL PRO
VEEDOR QUEDA
EXENTO DE T
ODA RESPONSABILID
AD EN RELACIÓN CON EL COMPRADOR O CUAL
QUIER OTRA
PERSONA ANTE CUAL QUIER D
AÑO ESPECIAL, INDIRECTO, PUNITIV
O, INCIDENT AL O CONSECUENTE.
El Prov
eedor no asume ninguna responsabilidad por l
os defect
os causados por t
ercer
os. La Garantía
Limitada e
xtiende al compr
ador derechos l
egales específic
os; un compr
ador puede tener otr
os derechos
según dónde viva. Algunas jurisdic
ciones no permiten la e
xclusión o limit
ación de los daños especial
es,
incidental
es o consecuent
es, o las limitaciones en el tiempo de vigencia de una gar
antía, de modo que las
exclusiones y limit
aciones expr
esadas arriba pueden no ser aplicabl
es en su caso.
IN
STR
UC
CIONES
DE OPE
RA
CIÓN
USO DEL FIL TRO REUTILIZABLE DE C
AFÉ
1.
Gire la t
apa del filtro de c
afé en sentido contr
ario a las manecillas del
rel
oj y retír
ela.
2.
Añada su café molido f
avorit
o (vendido por separ
ado) hasta la línea de
llenado encima de la malla filtr
ante.
3.
Vuel
va a c
oloc
ar la tapa del filtr
o de café y gir
e en sentido de las
manecillas del rel
oj para apr
etar
.
4.
Alinee la muesca situada en la base del filtr
o de café r
eutilizable c
on la
aguja dentro del r
eceptácul
o del vasit
o filtrant
e.
5.
Deslice el r
eceptácul
o del vasit
o filtrant
e y presione has
ta que haga clic.
NOTA:
No se rec
omienda utilizar café muy molido, hojas de té, c
ocoa ni otr
as
bebidas en polvo y
a que pueden obstruir la r
ejilla filtrant
e.
PARA REEMPLAZAR EL BO
TELLÓN
Cuando el botellón es
té vacío, la luz de bot
ellón vacío empezará a parpadear
.
Par
a prev
enir el congelamient
o o sobrec
alent
amiento, el dispensador no
cal
entará ni enfriará agua cuando la luz del bot
ellón está parpadeando.
Reemplace el bot
ellón tan pr
onto c
omo sea posible par
a permitir nuevament
e
el enfriamiento y c
alent
amiento.
1.
Abra la puert
a del dispensador y deslice el bot
ellón vacío fuer
a del
gabinete.
2.
Retire el tubo surtidor del bot
ellón vacío y c
olóquelo en su c
olgador .
3.
Ponga a un lado el bot
ellón vacío.
4.
Retire t
oda la tapa de plás
tico del nue
vo bot
ellón.
5.
Coloque el tubo surtidor en el nue
vo bot
ellón y deslice el c
ollarín hacia
abajo hasta que enc
aje en su lugar y escuche clic. Presione la part
e
superior del tubo surtidor hasta que el tubo t
oque la base del botellón.
Par
a botell
ones de 3 galones, apriet
e las lengüet
as situadas en la parte
superior del ensamble del tubo surtidor par
a separar del c
ollarín la tapa
del tubo y presione el c
ollarín con firmeza sobr
e la abertura del bot
ellón.
6.
Deslice el bot
ellón dentro del gabinet
e y cierre la puert
a.
LIMPIEZA Y MANTENIMIENTO
Par
a logr
ar el mejor sabor, rendimient
o e higiene, limpie el gabinete, l
os
contr
oles, el tubo surtidor del bot
ellón y la boquilla cada v
ez que reemplac
e
el botellón de agua. Use un paño limpio y un sanitizant
e para uso aliment
ario
o lejía.
Vacíe y limpie la bandeja de got
eo cuando sea necesario. Retir
e y limpie el
rec
eptáculo del v
asito filtr
ante c
on regularidad. (Mant
enga los dedos l
ejos de
la aguja filosa dentr
o del rec
eptáculo). La bandeja de got
eo y el rec
eptáculo
del vasit
o filtrant
e pueden lavar
se en la máquina lavaplat
os.
Limpie el tanque de agua fría por l
o menos una vez c
ada 3 meses.
Visite
PrimoWat
er .c
om par
a obtener ins
trucciones det
alladas de limpieza.
Par
a obtener inf
ormación de la garantía, asis
tencia adicional o videos de ins
trucciones par
a mantener u oper
ar su dispensador, visite
nuestr
a página de servicio al cliente en
PrimoWat
er .c
om o llámenos al 1-866-429-7566. Nues
tro equipo de at
ención al cliente ubic
ado
en EE. UU. gustosament
e le brindará asis
tencia.
Primo Wat
er Corporation, 101 N. Cherry St. Suit
e 501, Winston-Sal
em, NC 27101
"Cargando la instrucción" significa que debes esperar hasta que el archivo se cargue y puedas leerlo en línea. Algunas instrucciones son muy grandes y el tiempo de carga depende de la velocidad de tu conexión a Internet.
Otros modelos de dispensadores de agua Primo
-
 Primo 601244
-
 Primo 601363
-
 Primo 601243-C
-
 Primo 601324-C