Sangean SG-104 - Manual de uso
Reloj de mesa Sangean SG-104 - Manual de uso, léela gratuitamente en línea en formato PDF. Esperamos que esto te ayude a resolver cualquier duda que puedas tener. Si tienes más preguntas, contáctanos a través del formulario de contacto.
GB Operating instruction
Important safety instructions
1.
Read these instructions.
2.
Keep these instructions.
3.
Heed all warnings.
4.
Follow all instructions.
5.
Do not use this apparatus near water.
6.
Clean only with dry cloth.
7.
Do not block any ventilation openings. Install in accordance with the
manufacturer’s instructions.
8.
Do not install near any heat sources such as radiators, heat registers,
stoves, or other apparatus (including amplifiers) that produce heat.
9.
Do not defeat the safety purpose of the polarized or grounding-type plug.
A polarized plug has two blades with one wider than the other. A grounding
type plug has two blades and a third grounding prong. The wide blade or the
third prong are provided for your safety. If the provided plug does not fit into
your outlet. Consult an electrician for replacement of the obsolete outlet.
10.
Protect the power cord from being walked on or pinched particularly at plugs,
convenience receptacles, and the point where they exit from the apparatus.
11.
Only use attachments / accessories specified by the manufacturer.
12.
Use only with the cart, stand, tripod, bracket, or table specified by the
manufacturer, or sold with the apparatus. When a cart is used, use
caution when moving the cart / apparatus combination to avoid injury
from tip-over.
13.
Unplug this apparatus during lightning storms or when unused for long
periods of time.
14.
Refer all servicing to qualified service personnel. Servicing is required when
the apparatus has been damaged in any way, such as power-supply cord
or plug is damaged. liquid has been spilled or objects have fallen into the
apparatus, the apparatus has been exposed to rain or moisture, does not
operate normally, or has been dropped.
15.
To Reduce the Risk of Fire or Electric Shock, Do not Expose This Appliance
To Rain or Moisture.
16.
The Shock Hazard Marking and Associated Graphical Symbol is provided on
the rear of unit.
17.
Apparatus shall not be exposed to dripping or splashing and no objects filled
with liquids, shall be placed on the apparatus.
18.
Excessive sound pressure on ear- and headphones could impair the
hearing ability. Higher setting that idle on the equalizer leads to higher signal
voltages on the output for ear and headphones.
3A81X60S70020
SG-104
AM / FM Portable Digital Radio
with Protective Bumper
J
I
K
D E
A
1
5
3
2
6
8
9
10
7
B
F
H
G
C
4
11
12
13
14
15
GB
19.
The power plug should be close to the radio, and easy to be approached that
during the emergency, to disconnect the power from the radio, just unplug the
power plug from the AC power slot.
20.
Where the MAINS plug or an appliance coupler is used as the disconnect device,
the disconnected device shall remain readily operable.
IMPORTANT NOTE
To comply with the FCC RF exposure compliance requirements, no change to
the antenna or the device is permitted. Any change to the antenna or the device
could result in the device exceeding the RF exposure requirements and void user’s
authority to operate the device.
For United States:
Cautions to the user
The changes or modifications not expressly approved by the party responsible for
compliance could void the users authority to operate the equipment.
The equipment has been tested and found to comply with the limits for a Class B
Digital Device, pursuant to part 15 of the FCC Rules. These limits are designed
to provide reasonable protection against harmful interference in a residential
installation. This equipment generates, uses and can radiate radio frequency energy
and, if not installed and used in accordance with the instruction, may cause harmful
interference to radio communication. However, there is no guaranty that interference
will not occur in a particular installation. If this equipment does cause harmful
interference to radio or television reception, which can be determined by turning the
equipment off and on, the user is encouraged to try to correct the interference by one
or more of the following measures:
–
Reorient or relocate the receiving antenna.
–
Increase the separation between the equipment and receiver.
–
Connect the equipment into an outlet on a circuit different from that to which the
receiver is connected.
–
Consult the dealer or an experienced radio / TV technician for help.
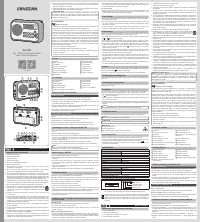
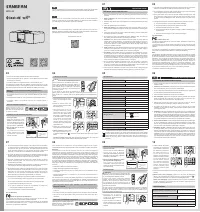
Control
1
Speaker
9
Radio alarm button
2
Band / step button
10
Buzzer alarm button
3
LCD display
11
Key lock switch
4
Volume up / down button
12
Telescopic aerial
5
Power / Sleep button
13
Headphone socket
6
Tuning up / down button
14
DC jack socket
7
Display / Clock set button
15
Battery compartment
8
Preset button
Icon display
A
FM / AM indicator
G
Key lock symbol
B
PM indicator
H
Battery indicator
C
Stereo indicator
I
Volume indicator
D
Buzzer alarm indicator
J
Preset indicator
E
Radio alarm indicator
K
Frequency / Clock display
F
Sleep timer indicator / Snooze indicator
Using the radio for the first time
Battery operation
1.
Remove the battery cover on the rear of the unit by pressing the catch.
2.
Insert four UM-3 (AA size) batteries into the spaces in the compartment.
3.
Take care to ensure all batteries are inserted with correct polarity as shown on the
rear cabinet. Replace the battery cover.
4.
Reduced power, distortion, “stuttering sound” and the battery icon flashing on the
display are all signs that the batteries need replacing.
5.
If the radio is not to be used for any extended period of time, it is recommended that
the batteries are removed from the radio.
Using the AC power adaptor
The AC power adaptor required for this unit should be 6 volts DC at 0.4 A center pin
positive.
Insert the adaptor plug into the DC socket on the left side of the radio.
Plug the adaptor into a standard mains socket outlet.
Whenever the adaptor is used, the batteries are automatically disconnected.
The AC adaptor should be disconnected from the main supply when not in use.
Operating your radio - Search tuning AM / FM
1.
Fully extend the antenna above the radio. Press the Power button to switch on your
radio.
2.
Press the Band button to select the required band.
3.
Press and hold the Tuning up / down button to start the search tuning. Your radio
will scan in an upwards direction (low frequency to high frequency) or downwards
direction (high frequency to low frequency) and stop automatically when it finds a
station of sufficient strength.
4.
To find other stations, press and release the Tuning Up / Down buttons.
5.
Adjust the volume by pressing the Volume up / down button to the required setting.
●
FM stereo is only available when using headphones.
●
To see time or frequency on the screen, press the Display button.
NOTE
Manual tuning - AM / FM
1.
Press the Power button to switch on your radio.
2.
Press the Band button to select the required band. Fully extend the antenna for best
reception.
3.
Press and release the Tuning up / down button to tune to a station. The FM
frequency will change in steps of 50 / 100kHz and AM frequency will change in steps
of 9 / 10kHz.
4.
When the waveband end is reached the radio will recommence tuning from the
opposite waveband end.
5.
Set the Volume using the Volume Up / Down buttons to the desired settings.
Presetting stations
You may store your preferred AM / FM radio stations to the preset stations (1 to 5). The
procedure for setting preset Stations is described below.
Note that the radios for AM and FM are saved together in the preset stations so there
are 10 of them. Your preset stations will be preserved for 30 minutes when there is no
power supply from either the battery or the AC adapter.
1.
Press the Power button to switch on your radio.
2.
Tune to the required station as previously described.
3.
Press and hold the required Preset button (1-5) until you hear a beep sound and the
display shows ‘M1’ for example next to the frequency. The station will be stored using the
preset number. Repeat this procedure for the remaining presets as you wish.
4.
Preset stations which have already been stored may be overwritten by following the
above procedure if required.
Software version / Setting up the tuning step increment / 24
/ 12 time format
Software version
The software display cannot be altered and is just for your reference.
1.
Make sure your radio is in power off mode.
2.
Press and hold the Band / step button until the software version is shown on the
display (e.g. P0 X).
Setting up the tuning step increment
3.
Continuing pressing and holding the Band / step button until you hear a beep sound.
Now the radio enters FM / AM step setting. The screen will show FM tuning step (i.e.
50 or 100). Press the Tuning up / down button to choose between 50kHz or 100kHz
and then press the Band / step button to confirm the selection.
4.
After the selection of FM tuning step, the display will show AM tuning step (i.e. 9 or
10). Press the Tuning up / down to choose between 9kHz or 10kHz and then press
the Band / step button to confirm your selection.
24 / 12 time format
5.
After the confirmation of AM tuning step, current 12 / 24 time format will flash on the
display. Press the Tuning up / down button to selection your requested option. Then
press the Band / step button to confirm your selection.
Clock setting
1.
Press and hold the clock set button until the radio beeps once and the hour digits of
time setting begins to flash.
2.
Press the Tuning Up / Down button to adjust the hour setting as required. Then press
the clock set button to confirm the hour setting. Now the minute digit of the setting
will flash on the display.
3.
Press the Tuning up / down button to adjust the minute setting as required. Then
press the clock set button to confirm the setting. Your radio clock is now set.
Alarm setting
There are two different alarm modes in this unit. You can choose to wake up to the
radio or to a buzzer. You can set the alarm with the radio on or off.
1.
Press and hold the Alarm button until you hear a beep and see one of these symbol
or
flashing on the display.
2.
Now both the hour digit and alarm symbol will flash. Press the Tuning up / down
button to set the required hour. Press the Alarm button again to confirm the setting.
3.
Now the minute digit will flash on the display. Press the Tuning up / down button
to adjust the required minute. Press the Alarm button again to confirm the minute
setting. If you are setting the radio alarm ( ), please go to step 5. Otherwise,
please follow the next step.
4.
Press the Tuning up / down button to adjust the volume. Then press the Alarm button
to confirm the setting. Now the alarm setting is completed. Once the alarm is set, it
will automatically go off the next day at the same time.
5.
If the radio alarm is selected, you need to choose the station to wake up to. Press
the Band button and then the Tuning up / down button to tune the radio to your
favorite station. Or you can choose from the preset stations by pressing the Tuning
up / down button and then Preset 1-5 button. Press the Alarm button to confirm the
setting.
6.
Press the Tuning up / down button to adjust the volume. Then press the Alarm button
to confirm the setting. Now the radio alarm setting is completed.
Snooze
When the alarm sounds, press any button other than the Standby button will silence
the alarm for 5 minutes. will appear on the display.
To cancel the snooze timer while the alarm is suspended, press the Power button.
Turning off the sounding alarm
Press the Power button to turn off the sounding alarm, otherwise, the alarm will sound
for an hour.
Cancelling the alarm setting
Press and hold the Alarm button until you hear a beep and the alarm symbol will
disappear on the display.
Sleep timer
Your radio can be set to turn off automatically after a preset time has elapsed. The
Sleep Timer setting can be adjusted between 15, 30, 45, 60, 90 and 120 minutes.
1.
Press and hold the Power / Sleep timer button until you hear a beep and the symbol
of
shows on the display.
2.
Holding the Power / Sleep timer button down will cycle through the times of 120, 90,
60, 45, 30 and 15 minutes.
3.
Release the button when the desired sleep timer option appears on the display. Now
the symbol will appear on the display. The radio will shut off after a preset time has
elapsed.
NOTE
To deactivate the sleep timer, simply press and release the Power button.
....................
Headphone socket
A 3.5mm stereo headphone socket is provided on the left hand side of your radio for
use with headphones. Inserting a plug automatically mutes the internal speaker.
NOTE
FM stereo is only available when using headphones.
....................................................
IMPORTANT
Excessive sound pressure from earphones and headphones can cause hearing loss.
.
●
High sound pressure!
●
Hearing damage risk.
●
Do not listen at high volume levels for long periods.
IMPORTANT
Key lock function
The key lock function is used to prevent unintentional operation of the radio.
1.
Key lock switch is located on the rear of the radio. When the key lock switch is set to
LOCK, every button will be disabled. Display will show the lock symbol
.
2.
To disable the key lock function switch the key lock button to off position. The key
lock function will be disabled.
Specifications
Power Requirements
Mains
DC in 6V / 0.4A
Battery
4x1.5 V Size “AA” / UM-3 / LR6
Frequency Range
FM
87.5-108 MHz
AM (9K)
522-1710 kHz
AM (10K)
520-1710 kHz
Circuit Features
Loudspeaker
2.25” 8ohm full range
Output Power
1Watt (max)
Headphone socket
3.5mm dia.
Aerial System
FM Telescopic aerial
Operating temperature range
0°C to +35°C
※
The barcode label on the product is defined as below:
Serial number
Production month
Production year
Product code
The company reserves the right to amend the specifications without notice.
If at any time in the future you should need to dispose of this product please
note that: Waste electrical products should not be disposed of with household
waste. Please recycle where facilities exist. Check with your Local Authority or
retailer for recycling advice. (Waste Electrical and Electronic Equipment
Directive).
F Mode d’emploi
Instructions importantes sur la sécurité
1.
Lisez ces instructions.
2.
Conservez ces instructions.
3.
Tenez compte de toutes les mises en garde.
4.
Suivez toutes les instructions.
5.
N’utilisez pas cet appareil à proximité de l’eau.
6.
Ne nettoyez qu’à l’aide d’un linge sec.
7.
N’obstruez aucune voie de ventilation. Installez conformément aux instructions
du fabricant.
8.
N’installez pas à proximité de sources de chaleur telles que radiateurs,
registre de chaleur, poêle ou autres appareils (y compris les amplificateurs) qui
produisent de la chaleur.
9.
Ne sous-estimez pas l’objectif de sécurité des prise polarisées ou de type terre.
Une prise polarisée a deux fiches dont l’une est plus large que l’autre. Une
prise de type terre a deux fiches plus une fiche supplémentaire de raccord à la
terre. La fiche large ou le raccord à la terre sont conçues pour votre sécurité.
Si la prise fournie ne convient pas à votre équipement, consultez un électricien
pour remplacer votre ancien équipement.
10.
Protégez le cordon d’alimentation contre les piétinements ou les pincements,
particulièrement au niveau des branchements, prises de courant, et du point
d’où il sort de l’appareil.
11.
N’utilisez que les extensions / accessoires spécifiés par le fabricant.
12.
N’utilisez qu’avec un chariot, support, trépied, crochet ou table spécifié
par le fabricant, ou vendu avec l’appareil. Lorsque vous utilisez un
chariot, soyez attentif lorsque vous déplacez la combinaison chariot /
appareil pour éviter les blessures dues au renversement.
13.
Débranchez cet appareil lors des orages ou lorsqu’il est inutilisé pendant une
longue période.
14.
Confiez toute réparation à du personnel de maintenance qualifié. La réparation
est nécessaire lorsque l’appareil a été endommagé de quelque sorte, par
exemple si le cordon d’alimentation ou la prise sont endommagés, si du liquide
a été répandu ou si des objets sont tombés dans l’appareil, si ce dernier a été
exposé aux moisissures ou à la pluie, s’il ne fonctionne pas normalement, ou
qu’il a chuté.
15.
Pour réduire le risque d'incendie ou de choc électrique, n'exposez pas cet
appareil à la pluie ou l'humidité.
16.
Le marquage de risque d’étouffement et les symboles graphiques associés
sont présents sur la face arrière de l’unité.
17.
L’appareil ne doit pas être exposé aux égouttements ou aux éclaboussures et
aucun objet rempli de liquide ne doit être placé dessus.
18.
Une pression excessive dans les oreilles et les écouteurs peuvent diminuer
l'audition. Les réglages hauts qui désactivent le fil des équaliseurs amènent à
des tensions de signal fortes sur la sortie pour les oreilles et les écouteurs.
19.
La prise d’alimentation doit être proche de la radio, et facilement accessible
afin de n’avoir qu’a débrancher la prise du secteur pour pouvoir déconnecter
l’appareil en cas d’urgence.
20.
Lorsque L'alimentation principale ou un appareil de raccordement sert de
sectionneur, le sectionneur doit toujours rester en état de marche.
REMARQUE IMPORTANTE
Pour être conforme aux exigences de conformité des radiofréquences de la FCC,
aucun changement sur l’antenne ou sur l’appareil n’est autorisé. Tout changement
sur l’antenne ou l’ appareil pourrait aboutir à un dépassement des conditions d’
exposition aux radiofréquences par l’appareil et annuler le droit de l’ utilisateur à
faire fonctionner l’appareil.
Pour les États-Unis:
Précautions pour l’utilisateur
Des changements ou des modifications sur ce produit non expressément
approuvés par la partie responsable de la conformité peut annuler le droit de
l’utilisateur d’utiliser cet équipement.
Cet équipement a été testé et approuvé conforme au limites des appareils
numériques de classe B, conformément à la partie 15 des règles de la FCC.
Ces limites ont pour objectif de fournir une protection raisonnable contre les
interférences nuisibles dans une installation résidentielle. Cet équipement
génère, utilise et rayonne de l’énergie de fréquence radio et peut nuire
aux communications radio s’il n’est pas installé et utilisé en accord avec
les instructions du mode d’emploi. Cependant, il n’est pas garanti que des
interférences surviennent dans une installation particulière. Si l’équipement
cause des interférences nuisibles à la réception radio ou télévision, qui
peuvent être localisées en allumant ou en éteignant l’équipement, l’utilisateur
est encouragé à corriger les interférences en employant une ou plusieurs des
mesures suivantes:
– Réorienter ou déplacer l’antenne de réception.
– Séparer davantage l’équipement et le récepteur.
– Connecter l’équipement à une prise de courant située sur un circuit différent
de celui du récepteur.
– Demandez assistance à un revendeur ou un technicien expérimenté dans le
domaine radio / TV.
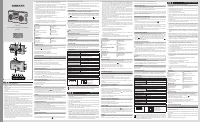
Touche de contrôle
1
Enceinte
9
Touche alarme radio
2
Touche Bande / incrément
10
Touche alarme sonnerie
3
Écran LCD
4
Touche Volume + / -
11
I n t e r r u p t e u r v e r r o u i l l a g e d e s
touches
5
Touche alimentation / veille
12
Antenne télescopique
6
Touche Réglage + / -
13
Prise écouteurs
7
Touche affichage / réglage de l’horloge
14
Fente prise CC
8
Touche de présélection
15
Compartiment des piles
Affichage d'icône
A
Indicateur AM / AM
G
Symbole verrouillage des touches
B
Indicateur PM
H
Indicateur batterie
C
Indicateur Stéréo
I
Indicateur volume
D
Indicateur alarme sonnerie
J
Indicateur présélection
E
Indicateur d’alarme radio
K
Fréquence / affichage de l'horloge
F
Indicateur minuteur de mise en veille /
report d’alarme
Utiliser la radio pour la première fois
Utilisation sur piles
1.
Enlevez le couvercle des piles à l’arrière de l’unité en appuyant sur la prise.
2.
Insérez quatre piles UM-3 (taille AA) dans les espaces du compartiment.
3.
Prenez soin de vous assurer que toutes les piles sont insérées avec la polarité
correcte, comme indiqué sur le boitier arrière. Replacez le couvercle de la
batterie.
4.
Puissance réduite, distorsion, « son bégayant » et l'icône de batterie clignotant
sur l'écran sont les signes que les piles doivent être remplacées.
5.
Si vous envisagez de ne pas utiliser la radio pendant une période prolongée, il
est conseille d’enlever toutes les piles de la radio.
Utilisation de l’adaptateur AC
L’adaptateur d’alimentation AC à utiliser avec cet appareil doit être un 6 volts DC à 0.4.
Broche centrale positive.
Insérez la prise de l’adaptateur dans la prise DC sur le coté droit de la radio.
Branchez l’adaptateur dans une prise secteur standard.
Dès lors que l’adaptateur est utilisé, les batteries sont automatiquement déconnectées.
L’adaptateur CA doit être déconnecté du secteur lorsqu’il est inutilisé.
Utilisation de la radio - recherche de station AM / FM
1.
Étendez complètement l'antenne au dessus de la radio. Appuyez sur la touche
Alimentation pour allumer la radio.
2.
Appuyez sur la touche Bande pour choisir la bande de votre choix.
3.
Tenez la touche Réglage + / - pour commencer la recherche de fréquence. Votre
radio effectuera une recherche vers le haut (fréquences basses vers fréquences
hautes) et s’arrêtera automatiquement lorsqu’une station de signal suffisant est
détectée.
4.
Pour trouver d’autres stations, maintenez la touche Réglage + / - appuyée.
5.
Réglez le volume en appuyant sur la touche Volume + / - sur le réglage de votre
choix.
F
"Cargando la instrucción" significa que debes esperar hasta que el archivo se cargue y puedas leerlo en línea. Algunas instrucciones son muy grandes y el tiempo de carga depende de la velocidad de tu conexión a Internet.
Otros modelos de relojes de mesa Sangean
-
 Sangean MMR-99
-
 Sangean PR-D5
-
 Sangean WFR-32