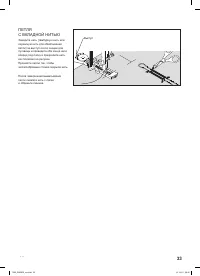
Singer Fashion Mate 7256 - Manual de uso - Página 23
Máquina de coser Singer Fashion Mate 7256 - Manual de uso, léela gratuitamente en línea en formato PDF. Esperamos que esto te ayude a resolver cualquier duda que puedas tener. Si tienes más preguntas, contáctanos a través del formulario de contacto.


42
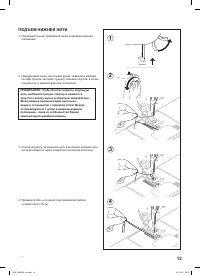
Under side
Côté de dessous
Reverso
Top side
Côté de dessus
Cara
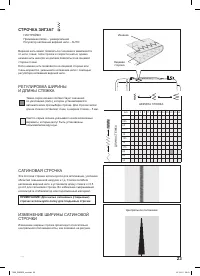
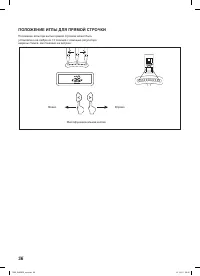
ZIGZAG STITCHING
The top thread may appear on the bottom depending on the
thread, fabric, type of stitch and sewing speed, but the bobbin
thread must never appear on the top of the fabric.
If bobbin thread is pulling to the top or you are experiencing
puckering, slightly reduce the tension with the Thread Tension
Control.
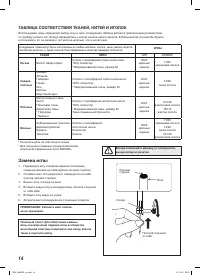
SETTINGS :Presser foot - General Purpose Foot
:Thread tension control - AUTO
D a r k g r e y b o x i n d i c a t e s t h e A u t o / d e f a u l t v a l u e s e t
automatically when the pattern is selected.
For the Zigzag Pattern the stitch length is 2 mm and the
stitch width is 5 mm.
The light grey boxes indicate all the possible personal
preference options available to set manualy.
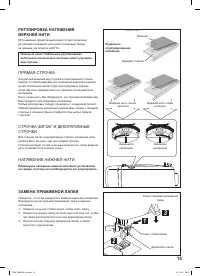
ADJUSTING STITCH WIDTH AND LENGTH
PLACEMENT OF PATTERNS
The satin stitch increases from the center needle position;
m a k i n g i t p o s s i b l e t o c r e a t e c e n t e r t a p e r e d s t i t c h , a s
illustrated.
SATIN STITCH
This is a closely spaced stitch for appliqué, bar-tacking, etc.
Slightly loosen the top thread tension and manually adjust the
stitch length between 0.5 and 2.0 for satin stitching.
Use a backing of stabilizer or interfacing to avoid puckering.
NOTE: When sewing a dense (closely spaced) Satin
Stitch, the Satin Stitch Foot MUST be used.
Center position
Position centrale
Aguja posicionada en el centro
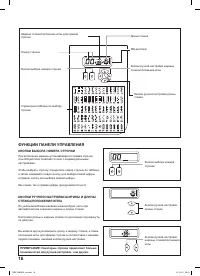
STITCH LENGTH
LONGUEUR DU POINT
LARGO PUNT
ADA
STITCH WIDTH
LARGEUR DU POINT
ANCHO PUNTADA
mm
0 0.5 1.0 1.5 2.0 2.5 3.0 3.5 4.0 4.5 5.0 5.5 6.0
0
0.25
0.5
0.75
1.0
1.25
1.5
1.75
2.0
2.5
3.0
СТРОЧКА
ЗИГЗАГ
НАСТРОЙКИ
:
Прижимная
лапка
–
универсальная
Регулятор
натяжения
верхней
нити
– AUTO
Верхняя
нить
может
появляться
с
изнанки
в
зависимости
от
нити
,
ткани
,
типа
строчки
и
скорости
шитья
,
однако
нижняя
нить
никогда
не
должна
появляться
на
лицевой
стороне
ткани
.
Если
нижняя
нить
появляется
на
лицевой
стороне
или
ткань
морщится
,
уменьшите
натяжение
нити
с
помощью
регулятора
натяжения
верхней
нити
.
РЕГУЛИРОВКА
ШИРИНЫ
И
ДЛИНЫ
СТЕЖКА
Центральное
положение
ШИРИНА
СТЕЖКА
Изнанка
Лицевая
сторона
ДЛИНА
С
ТЕЖКА
Темно
-
серое
окошко
соответствует
значению
по
умолчанию
(Auto),
которое
устанавливается
автоматически
при
выборе
строчки
.
Для
строчки
зигзаг
длина
стежка
составляет
2
мм
,
а
ширина
стежка
– 5
мм
.
Светло
-
серые
окошки
указывают
на
все
возможные
варианты
,
которые
могут
быть
установлены
пользователем
вручную
.
САТИНОВАЯ
СТРОЧКА
Эта
плотная
строчка
используется
для
аппликации
,
усиления
областей
повышенной
нагрузки
и
т
.
д
.
Слегка
ослабьте
натяжение
верхней
нити
и
установите
длину
стежка
от
0.5
до
2.0
для
сатиновой
строчки
.
Во
избежание
сморщивания
используйте
стабилизатор
или
подкладочный
материал
.
ИЗМЕНЕНИЕ
ШИРИНЫ
САТИНОВОЙ
СТРОЧКИ
Изменение
ширины
строчки
происходит
относительно
центрального
положения
иглы
,
как
показано
на
рисунке
.
ПРИМЕЧАНИЕ
:
Для
шитья
сатиновых
(
гладьевых
)
строчек
используйте
лапку
для
гладьевых
строчек
.
23
7256_SINGER_rus.indd 23
7256_SINGER_rus.indd 23
21.12.10 09:31
21.12.10 09:31
"Cargando la instrucción" significa que debes esperar hasta que el archivo se cargue y puedas leerlo en línea. Algunas instrucciones son muy grandes y el tiempo de carga depende de la velocidad de tu conexión a Internet.
Otros modelos de máquinas de coser Singer
-
 Singer 4411CL
-
 Singer 4432CL
-
 Singer C5200