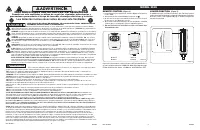
COLOQUE LA BASE EN EL PISO; PARTE INFERIOR DE LA BASE - Lasko 2535 - Manual de uso - Página 4

Índice:
- Página 2 – FUNCIÓN DE PERSIANA; CONTROL REMOTO; IMPORTANT SAFETY INFORMATION; Read all instructions before using this Fan.; CAUTION
- Página 3 – PLACE BASE FLAT ON FLOOR; BOTTOM OF BASE
- Página 4 – COLOQUE LA BASE EN EL PISO; PARTE INFERIOR DE LA BASE
- Página 5 – REMOTE CONTROL; LOUVER FUNCTION; INSTRUCCIONES IMPORTANTES DE SEGURIDAD; Lea todas las instrucciones antes de usar este Ventilador.; PRECAUTIÓN
OPERATION
This Fan may be operated by the Manual Controls located
on top of the unit (as shown in
Figure 5
) or by the Remote
Control (shown in
Figure 6)
.
1. Place the Fan on a firm and level surface.
2. Plug the cord set into a 120 volt outlet.
3. Turn the Fan ON by pressing the
Power Button
( ).
4.
SPEEDS:
Press the
Fan Speed Button
( ) to desired
speed setting. Each time the Fan Speed Button is
pressed, the speed will change from Low (1), to Medium
(2), to High (3). When intially plugged in, the Fan will be in
Low Speed. When the Fan is turned OFF and ON again,
the unit will resume the speed at which it was turned
OFF.
5.
OSCILLATION:
Press the
Oscillation Button
( ) to start
and stop the oscillation function.
6.
TIMER:
The timer function allows the unit to be set to
operate for a length of time from 1/2 hour to 7 1/2 hours,
in increments of a 1/2 hour. Press the
Timer Button
(
) to set the length of time desired. Each time the timer
button is pressed, the time is increased by 1/2 hour.
After reaching 7 1/2 hours, pressing the timer button
once more will reset the Fan to continuous running. The
lights on the front of the unit will light up appropriately
with the length of time that the Fan is set for.
7.
SLEEP:
This function allows the unit to be set in Sleep
MODEL 2535
Rev. K 10/12
4
2535ES
Rev. K 10/12
9
2535ES
Figure 5
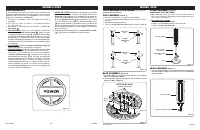
ARMADO DE LA TUBERÍA
(Figura 1)
1. Saque el conjunto de la tubería del cartón como muestra.
(Paso 1)
2. Desafloje la
Tuerca De Ajuste De Altura
, girando en sentido
contrahorario.
(Paso 2)
3. Eleve la
Extensión De La Tubería
.
(Paso 3)
4. Apriete la
Tuerca De Ajuste De Altura
, girando en sentido
horario.
(Paso 4)
MODELO 2535
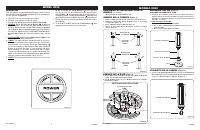
ARMADO DE LA BASE
(Figura 2)
1. Arme la
Base
entrecerrando las
Copas
en los
Orificios De Copa
situados en la
Parte Inferior De La Base
.
2. Fije
(5)
Tornillos #8 X 1/2"
en los
Orificios De Copa
en la
Parte
Inferior De La Base
.
CONJUNTO DE LA CABEZA
(Figura 4)
1.
Coloque el
Conjunto del Cabezal
sobre el extremo del
Extensión
De La Tubería
torciendo
Conjunto del Cabezal
abajo hastaquese
siente en el
Extensión De La Tubería.
(Figura 4)
Figura 4
Extensión De La Tubería
Conjunto del Cabezal
ENSAMBLE DEL PIE
(Figura 3)
COLOQUE LA BASE EN EL PISO
1. Utilizando un movimiento giratorio, inserte el extremo del tubo de
diámetro grande en el agujero de la
Base
. El girar el tubería a me-
dida que se lo empuja asegura que el tubería quede plenamente
asentado en la base.
2.
PARA AJUSTAR LA ALTURA:
a) Afloje la
Tuerca De Ajuste De Altura
.
b) Eleve o baje el
Extensión De La Tubería
hasta obtener la
altura deseada.
c) Apriete la
Tuerca De Ajuste De Altura
.
Base
Extensión De La Tubería
Tuerca De Ajuste De Altura
Figura 3
Conjunto del Cabezal
Figura 2
(5)
Tornillos #8 X 1/2"
C o p a s
PARTE INFERIOR DE LA BASE
Orificios
De Copa
Mode. Pressing the
Sleep Button
( ) once will set
the unit on Low for 6 continuous hours. Pressing the
Sleep Button
( ) a second time will reset the unit to 6
continuous hours. The Oscillation Button ( ) will function
when the Fan is in Sleep Mode. Pressing any other button
(Timer, Fan Speed or the Power Button) will shut off the
Sleep Mode.
8. To turn the Fan OFF, press the
Power Button
( ) and
unplug the unit from the electrical outlet.
Figura 1
Extensión De
La Tubería
Tuerca De
Ajuste De
Altura
Paso 1
Paso 3
Paso 4
Paso 2
Extensión De
La Tubería
Tuerca De
Ajuste De
Altura
HERRAMIENTAS NECESARIAS PARA EL
ARMADO
(no incluida)
- Destornillador de Cabeza Phillips # 2
"Cargando la instrucción" significa que debes esperar hasta que el archivo se cargue y puedas leerlo en línea. Algunas instrucciones son muy grandes y el tiempo de carga depende de la velocidad de tu conexión a Internet.
Resumen
Rev. K 10/12 2 2535ES Rev. K 10/12 11 2535ES MODELO 2535 FUNCIÓN DE PERSIANA (Figura 7) Además de la función oscilante, este Ventilador está equipado con persianas en la parrilla anterior, lo cual permite ajustar verticalmente el flujo de aire. Haga girar el control de persiana (Insertar 7A) hacia a...
FUNCIONAMIENTO Este Ventilador puede hacerse funcionar mediante los Controles Manuales ubicados en la parte superior de la unidad (como se muestra en la Figura 5 ) o con el Control Remoto (se muestra en la Figura 6 ). 1. Coloque el ventilador sobre una superficie firme y nivelada. 2. C o n e c t e ...
OPERATION This Fan may be operated by the Manual Controls located on top of the unit (as shown in Figure 5 ) or by the Remote Control (shown in Figure 6) . 1. Place the Fan on a firm and level surface.2. Plug the cord set into a 120 volt outlet.3. Turn the Fan ON by pressing the Power Button ( ). 4....
Otros modelos de ventiladores Lasko
-
 Lasko 1646
-
 Lasko 1823
-
 Lasko 1843
-
 Lasko 1850
-
 Lasko 2520
-
 Lasko 2521
-
 Lasko 2524
-
 Lasko 2526
-
 Lasko 2551
-
 Lasko 2554