PRECAUCIÓN; CONSERVE ESTAS INSTRUCCIONES; Lea todas las instrucciones antes de usar este Ventilador.; INSTRUCCIONES IMPORTANTES DE SEGURIDAD; ADVERTENCIA; ASSEMBLY; OPERATION - Lasko T36211 - Manual de uso - Página 3

Índice:
- Página 2 – SAVE THESE INSTRUCTIONS; Read all instructions before using this Fan.; IMPORTANT SAFETY INSTRUCTIONS; CAUTION; WARNING; ENSAMBLAJE
- Página 3 – PRECAUCIÓN; CONSERVE ESTAS INSTRUCCIONES; Lea todas las instrucciones antes de usar este Ventilador.; INSTRUCCIONES IMPORTANTES DE SEGURIDAD; ADVERTENCIA; ASSEMBLY; OPERATION
- Página 4 – MAINTENANCE; TROUBLE SHOOTING TIPS; VENTILADOR DE TORRE DE 91,44 CM; LEA Y GUARDE ESTAS INSTRUCCIONES; Por favor no regrese el producto a la tienda!; Este Ventilador es sólo para uso residencial.
NEW 12/18
6
T36211ES
PRECAUCIÓN
CONSERVE ESTAS INSTRUCCIONES
Lea todas las instrucciones antes de usar este Ventilador.
INSTRUCCIONES IMPORTANTES DE SEGURIDAD
Cuando use este ventilador, se deben de seguir las siguientes advertencias y precauciones
para reducir el riesgo de incendio, descargas eléctricas y lesiones:
•
EVITE
el uso de cables de extensión, enchufes múltiples, triples, ambientadores eléctricos u otro dispositivo conectado por cables,
ya que estos dispositivos pueden sobrecalentarse y causar un riesgo de incendio.
•
NO
coloque los cables de alimentación debajo de alfombras, tapetes o muebles. Esto puede dañar el cable o causar que se sobreca-
liente y originar un riesgo de incendio
•
SIEMPRE
colocar el ventilador en una superficie estable, plana y nivelada mientras esté funcionando para evitar que el ventilador se caiga.
•
NUNCA
inserte ni permita que introduzcan los dedos u objetos en las aberturas de la parrilla del ventilador mientras este esté en
funcionamiento, ya que el ventilador puede dañarse o malograrse.
•
NO
bloquee, cubra ni obstruya el flujo de aire hacia o desde el ventilador mientras esté en funcionamiento.
•
NO
utilice este ventilador al aire libre o cerca del agua o lugares húmedos como bañeras, piscinas o jacuzzis. El uso de este ventilador
en un lugar húmedo puede provocar una descarga eléctrica.
•
NO
cubra el cable de corriente con tapetes, alfombras estrechas o artículos de coberturas similares. No coloque el cable de corriente debajo
de muebles o artefactos. Coloque el cable de corriente lejos del tráfico de la habitación, donde las personas no se tropiecen con éste.
•
NUNCA
use un solo cable de extensión para hacer funcionar más de un ventilador u otro aparato eléctrico.
•
NO
use este ventilador si es que se ha dañado o si no funcione adecuadamente.
• Cuando use el control remoto de su televisor u otro equipamiento, verifique para controlar que no encienda el Ventilador también.
• Mantenga la unidad de control remoto del Ventilador lejos de sillas y de su cama donde exista la posibilidad de que alguien se siente
encima, deposite elementos sobre él o encienda el Ventilador inadvertidamente.
•
ESTE VENTILADOR NO CUMPLE CON LOS REQUERIMIENTOS DEL ARTÍCULO 547-7 (2008) DEL NEC.
Este ventilador no es adec-
uado para su uso en instalaciones agrícolas, incluyendo las áreas donde el ganado, aves de corral u otros animales están encerrados.
Consulte el Artículo 547-7 (2008) del Código Eléctrico Nacional (NEC) o los códigos o normas locales o estatales aplicables, relacio-
nados con los requerimientos eléctricos para las instalaciones de agricultura.
•
ESTE ARTEFACTO NO CUMPLE CON LOS REQUISITOS DEL ARTÍCULO 500 DEL NATIONAL ELECTRICAL CODE (Código Eléctrico
Nacional) 2008
. Este ventilador no es adecuado para uso en lugares peligrosos. Consulte el Artículo 500 del Código Eléctrico Nacional
(NEC) o LOS CÓDIGOS O NORMAS LOCALES O ESTATALES APLICABLES, RELACIONADOS CON LOS REQUERIMIENTOS ELÉCTRI-
COS PARA LOS SITIOS PELIGROSOS.
AVISO
: Este equipo ha sido probado y cumple con los límites para aparatos digitales Clase B, conforme a la Parte 15 de las Normas de
la FCC. Estos límites están diseñados para brindar protección razonable contra la interferencia perjudicial en una instalación residen-
cial. Este equipo genera, utiliza y puede irradiar energía de frecuencias de radio y, si no se instala y utiliza de conformidad con las in-
strucciones, puede causar interferencia perjudicial a las comunicaciones de radio. Sin embargo, no hay garantía de que la interferencia
no ocurra en una instalación en particular. Si este equipo no causa interferencia perjudicial a la recepción de radio o televisión, lo cual
se puede determinar al encender y apagar el equipo, el usuario puede intentar corregir la interferencia con una o más de las siguientes
medidas: Reorientar o reubicar la antena receptora. Aumentar la separación entre el equipo y el receptor. Conectar el equipo en un
tomacorriente de un circuito diferente a donde está conectado el receptor. Pedir ayuda al distribuidor o a un técnico experimentado
de televisión y radio. Se informa al usuario que los cambios y las modificaciones realizadas al equipo sin la aprobación del fabricante
pueden anular la autoridad del usuario de operar este equipo.
ADVERTENCIA
PARA REDUCIR EL RIESGO DE INCENDIOS, DESCARGAS ELÉCTRICAS SIEMPRE SIGA
LAS SIGUIENTES INSTRUCCIONES Y ADVERTENCIAS:
NO
utilice este ventilador para ventilar las zonas donde se usen, almacenen o estén presentes líquidos o vapores inflamables,
incluidos pinturas, gasolina, barnices, disolventes o productos de acabado para pisos. ¡SIEMPRE lea y siga todas las adverten-
cias e instrucciones descritas en los envases de estos productos!
SIEMPRE
asegúrese de que el enchufe encaje bien en el tomacorriente. Cuando los enchufes no encajan bien en el tomacorri-
ente, pueden deslizarse un poco y crear una mala conexión. Esto puede causar que los tomacorrientes se sobrecalienten y crear
un riesgo de incendio potencial. Un electricista calificado debe cambiar los tomacorrientes que se encuentren en esta condición.
SIEMPRE
desenchufe el cable de corriente cuando realice mantenimiento, limpieza o mueva el ventilador. NO use el interruptor
ENCENDIDO/APAGADO (ON/OFF) como el único medio para desconectar de la electricidad. NUNCA deje a los niños sin super-
visión cuando el ventilador esté encendido o conectado. SIEMPRE apague y desenchufe el ventilador cuando no esté en uso.
ASEGURESE
que la fuente de energía para el ventilador sea de 120 Vca. NO enchufe el ventilador en una fuente de energía de
240 Vca ni en ninguna otra fuente de energía que no sea la indicada.
El
Blue Plug
™
en su ventilador Lasko es una característica de seguridad. Contiene un dispositivo de seguridad no remplazable
(fusible) que no debe ser removido ni manipulado. Para reducir el riesgo de incendios, descargas eléctricas y lesiones,
NO
rem-
ueva, remplace, repare ni manipule el enchufe suministrado originalmente. Si el ventilador no funciona adecuadamente, puede
deberse al dispositivo de seguridad incorporado en este enchufe.
ESTE ARTEFACTO TIENE UN ENCHUFE POLARIZADO
(una hoja del ventilador es más amplia que la otra). Este enchufe está
diseñado para encajar en el tomacorriente de una sola forma. Haga coincidir la patilla ancha del enchufe con la ranura ancha
del tomacorriente e INSÉRTELA COMPLETAMENTE. NO intente modificar o anular esta medida de seguridad. Si el enchufe no
encaja en el tomacorriente, consulte a un electricista calificado. El enchufe puede necesitar ser remplazado.
NEW 12/18
3
T36211ES
MODEL T36211
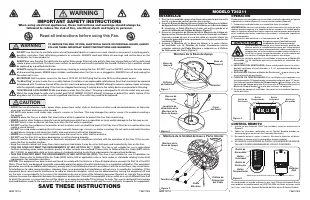
ASSEMBLY
1. For ease of assembly, lay the Fan down so that the front grill
and control panel are facing up.
2. Assemble the Suppor t Bases by interlocking the
Bosses
on
Support Base A
into the
Boss Holes
on
Support Base B
. Thread
the
Power Supply Cord
through the large hole in the center of
the Suppor t Base Assembly.
(Figure 1)
3. Align the
Support Base Assembly Alignment Tabs
with the
alignment slots on the bottom of the Fan, noting that the cord
channel on the bottom of the suppor t base should be towards
the back of the Fan.
(Figure 2)
4. Secure the
Support Base Assembly
to the bottom of the Fan
with
(4) Thumb Screws
. Gently pull any excess slack of the
Power Supply Cord
and place it in the
Wire Locating Trough
.
(Figure 3)
Figure 1
Support
Base B
Support
Base A
Bosses
Boss Holes
Support Base Assembly
Thumb
Screws
Support Base
Assembly
Power
Supply Cord
Wire
Locating
Trough
Figure 3
Base to Bottom of Unit Assembly
OPERATION
This Fan may be operated by the Manual Controls located on front
of the unit
(Figure 4)
or by the Remote Control
(Figure 5)
.
1. Place the Fan on a firm and level sur face.
2. Plug the cord set into a 120 volt outlet.
CAUTION:
Plastic or rubber tabs, like the feet on this unit, may stick
to furniture surfaces and/or hardwood floors. The unit may leave a
residue that could darken, stain or leave permanent blemishes on
the finish of cer tain furniture sur faces, including wood sur faces,
and/or hardwood floors.
Be sure that the plug fits tightly into outlet.
When plugs fit loosely into receptacles, they may slip
partially or completely out of the receptacle with only
the slight movement of the attached cord. Recepta-
cles in this condition may overheat and pose a serious
fire hazard; if covered by a cur tain or drape, the fire
hazard is even greater.
3. Apply power to the Fan by pushing the
Power Button
( ). The
Fan will initially operate in High Speed, speed 3.
4.
FAN SPEED:
You may now adjust the Fan speed to the desired
level, 3, 2, or 1 by pressing the Fan
Speed Button
(
).
5.
OSCILLATION:
Press the
Oscillation Button
(
) to start and
stop the oscillation function.
6.
TIMER FUNCTION:
This Fan is equipped with a timer. The timer
can be set for 1-7 hours. Continue pressing the
Timer Button
(
) to reach the desired time setting. To cancel timer, press
Timer Button
(
) until lights are extinguished.
7. After turning the Fan off, unplug the unit from the electrical outlet.
Alignment Slot
Support Base
Assembly
Alignment Tab
Figure 2
Cord Channel
Figure 4
Oscillation
Button
Power
Button
Timer
Button
Speed
Button
If you lose your remote control, please call Customer Service to
order a replacement at (800) 233-0268, Monday through Friday,
between the hours of 8:00 a.m. and 5:00 p.m. EST.
REMOTE CONTROL
1. Install two “A A A” batteries (not included) as shown in
Figure 5
2. All the functions per formed with the Remote Control work
identically to the Manual Controls.
3. Do not mix old and new batteries. Do not mix alkaline, standard
(carbon-zinc) or rechargeable (nickel- cadmium) batteries.
4. DO NOT DISPOSE OF BATTERIES IN FIRE. BATTERIES MAY
EXPLODE OR LEAK.
Figure 5
TIMER
POWER
OSC
SPEED
LOUVERS
TIMER
POWER
OSC
SPEED
IONIZER
TIMER
POWER
OSC
SPEED
Power Button
Speed Button
Timer Button
AAA
Batteries
Oscillation
Button
KEEP BATTERIES OUT OF REACH OF CHILDREN
"Cargando la instrucción" significa que debes esperar hasta que el archivo se cargue y puedas leerlo en línea. Algunas instrucciones son muy grandes y el tiempo de carga depende de la velocidad de tu conexión a Internet.
Resumen
NEW 12/18 2 T36211ES SAVE THESE INSTRUCTIONS Read all instructions before using this Fan. IMPORTANT SAFETY INSTRUCTIONS When using electrical appliances, these instructions and warnings should always be followed to reduce the risk of fire, electrical shock and injury to persons: CAUTION • AVOID the ...
NEW 12/18 6 T36211ES PRECAUCIÓN CONSERVE ESTAS INSTRUCCIONES Lea todas las instrucciones antes de usar este Ventilador. INSTRUCCIONES IMPORTANTES DE SEGURIDAD Cuando use este ventilador, se deben de seguir las siguientes advertencias y precauciones para reducir el riesgo de incendio, descargas eléct...
NEW 12/18 4 T36211ES MODEL T36211 MAINTENANCE To reduce the risk of electrical shock and fire please observe the following instructions: - Always unplug the cord before moving, servicing or cleaning. - NEVER place the Fan in or near water. - Clean the Fan only with a vacuum equipped with a brush att...
Otros modelos de ventiladores Lasko
-
 Lasko 1646
-
 Lasko 1823
-
 Lasko 1843
-
 Lasko 1850
-
 Lasko 2520
-
 Lasko 2521
-
 Lasko 2524
-
 Lasko 2526
-
 Lasko 2535
-
 Lasko 2551