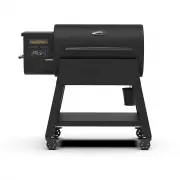
Louisiana Grills 10639 - Manual de uso - Página 3


Índice:
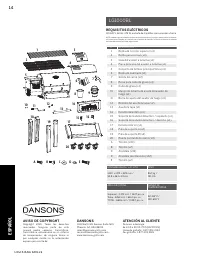
- Página 4 – ESP; REQUISITOS ELÉCTRICOS; AVISO DE COPYRIGHT
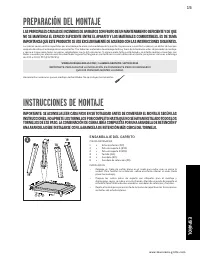
- Página 5 – ENSAMBLAJE DEL CARRITO; INSTRUCCIONES DE MONTAJE; PREPARACIÓN DEL MONTAJE
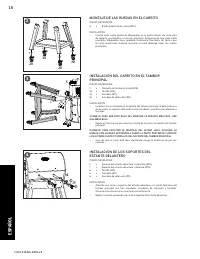
- Página 6 – MONTAJE DE LAS RUEDAS EN EL CARRITO
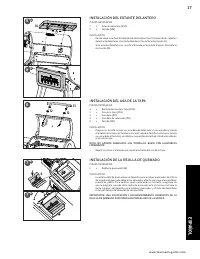
- Página 7 – INSTALACIÓN DEL ESTANTE DELANTERO; INSTALACIÓN DE LA REJILLA DE QUEMADO
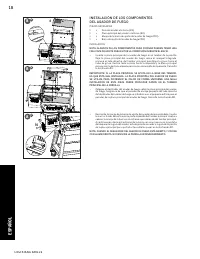
- Página 8 – INSTALACIÓN DE LOS COMPONENTES
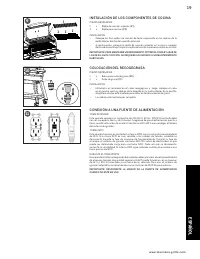
- Página 9 – INSTALACIÓN DE LOS COMPONENTES DE COCINA; COLOCACIÓN DEL RECOGEGRASA; CONEXIÓN A UNA FUENTE DE ALIMENTACIÓN
- Página 10 – IMPORTANT
LO U I S I A N A G R I L L S
1 2
FRANÇAIS
FRANÇAIS
Insert the Flame Broiler Adjusting Bar through the opening
hole on the left side of the Main Barrel. Add the Flame Broiler
Adjusting Bar Handle on the end outside the Barrel. Next,
slide the notched end of the Adjusting Bar into the locking tab
on the Flame Broiler Slider, giving you adjustable access to
the Flame Broiler Slider on the Main Plate. Note illustration.
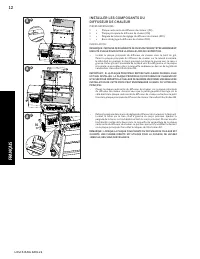
INSTALLER LES COMPOSANTS DU
DIFFUSEUR DE CHALEUR
PIÈCES NÉCESSAIRES :
1
x
Plaque coulissante du diffuseur de chaleur (#3)
1
x
Plaque principale du diffuseur de chaleur (#4)
1
x
Poignée de la barre de réglage du diffuseur de chaleur (#10)
1
x
Barre de réglage du diffuseur de chaleur (#11)
INSTALLATION :
REMARQUE : CERTAINS DES ÉLÉMENTS DE CUISSON PEUVENT ÊTRE LÉGÈREMENT
ENDUITS D'HUILE POUR ÉVITER LA ROUILLE LORS DE L'EXPÉDITION.
•
Insérez la plaque principale du diffuseur de chaleur dans le baril du gril.
Posez la plaque principale du diffuseur de chaleur sur le rebord incorporé,
le côté droit en premier, du baril principal qui dirige la graisse vers le seau à
graisse. Faites glisser l'ensemble de la pièce vers le côté gauche, et la plaque
principale se verrouillera dans la languette surélevée au-dessus de la grille de
combustion. Consultez l'illustration 8A.
IMPORTANT : SI LA PLAQUE PRINCIPALE REPOSE SUR LA BASE DU BARIL, ELLE
EST MAL INSTALLÉE. LA PLAQUE PRINCIPALE DU DIFFUSEUR DE CHALEUR EST
UTILISÉE POUR RÉPARTIR LA CHALEUR DE MANIÈRE UNIFORME. UNE MAUVAISE
INSTALLATION DE CETTE PIÈCE PEUT ENDOMMAGER LE BARIL DE VOTRE GRIL
PRINCIPAL.
•
Placez la plaque coulissante du diffuseur de chaleur sur la plaque principale
du diffuseur de chaleur. Assurez-vous que la petite goupille d'ancrage sur le
côté droit de la plaque coulissante du diffuseur de chaleur entre dans le petit
trou de la plaque principale du diffuseur de chaleur. Consultez l'illustration 8B.
cooking. Note illustration
openings. Ensure the raised tab is on the left, to easily adjust for direct or indirect flame when
Place the flame broiler slider on top of the flame broiler main plate, covering the slotted
grate. Note illustration . The flame broiler main plate is used to distribute the heat evenly.
Slide the entire piece to the left side, and the tray will lock into the raised tab above the burn
built-in ledge, right side first, of the main grill that directs grease towards the grease bucket.
Insert the flame broiler main plate into the grill barrel. Rest the flame broiler main plate on the
NOTE: Both flame broiler parts are lightly coated with oil to avoid rusting when shipped.
1x Porcelain-Coated Steel Upper Cooking Rack (#17)
2x Porcelain-Coated Cast-Iron Cooking Grids (#16)
1x Smoke Adjusting Bar (#15)
1x Smoke Adjusting Bar Knob (#14)
1x Flame Broiler Main Plate (#13)
1x Flame Broiler Slider (#12)
8.INSTALLING THE COOKING COMPONENTS
(#4)
Insert the Flame Broiler Adjusting Bar through the opening
hole on the left side of the Main Barrel. Add the Flame Broiler
Adjusting Bar Handle on the end outside the Barrel. Next,
slide the notched end of the Adjusting Bar into the locking tab
on the Flame Broiler Slider, giving you adjustable access to
the Flame Broiler Slider on the Main Plate. Note illustration.
•
Retirez la poignée de la barre de réglage du diffuseur de chaleur en la tournant.
Insérez la barre via le trou situé à gauche du corps principal. Ajoutez la
poignée de la barre sur l'extrémité sortant du corps principal. Glissez ensuite
l'extrémité crantée de la barre dans la languette de verrouillage de la plaque
coulissante du diffuseur de chaleur, ce qui vous permet d'y accéder facilement
via la plaque principale. Consultez les étapes de l'illustration 8C.
REMARQUE : LORSQUE LA PLAQUE COULISSANTE DU DIFFUSEUR DE CHALEUR EST
OUVERTE, UNE FLAMME DIRECTE EST UTILISÉE POUR LA CUISSON, NE LAISSEZ
JAMAIS LE GRIL SANS SURVEILLANCE.
8
A
8
B
8
C
4
3
4
10
11
"Cargando la instrucción" significa que debes esperar hasta que el archivo se cargue y puedas leerlo en línea. Algunas instrucciones son muy grandes y el tiempo de carga depende de la velocidad de tu conexión a Internet.
Resumen
LO U I S I A N A G R I L L S 1 4 ESPAÑOL ESP AÑOL ENSAMBLADA (An. × Al. × Pr.) PESO 1340 x 1172 x 823 mm / 52,8 x 46,1 x 32,4 in 86,7 kg / 191,1 lb ÁREA DE COCINA RANGO DE TEMPERATURAS Superior - 2,372 cm² / 367,7 pu. cu.Tolva - 4264 cm² / 661,0 pu. cu.TOTAL - 6636 cm² / 1028,7 pu. cu. 82-315°C / 18...
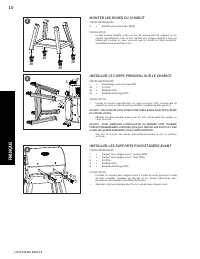
w w w. l o u i s i a n a - g r i l l s .c o m 1 5 ESPAÑOL ESP AÑOL ENSAMBLAJE DEL CARRITO PIEZAS NECESARIAS:1 x Estante inferior (#17) 2 x Pata de soporte A (#18) 2 x Pata de soporte B (#19) 8 x Tornillo (#A) 8 x Arandela (#C) 8 x Arandela de retención (#D) INSTALACIÓN: • Coloque un trozo de cartó...
LO U I S I A N A G R I L L S 1 6 ESPAÑOL ESP AÑOL MONTAJE DE LAS RUEDAS EN EL CARRITO PIEZAS NECESARIAS:4 x Rueda pivotante de cierre (#20) INSTALACIÓN: • Inserte cada rueda pivotante bloqueable en la parte inferior de cada pata de soporte, ajustándola a mano en el orificio. Asegúrese de que cada r...
Otros modelos de parrillas Louisiana Grills
-
 Louisiana Grills 10638
-
 Louisiana Grills 10640