Singer Fashion Mate 7256 Máquina de coser – Manual de instrucciones en formato pdf, léalo en línea gratis. Esperamos que le ayude a resolver cualquier duda que pueda tener al utilizar el aparato.
Si aún tiene preguntas, escríbalas debajo del manual de instrucciones.
"Estamos cargando el manual" significa que debe esperar a que se cargue el archivo para poder leerlo en línea. Algunos manuales son muy pesados y el tiempo que tardan en aparecer depende de su velocidad de internet.

28
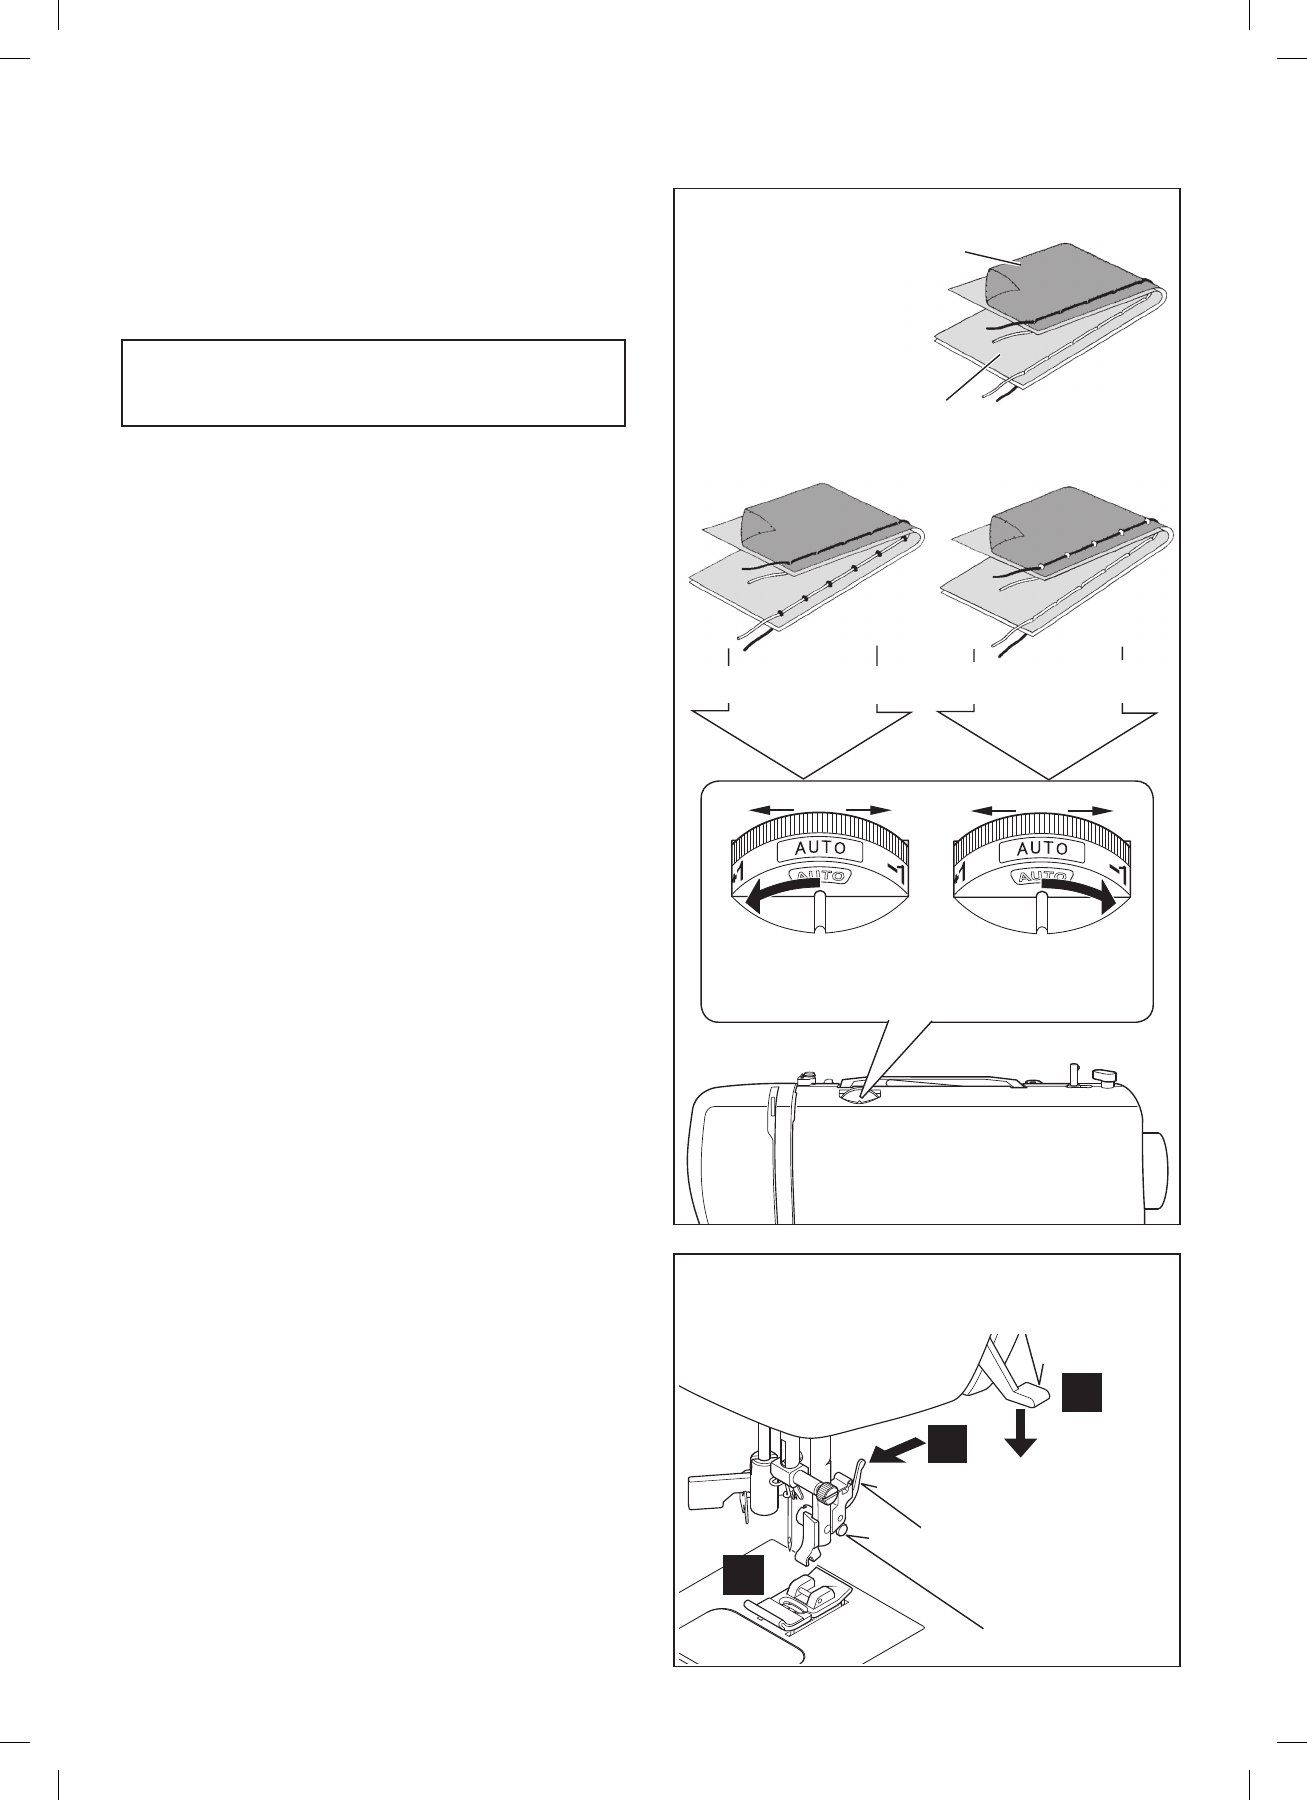
ADJUSTING TOP THREAD TENSION
STRAIGHT STITCHING
The correct appearance of your stitching is largely determined
by the balanced tension of both top and bobbin threads. The
tension is well balanced when these two threads ‘lock’ in the
middle of layers of the fabric you are sewing.
If, when you start to sew, you
¿QG
that the stitching is irregular,
you will need to adjust the tension control.
Make any adjustments with presser foot ‘down’.
A balanced tension (identical stitches both top and bottom) is
usually only desirable for straight stitch sewing.
90% of your sewing will be done with the tension control dial (on
top of the machine) set at “AUTO” .
BOBBIN TENSION
The bobbin tension has been correctly set at the factory,
so you do not need to adjust it.
ZIG ZAG and DECORATIVE SEWING
For zigzag sewing and decorative stitch functions, thread ten-
sion should be less than for straight stitch sewing.
You will always obtain a nicer stitch and less puckering when
the upper thread appears on the bottom side of your fabric.
CHANGING PRESSER FOOT
Be sure needle is in the up position. Raise presser foot lifter.
1. Push presser foot release lever to remove the foot.
2. Place the desired foot on the needle plate aligning the
presser foot pin with the foot holder.
3. Lower the presser foot lifter so that the foot holder snaps
on the foot.
1
3
2
Helpful Hint: A slight adjustment to a higher number or a
lower number may improve sewing appearance.
Under side
Côté de dessous
Reverso
Top side
Côté de dessus
Cara
Well balanced
Correct
Bien equilibrada
Decrease tension
Diminuer la tension
Disminuir tensión
Increase tension
Augmenter la tension
Aumentar tensión
Foot release lever
Presser foot lifter
Levier de verrouillage du pied
Palanca pie prensatelas
Foot holder
Support du pied
Sujetador prensatelas
Palanca de desprendimiento
prensatelas
Levier de verrouillage du pied
РЕГУЛИРОВКА
НАТЯЖЕНИЯ
ВЕРХНЕЙ
НИТИ
90%
швейных
проектов
выполняются
при
положении
регулятора
натяжения
нити
(
расположенный
сверху
на
машине
)
на
отметке
«AUTO».
ПРЯМАЯ
СТРОЧКА
Аккуратный
внешний
вид
строчки
в
значительной
степени
зависит
от
сбалансированного
натяжения
верхней
и
нижней
нитей
.
Натяжение
нитей
тогда
отрегулировано
хорошо
,
когда
обе
нити
переплетаются
в
середине
слоев
рабочего
материала
.
Если
,
начав
шить
,
Вы
обнаружите
,
что
строчка
неправильная
,
Вам
придется
отрегулировать
натяжение
.
Любые
регулировки
следует
проводить
с
опущенной
лапкой
.
Сбалансированное
натяжение
(
одинаковые
стежки
с
лицевой
стороны
и
изнанки
)
обычно
требуется
при
шитье
прямой
строчкой
.
СТРОЧКА
ЗИГЗАГ
И
ДЕКОРАТИВНЫЕ
СТРОЧКИ
Для
строчки
зигзаг
и
декоративных
строчек
натяжение
нити
должно
быть
меньше
,
чем
для
прямой
строчки
.
Строчка
выглядит
лучше
и
меньше
морщиться
,
когда
верхняя
нить
появляется
на
изнанке
ткани
.
НАТЯЖЕНИЕ
НИЖНЕЙ
НИТИ
Правильное
натяжение
нижней
нити
было
установлено
на
заводе
,
поэтому
нет
необходимости
его
регулировать
.
ЗАМЕНА
ПРИЖИМНОЙ
ЛАПКИ
Убедитесь
,
что
игла
находится
в
крайнем
верхнем
положении
.
Переведите
рычаг
подъема
прижимной
лапки
в
верхнее
положение
.
1.
Нажмите
на
рычаг
стойки
лапки
,
чтобы
снять
лапку
.
2.
Поместите
нужную
лапку
на
игольную
пластину
так
,
чтобы
паз
лапки
располагался
точно
под
держателем
лапки
.
3.
Опустите
рычаг
подъема
прижимной
лапки
,
и
лапка
сцепится
с
держателем
.
Полезный
совет
:
Небольшое
регулирование
на
большее
или
меньшее
значение
может
улучшить
вид
строчки
.
Увеличьте
натяжение
Рычаг
подъема
прижимной
лапки
Рычаг
стойки
лапки
Держатель
лапки
Верхняя
нить
сильно
натянута
Верхняя
нить
слабо
натянута
Изнанка
Правильно
отрегулированное
натяжение
Лицевая
сторона
Уменьшите
натяжение
15
7256_SINGER_rus.indd 15
7256_SINGER_rus.indd 15
21.12.10 09:31
21.12.10 09:31
¿Tiene más preguntas?¿No ha encontrado la solución a su problema en el manual o tiene otros problemas? Haga su pregunta en el siguiente formulario con una descripción detallada de su situación para que otras personas y expertos puedan responderla. Si sabe cómo resolver el problema de otra persona, ayúdele :)


