Singer Fashion Mate 7256 Máquina de coser – Manual de instrucciones en formato pdf, léalo en línea gratis. Esperamos que le ayude a resolver cualquier duda que pueda tener al utilizar el aparato.
Si aún tiene preguntas, escríbalas debajo del manual de instrucciones.
"Estamos cargando el manual" significa que debe esperar a que se cargue el archivo para poder leerlo en línea. Algunos manuales son muy pesados y el tiempo que tardan en aparecer depende de su velocidad de internet.

38
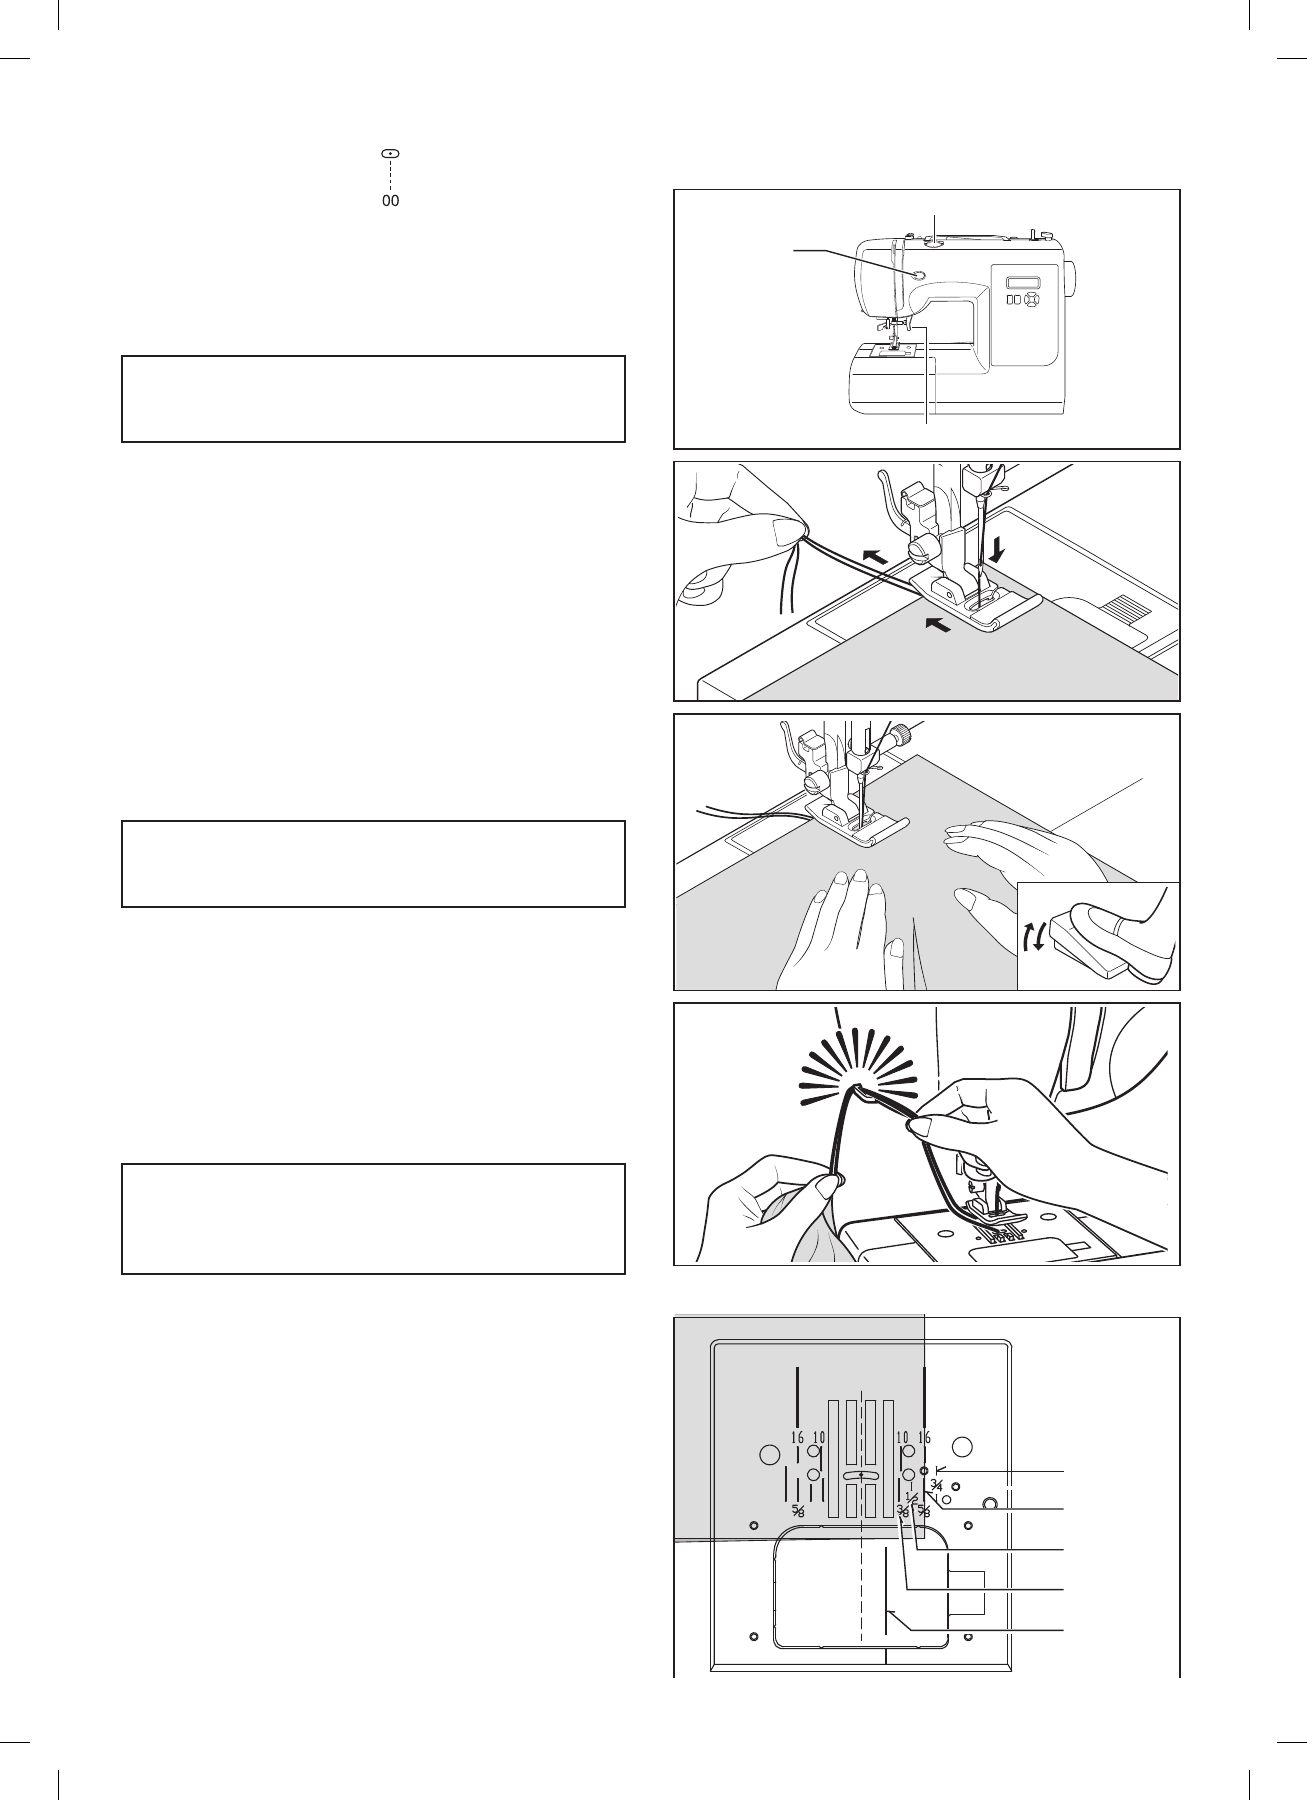
STRAIGHT STITCHING
Straight stitch is most frequently used for all types of sewing.
Let’s begin by following the steps below.
1. SETTINGS
Presser foot - General Purpose Foot
Thread tension control - AUTO
A. Thread tension control
B. Reverse stitch button
C. Presser foot lifter
2. Pull both threads under the presser foot toward the back of
the machine, leaving about 6” (15cm) clear.
3. Place the fabric under the presser foot and lower the
presser foot lifter.
4. Turn the hand wheel toward you (counter-clockwise) until
the needle enters the fabric.
5. Start the machine. Guide the fabric gently with your hands.
When reaching the edge of the material, stop the sewing
machine.
6. First turn the handwheel toward you (counter-clockwise)
until the needle is at its highest position. Raise the presser
foot, draw materials to the rear and cut off excess thread
with the thread cutter located on the bottom of face cover
as shown.
KEEPING SEAMS STRAIGHT
To keep the seam straight, use one of the numbered guide
lines on the needle plate. The numbers indicate distance from
the needle at its center position.
The guide line on the bobbin cover plate is 1/4" (6mm) seam
guide line which is used for piecing quilt blocks and also for
narrow seams.
NOTE: To secure the stitching and avoid raveling,
p r e s s t h e r e v e r s e s t i t c h s w i t c h a n d s e w a f e w
stitches at the start and end of the seam.
NOTE: The Needle Plate has both Metric and Inch
Markings as an aid for guiding your fabric when
sewing a seam.
NOTE: Based upon the weight of the fabric, slight
“
fi
ne tuning” of the tension may be desired.
C
A
B
1
6
5
2
3
4
3/4" (19 mm)
5/8" (16 mm)
1/2" (13 mm)
3/8" ( 9 mm)
1/4" ( 6 mm)
ПРЯМАЯ
СТРОЧКА
Прямая
строчка
чаще
всего
используется
для
всех
типов
шитья
.
Давайте
начнем
,
выполняя
следующие
действия
.
1.
НАСТРОЙКИ
Прижимная
лапка
–
универсальная
Регулятор
натяжения
верхней
нити
– AUTO
A.
Регулятор
натяжения
верхней
нити
B.
Кнопка
шитья
в
обратном
направлении
C.
Рычаг
подъема
прижимной
лапки
2.
Проведите
обе
нити
назад
под
прижимной
лапкой
,
оставив
около
15
см
.
3.
Подложите
ткань
под
лапку
и
опустите
рычаг
прижимной
лапки
.
4.
Поворачивайте
маховик
на
себя
(
против
часовой
стрелки
),
пока
игла
не
войдет
в
ткань
.
5.
Нажмите
на
педаль
,
и
машина
начнет
шить
.
Аккуратно
направляйте
ткань
руками
.
Достигнув
края
материала
,
остановите
машину
.
6.
Поворачивайте
маховик
на
себя
(
против
часовой
стрелки
),
пока
игла
не
станет
в
крайнее
верхнее
положение
.
Поднимите
прижимную
лапку
,
извлеките
материал
,
потянув
назад
,
и
обрежьте
лишние
нитки
с
помощью
ножа
,
расположенного
в
нижней
части
боковой
панели
,
как
показано
на
рисунке
.
ВЫПОЛНЕНИЕ
ПРЯМЫХ
ШВОВ
Чтобы
строчка
шла
прямо
,
направляйте
ткань
вдоль
одной
из
пронумерованных
направляющих
линий
на
игольной
пластине
.
Цифры
означают
расстояние
от
иглы
в
центральном
положении
.
Направляющая
линия
на
крышке
шпульного
отсека
предназначена
для
швов
шириной
6
мм
и
используется
для
сшивания
лоскутков
(
квилтинга
)
и
для
узких
швов
.
19
мм
16
мм
13
мм
9
мм
6
мм
ПРИМЕЧАНИЕ
:
В
зависимости
от
толщины
ткани
может
потребоваться
небольшая
корректировка
натяжения
нитей
.
ПРИМЕЧАНИЕ
:
На
игольной
пластине
нанесены
как
метрические
отметки
,
так
и
значения
в
дюймах
,
помогающие
направлять
ткань
во
время
шитья
.
ПРИМЕЧАНИЕ
:
Во
избежание
распускания
шва
нажмите
на
кнопку
шитья
в
обратном
направлении
и
прошейте
несколько
стежков
в
начале
и
в
конце
строчки
для
закрепки
.
21
7256_SINGER_rus.indd 21
7256_SINGER_rus.indd 21
21.12.10 09:31
21.12.10 09:31
¿Tiene más preguntas?¿No ha encontrado la solución a su problema en el manual o tiene otros problemas? Haga su pregunta en el siguiente formulario con una descripción detallada de su situación para que otras personas y expertos puedan responderla. Si sabe cómo resolver el problema de otra persona, ayúdele :)


