operatIng - ProTeam 107304 - Manual de uso - Página 6

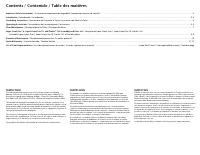
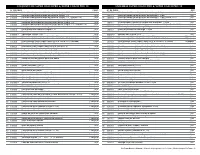
Índice:
- Página 2 – Contents / Contenido / Table des matières; INSPECCIÓN
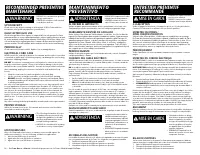
- Página 4 – WARNING; IntroductIon
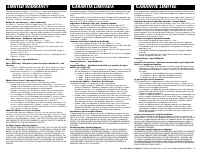
- Página 5 – Figure AA; INSTRUCCIONES DE CONEXIÓN A TIERRA
- Página 6 – operatIng
- Página 7 – WEARING THE BACKPACK VACUUM
- Página 9 – ENSEMBLE SUPER COACH PRO 6/SUPER COACH PRO 10
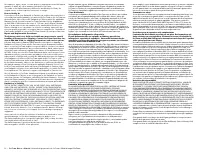
- Página 11 – LImIted WarrantY
ProTeam Owner's Manual
/ Manual del propietario de ProTeam /
Mode d’emploi ProTeam – 5
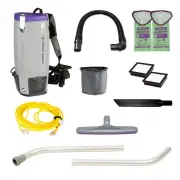
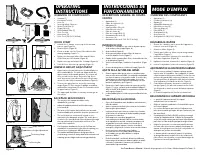
OVERVIEW OF COMPONENTS
• Vacuum (1)
• Extension Cord (2)
• Hose (3)
• Intercept Micro Filter (4)
• Micro Cloth Filter (5)
• Dome Filter (6)
• HEPA Exhaust Filter (7)
• Floor Tool (8)
• Accessories (9)
• Floor Tool (10) (PV FS 6 Only)
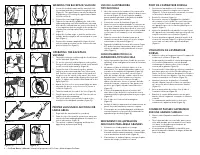
QUICK START
1. Unlatch the 3 clamps on the top of the unit and
remove cap (Figure A).
2. Remove filters (Figure B).
3. Check to make sure the Dome Filter did not shift
during shipping (Figure C).
4. Replace the Intercept Micro Filter and the Micro
Cloth Filter into the vacuum (Figure B).
5. Replace the cap and relatch the 3 clamps (Figure A).
6. Push the hose into the cap opening (Figure D).
HARNESS HEIGHT ADJUSTMENT
1. Upper harness should sit between shoulder blades for
most comfortable fit. The unit was shipped with the
upper harness in the middle position. If you are a tall
user, you will need to move the position up. If you
are a shorter user, you will need to move the position
down (See side view of vacuum and harness Figure E).
2. To move the upper harness, loosen the tensioning
straps (Figure F). Then using a #3 phillips screwdriver,
unthread the screw from the unit. It is located in center
of upper harness (Figure F).
3. The upper pad should be secured by screwing it all
the way in.
BACKPACK ERGONOMICS
•
The weight of the vacuum should be evenly
distributed on your hips.
•
Adjust the padded waist belt and shoulder straps
for a custom fit.
•
The areas on the harness that touch the user are made
from breathable mesh material to keep the operator cool.
•
The on/off switch is conveniently located on the
waist belt of the backpack vacuum. The switch box is
secured to the waist belt with Velcro® running through
the top and bottom of switch box and then to the
inside of the waist belt.
•
Use the proper attachments for the job. ProTeam has
attachments to perform most jobs without requiring you
to bend over or getting into difficult positions.
•
The padded articulating harness design provides in-
creased range of motion during detail and overhead work
reducing operator fatigue and increasing productivity.
(1) (2) (3)
(4) (5)
(6)
Figure A
Figure C
Figure B
Figure D
Figure E
DESCRIPCIÓN GENERAL DE COMPO-
NENTES
• Aspiradora (1)
• Cable de extensión (2)
• Manguera (3)
• Intercept Micro Filter (4)
• Microfiltro de tela (5)
• Filtro de domo (6)
• Filtro de escape HEPA (7)
• Herramienta de suelo (8)
• Accesorios (9)
• Herramienta de suelo (10) (PV FS 6 Only)
INTRODUCCIÓN
1. Destrabe los 3 sujetadores que están en la parte superior
de la unidad y retire la tapa (Figure A).
2. Retire los filtros (Figure B).
3. Revise para asegurarse de que el filtro de domo no
se movió durante el envío (Figure C).
4. Cambie el filtro Intercept Micro Filter y el microfiltro de tela
en la aspiradora (Figure B).
5. Vuelva a colocar la tapa y a trabar los 3 sujetadores (Figure
A).
6. Presione la manguera en el orificio de la tapa (Figure D).
AJUSTE DE LA ALTURA DEL ARNÉS
1. El arnés superior debe apoyar entre los omóplatos para
tener un calce más confortable. La unidad fue despachada
con el arnés superior en la posición media. Si usted es alto,
tendrá que mover la posición hacia arriba. Si no es tan
alto, tendrá que mover la posición hacia abajo (Ver vista
lateral de aspiradora y arnés Figure E).
2. Para mover el arnés superior, afloje las correas de tensión
(Figure F). Luego, y usando un destornillador Phillips #3,
afloje el tornillo de la unidad. Se encuentra en el medio del
arnés superior (Figure F).
3. La almohadilla superior se debe sujetar atornillándola todo
hasta.
ERGONOMÍA DE LA MOCHILA
• El peso de la aspiradora debe distribuirse uniformemente
sobre las caderas.
•
Ajuste el cinturón acolchado y las correas de los hombros
para un ajuste personalizado.
• Las áreas del arnés que están en contacto con el usuario
están hechas de un material de malla respirable para que
el operador no sufra calor.
• El interruptor de encendido/apagado está
convenientemente ubicado sobre la correa de cintura
de la aspiradora de mochila. La caja de interruptor está
asegurada a la correa de cintura con Velcro® que se
extiende por la parte superior e inferior de la caja de
interruptor y luego hasta el interior de la correa de cintura.
•
Use los accesorios adecuados para el trabajo.
ProTeam tiene accesorios para realizar la mayoría
de los trabajos sin que deba doblarse o adoptar
posiciones difíciles.
• El diseño articulado y acolchado del arnés posibilita un
mayor rango de movimiento durante trabajos de detalle
y elevados, reduciendo el cansancio del operador y
aumentando la productividad.
OVERVEIW DES COMPOSANTS
•
Aspirateur (1)
•
Cordon d’extension (2)
•
Boyau (3)
• Microfiltre I
ntercept (4)
•
Microfiltre en tissu (5)
•
Filtre en dôme (6)
• Filtre HEPA (7)
•
Outil plancher (8)
•
Accessoires (9)
•
Outil plancher (10) (PV FS 6 Only)
DÉMARRAGE RAPIDE
1. Ouvrez les 3 attaches sur le dessus de l’appareil et
retirez le couvercle (Figure A).
2. Retirez les filtres (Figure B).
3. Vérifiez que le filtre en dôme n’a pas bougé durant
l’expédition (Figure C).
4. Installez le microfiltre Intercept et le microfiltre en
tissu dans l’aspirateur (Figure B).
5. Replacez le couvercle et fermez les 3 attaches (Figure A).
6. Insérez le tuyau dans l’orifice du couvercle (Figure D).
AJUSTEMENT DE LA HAUTEUR DU HARNAIS
1. Pour un confort optimal, le harnais supérieur devrait
reposer entre les omoplates. Sur cet appareil, le harnais
est présentement à la position médiane. Si vous êtes une
personne de grande taille, remontez le harnais. Si vous
êtes une personne de plus petite taille, baissez le harnais
(voir l’aspirateur et le harnais vus de côté, Figure E).
2. Pour remonter le harnais, desserrez les courroies de
serrage (Figure F). À l’aide d’un tournevis à tête étoilée
#3, dévissez la vis située au centre du harnais supérieur
(Figure F).
3. Le coussinet supérieur doit être fixé en vissant la vis.
ERGONOMIE DE L’ASPIRATEUR DORSAL
• Le poids de l’aspirateur devrait être réparti
uniformément sur vos hanches.
•
Réglez le ceinturon rembourré et les bandoulières pour
un confort optimal.
•
Les sections du harnais qui touchent l’utilisateur sont
faites de tissu maillé qui respire afin que l’opérateur n’ait
pas trop chaud.
•
L’interrupteur En M./Arrêt (On/Off) est situé sur la sangle
ceinture de l’aspirateur dorsal. Le boîtier de l’interrupteur
est fixé à la sangle ceinture par une bande Velcro® passant
par le haut et le bas du boîtier puis par la sangle ceinture.
•
Utilisez les accessoires convenant au travail à effectuer.
ProTeam offre des accessoires adaptés à la plupart des
travaux et conçus pour vous éviter de vous pencher ou
d’adopter une position inconfortable.
•
Le harnais articulé et matelassé permet à l’opérateur
de bouger librement lorsqu’il nettoie des endroits dif-
ficiles d’accès ou en hauteur, ce qui réduit la fatigue de
l’opérateur et accroît la productivité.
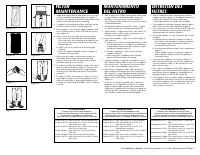
Figure F
Tensioning Straps
Upper Harness
(7)
Pivoting Bar
Harness Height Adjustments
operatIng
InstructIons
InstruccIones de
FuncIonamIento
mode d'empLoI
(8) (9) (10)
"Cargando la instrucción" significa que debes esperar hasta que el archivo se cargue y puedas leerlo en línea. Algunas instrucciones son muy grandes y el tiempo de carga depende de la velocidad de tu conexión a Internet.
Resumen
Contents / Contenido / Table des matières Important Safety Instructions / Instrucciones importantes de seguridad / Importantes mesures de sécurité ............................................................................................................................................................
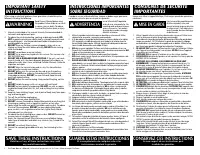
ProTeam Owner's Manual / Manual del propietario de ProTeam / Mode d’emploi ProTeam – 3 Para reducir el riesgo de incen- dio, descarga eléctrica o lesiones: • NO use la aspiradora si el cable está deshilachado, gastado o dañado. • NO aspire líquidos ni exponga la aspiradora a la lluvia o el agua. • ...
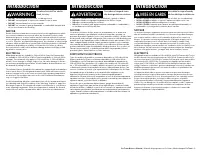
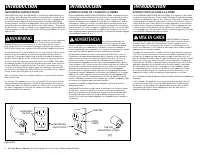
4 – ProTeam Owner's Manual / Manual del propietario de ProTeam / Mode d’emploi ProTeam GROUNDED OUTLET GROUNDING PIN GROUNDED OUTLET BOX (A) (B) ADAPTER METAL SCREW TAB FOR GROUNDING SCREW (C) Figure AA INSTRUCCIONES DE CONEXIÓN A TIERRA ESTAS ASPIRADORAS DEBEN TENER CONEXIÓN A TIERRA. Si la aspirad...
Otros modelos de aspiradoras ProTeam
-
 ProTeam 105896
-
 ProTeam 107251
-
 ProTeam 107252
-
 ProTeam 107303
-
 ProTeam 107308
-
 ProTeam 107310
-
 ProTeam 107363
-
 ProTeam 107535
-
 ProTeam 107538
-
 ProTeam 107713