Segway AA.05.15.01.0002 - Manual de uso - Página 25
Scooter eléctrico Segway AA.05.15.01.0002 - Manual de uso, léela gratuitamente en línea en formato PDF. Esperamos que esto te ayude a resolver cualquier duda que puedas tener. Si tienes más preguntas, contáctanos a través del formulario de contacto.

KO
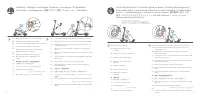
KickScooter 전원을 켠 후, 소유자는 브레이크 레버를 5번 누르고 잠금 해제 상태에서 전원 버튼을 한 번 눌러 RESET을 완료할 수
있습니다. 그러면 소유자는 Find My를 사용하여 KickScooter를 찾을 수 없습니다. Find My에 KickScooter를 다시 추가하기 전에
소유자는 Find My에서 KickScooter를 제거해야 합니다.
J P
KickScooter の電源を入れた後、ブレーキレバーを5回握り、KickScooter がアンロックされた状態で電源ボタンを1回押すと、
RESETが完了します。そうすると、オーナーは「Find My」でこの KickScooter を見つけることができなくなります。KickScooter
を Find My で表示させるために、オーナーはもう一度追加操作を行う必要があります。
TR Aracın sahibi KickScooter'ı açtıktan sonra kilidi açılmı durumda fren kolunu 5 kez sıkarak ve bir kez güç dümesine basarak
RESET ilemini tamamlayabilir. Ardından aracın sahibi bu KickScooter'ı bulmak için Find My'ı kullanamayacaktır. Aracın sahibinin
KickScooter'ı Find My'a tekrar eklemeden önce KickScooter'ı Find My'dan kaldırması gerekir.
AR
PT Depois de ligar a KickScooter, o proprietário pode concluir o RESET apertando a alavanca do travão 5 vezes e premindo o
botão de ligar/desligar quando estiver desbloqueado. Depois o proprietário não pode usar o Find My para encontrar esta
KickScooter. O proprietário deve remover a KickScooter do Find My antes de adicionar o KickScooter ao Find My novamente.
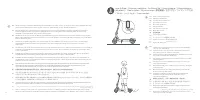
Apple Find My network
Add KickScooter to Find My / Ajouter un KickScooter à Find My / KickScooter zu Find My hinzufügen /
Aggiungere il KickScooter a Find My / Añadir KickScooter a Find My
/ Dodaj KickScooter do Find My
/
Voeg
KickScooter toe aan Find My
/
RДобавить KickScooter в Find My /
Find My配對 /
Find My에 KickScooter
추가 / KickScooter を Find My に追加
/ Find My'a KickScooter Ekleme / /
Adicione a KickScooter ao Find My
EN
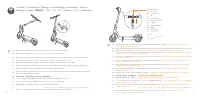
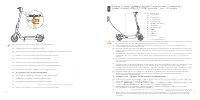
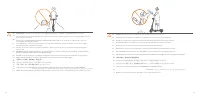
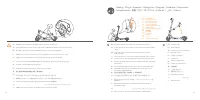
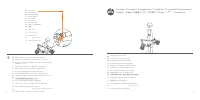
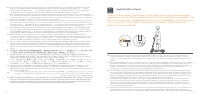
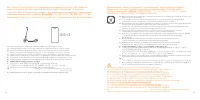
Launch Find My app on a iPhone or iPad, Tap + then tap Add Other Item
⊕
. Power on the KickScooter, and pair KickScooter
(unlocked) with Apple Find My by squeezing the brake lever three times, pressing the power button once, then choosing the
KickScooter in the Find My app and following the on-screen instructions. (The KickScooter will automatically exit pairing in ten
minutes.)
F R
Lancement Find My app Sur l'iPhone ou l'iPad, cliquez sur +, puis cliquez sur ajouter d'autres éléments
⊕
. Ensuite, le propriétaire
doit allumer le KickScooter et associer le KickScooter (déverrouillé) avec Apple Find My app en appuyant trois fois sur le levier
de frein et en appuyant une fois sur le bouton marche/arrêt, puis choisir le KickScooter dans Apple Find My app et l’ajouter dans
Find My conformément aux instructions. (Le KickScooter quittera automatiquement l’association après dix minutes. Le
propriétaire peut également compléter cette étape via l’application Segway-Ninebot.)
DE
Starten Find My app Tippen Sie auf einem iPhone oder iPad auf und tippen Sie dann auf Anderes Element hinzufügen
⊕
. Dann
muss der Eigentümer den KickScooter einschalten und den KickScooter (entsperrt) mit der Apple Find My app koppeln, indem
er dreimal den Bremshebel betätigt und einmal die Ein-/Aus-Taste drückt. Danach wählt er den KickScooter in der Apple Find
My app aus und fügt ihn gemäß den Anweisungen zu Find My hinzu. (Der KickScooter beendet die Kopplung automatisch nach
zehn Minuten. Der Eigentümer kann diesen Schritt auch mit der Segway-Ninebot-App ausführen.)
I T
Avvia Find My app Su un iPhone o iPad, tocca + quindi tocca Aggiungi altro elemento
⊕
. A quel punto, il proprietario dovrà
accendere il KickScooter e associarlo (da sbloccato) a Apple Find My app premendo tre volte la leva del freno e una volta il
pulsante di accensione; quindi, dovrà selezionare il KickScooter in Apple Find My app e aggiungerlo a Find My secondo le
istruzioni (il KickScooter uscirà automaticamente dall'associazione in dieci minuti. Questo passaggio può essere completato
anche tramite l'app Segway-Ninebot).
ES
Lanzamiento Find My app En iPhone o ipad, haga clic en +, y luego haga clic para agregar otros proyectos.
⊕
. A continuación, el
propietario debe encender el KickScooter y emparejar KickScooter (desbloqueado) con Apple Find My app , apretando la
palanca del freno tres veces y pulsando el botón de encendido una vez. Después debe elegir el KickScooter en Apple Find My app
Find My
ـﻟ مﺪﺨﺘﺴﻤﻟا ﻞﻴﻟد
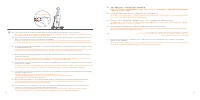
EN
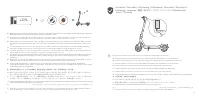
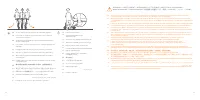
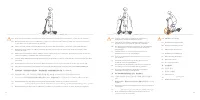
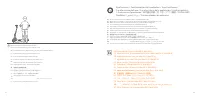
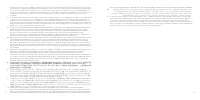
After powering on the KickScooter, owner can complete RESET by squeezing brake lever by 5 times and pressing power button
once in unlocked status. Then the owner can not use Find My to find this KickScooter. Owner has to remove the KickScooter
from the Find My before adding the KickScooter into Find My again.
F R
Après avoir allumé le KickScooter, le propriétaire peut RESET en appuyant sur le levier de frein 5 fois et en appuyant sur le
bouton marche/arrêt une fois en statut déverrouillé. Ensuite, le propriétaire ne pourra pas utiliser Find My pour trouver ce
KickScooter. Le propriétaire doit retirer le KickScooter de Find My avant d’ajouter à nouveau le KickScooter dans Find My.
DE
Nach dem Einschalten des KickScooter kann der Eigentümer den RESET abschließen, indem er den Bremshebel 5 Mal betätigt
und die Ein-/Aus-Taste einmal im entsperrten Zustand drückt. Dann kann der Eigentümer diesen KickScooter nicht mit Find My
finden. Der Eigentümer muss den KickScooter aus Find My entfernen, bevor er ihn wieder zu Find My hinzufügen kann.
I T
Dopo aver acceso il KickScooter, il proprietario può completare il RESET premendo la leva del freno 5 volte e, una volta entrato in
stato sbloccato, premendo il pulsante di accensione. A quel punto, il proprietario non potrà più usare Find My per trovare il
KickScooter. Prima di poterlo aggiungere nuovamente, il proprietario dovrà rimuovere il KickScooter da Find My.
ES
Después de encender el KickScooter, el propietario puede realizar RESET apretando la palanca del freno 5 veces y pulsando el
botón de encendido una vez en estado desbloqueado. Entonces el propietario no podrá usar Find My para buscar el KickScooter.
El propietario tiene que eliminar el KickScooter de Find My para poder añadirlo de nuevo.
P L
Po włączeniu KickScootera właściciel może wykonać RESET, naciskając dźwignię hamulca 5 razy i naciskając raz przycisk
zasilania w stanie odblokowanym. Następnie właściciel nie może używać Find My, aby znaleźć ten KickScooter. Właściciel
musi usunąć KickScooter z Find My przed ponownym dodaniem KickScootera do Find My.
NL Nadat de KickScooter is ingeschakeld, kan de eigenaar de RESET voltooien door de remhendel 5 keer in te knijpen en op de
aan/uit-knop te drukken zodra de status ontgrendeld is. Dan kan de eigenaar Find My niet gebruiken om deze KickScooter te
vinden. De eigenaar moet de KickScooter uit Find My verwijderen voordat hij de KickScooter weer aan Find My toevoegt.
RU
После включения KickScooter владелец может выполнить сброс настроек (RESET), нажав рычаг тормоза 5 раз и нажав
кнопку питания один раз в разблокированном состоянии. После этого владелец не сможет использовать Find My для
поиска KickScooter. Владелец должен удалить KickScooter из Find My, прежде чем снова добавить KickScooter в Find My.
漢 滑板車開機後,在車輛非鎖定狀態下,車主按壓煞車手5次,再按1次電源鍵,即可完成RESET設定,此時車輛解綁Find My,車主將無
法使用行動裝置Apple Find My app 尋找車輛。如需重新綁定,車主需要先移除Apple Find My app 中的滑板車資訊,隨後重新執行
Find My。
×3
y añadirlo a Find My de acuerdo con las instrucciones (el KickScooter saldrá automáticamente del modo de emparejamiento en
diez minutos. El propietario también puede completar este paso mediante la aplicación Segway-Ninebot).
P L
Uruchom Find My app Na telefonie iPhone lub iPadzie stuknij, a następnie stuknij Dodaj inny element
⊕
. Następnie właściciel
musi włączyć KickScooter i sparować KickScooter (odblokowany) z aplikacją Apple Find My app , naciskając trzykrotnie
dźwignię hamulca i naciskając raz przycisk zasilania, a następnie wybrać KickScooter w Apple Find My app i dodać go do
Find My zgodnie z instrukcjami. (KickScooter automatycznie zakończy parowanie za dziesięć minut. Właściciel może również
wykonać ten krok za pomocą aplikacji Segway-Ninebot).
NL Lanceren Find My app Tik op een iPhone of iPad op en tik vervolgens op Andere items toevoegen
⊕
. Vervolgens moet de eigenaar
de KickScooter aanzetten en de KickScooter (ontgrendeld) koppelen aan de Apple Find My app door drie keer de remhendel in
te knijpen en één keer op de aan/uit-knop te drukken, vervolgens de KickScooter kiezen in de Apple Find My app en deze
volgens de instructies aan Find My toevoegen. (De KickScooter stopt automatisch met koppelen binnen tien minuten. De
eigenaar kan deze stap ook voltooien met de Segway-Ninebot-app.)
RU
Запуск Find My app На iPhone или iPad нажмите +, а затем нажмите, чтобы добавить другие элементы
⊕
. После этого
владельцу необходимо включить питание KickScooter и выполнить сопряжение KickScooter (разблокированного) с
приложением Apple Find My app . Для этого необходимо три раза нажать рычаг тормоза, затем однократно нажать
кнопку питания, выбрать KickScooter в приложении Apple Find My app и добавить его в Find My в соответствии с
инструкциями. (KickScooter автоматически выйдет из режима сопряжения через десять минут. Владелец также может
выполнить этот шаг с помощью приложения Segway-Ninebot).
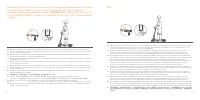
漢 在iPhone或iPad上啟動“查找我的應用程序”,輕按 +,然後輕按“添加其他項目”。接著啟動滑板車,在車輛非鎖定的情況下,按壓
3次煞車手把,再按1次電源鍵,使車輛進入配對模式。點擊顯示的車主滑板車連線車輛,接著依照App指示完成Find My配對。(車輛
將在10分鐘後自動退出配對模式。使用者也可透過九號出行App完成此操作。)
KO
iPhone 또는 iPad에서 Find My app을 시작하고 +를 살짝 누른 다음 다른 항목 추가를 살짝 누릅니다. 그런 다음 KickScooter의
전원을 켜고 브레이크 레버를 세 번, 전원 버튼을 한 번 눌러 KickScooter(잠금 해제됨)를 Apple Find My app 과 페어링한 후,
Apple Find My app 에서 KickScooter를 선택하고 지침에 따라 Apple Find My app 에 추가해야 합니다. (KickScooter는 10분 후
자동으로 페어링을 종료합니다. 소유자는 Segway-Ninebot 앱으로도 이 단계를 완료할 수 있습니다.)
J P
iPhoneまたはiPadで Find My appを起動し、+を軽く押してから、「他のアイテムを追加する」を軽く押します。その後、
KickScooter の電源を入れ、ブレーキレバーを3回握り、電源ボタンを1回押して、KickScooter (アンロック済み)を Apple Find
My app とペアリングします。ペアリング後、Apple Find My app で KickScooter を選択し、説明に従って Find My に追加して
ください。( KickScooter は10分後に自動的にペアリングモードを終了します。この操作は、Segway-Ninebot アプリでも行えま
す)。
TR iPhone veya iPad üzerinde Find My app'i fırlat, Tap + sonra ba
ş
ka Ö
ğ
eleri Ekle
⊕
. Daha sonra aracın sahibi KickScooter"ı çalıtırıp
fren kolunu üç kez sıkarak ve güç dümesine bir kez basarak KickScooter"ı (kilidi açık ekilde) Apple Find My app ile eletirir,
ardından Apple Find My app 'de KickScooter seçimini yaparak aracı talimatları uygulayarak Find My'a ekleyebilir. (KickScooter,
on dakika içinde otomatik olarak eletirmeden çıkacaktır. Aracın sahibi bu adımı Segway-Ninebot Uygulaması ile de
tamamlayabilir.)
AR
PT Abre a Find My app num iPhone ou iPad, toque + e depois toque em Adicionar outro item
⊕
. Ligue a KickScooter, e emparelhe a
KickScooter (desbloqueada) com a Apple Find My apertando a alavanca do travão três vezes, premindo uma vez o botão de
energia, depois escolha a KickScooter na Find My app e siga as instruções no ecrã. (A KickScooter sairá automaticamente do
emparelhamento em dez minutos.)
DE
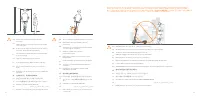
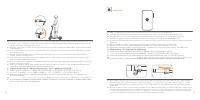
Nach dem Festlegen eines Passcodes muss der Fahrer den Netzschalter drücken, um das Dashboard zu aktivieren, und dann
den Passcode eingeben, indem er den Richtungsanzeigerschalter drückt. Die Zahl wird bei jedem Drücken von „
→
“ um eins
erhöht und bei jedem Drücken von „
←
“ um eins verringert. Der Fahrer muss den Bremshebel drücken oder den Hupenknopf
einmal drücken, um jedes eingegebene Passwort zu bestätigen. Bei jeder Bestätigung ertönt ein Signalton.
I T
Dopo aver impostato un passcode, il pilota deve premere il pulsante di accensione per svegliare il cruscotto, quindi immettere il
passcode premendo l'interruttore dell'indicatore di direzione. Il numero aumenta di uno per ogni pressione di "
→
" e diminuisce di
uno per ogni pressione di "
←
". Il pilota deve premere la leva del freno o premere il pulsante del clacson una volta per confermare
ogni password inserita. Verrà emesso un segnale acustico per ogni conferma.
ES
Después de configurar un código de acceso, el conductor debe presionar el botón de encendido para activar el panel de control
y, a continuación, introducir el código de acceso presionando el botón del indicador de dirección. El número aumenta en uno por
cada pulsación de “
→
” y disminuye en uno por cada pulsación de “
←
”. El conductor debe apretar la palanca del freno o presionar
la bocina una vez para confirmar cada contraseña que se introduce. Se escuchará un pitido en cada confirmación.
P L
Po ustawieniu hasła kierowca musi nacisnąć przycisk zasilania, aby wybudzić deskę rozdzielczą, a następnie wprowadzić
hasło, naciskając przełącznik kierunkowskazów. Liczba zwiększa się o jeden za każdym naciśnięciem „
→
” i zmniejsza się o
jeden za każdym naciśnięciem „
←
”. Kierowca musi jednokrotnie nacisnąć dźwignię hamulca lub nacisnąć przycisk klaksonu,
aby potwierdzić każde wprowadzone hasło. Po każdym potwierdzeniu rozlegnie się sygnał dźwiękowy.
NL Na het instellen van een toegangscode, moet de rijder op de aan / uit-knop drukken om het dashboard te activeren en
vervolgens de toegangscode invoeren door op de richtingaanwijzerschakelaar te drukken. Het aantal wordt met één verhoogd
voor elke keer dat u op "
→
" drukt en met één voor elke keer dat u op "
←
" drukt. De rijder moet de remhendel inknijpen of op de
claxonknop drukken om elk ingevoerd wachtwoord te bevestigen. Bij elke bevestiging klinkt een pieptoon.
RU
После установки пароля ездоку необходимо нажать кнопку питания для активации приборной панели, затем ввести
пароль, нажав переключатель указателей поворота. Число увеличивается на единицу при каждом нажатии "
→
" и
уменьшается на единицу при каждом нажатии "
←
". Для подтверждения каждого введенного пароля ездок должен
однократно нажать рычаг тормоза или кнопку звукового сигнала. При каждом подтверждении прозвучит звуковой
сигнал.
漢 設定密碼後,用戶需在騎行前單按電源鍵喚醒儀錶板,接著按壓方向燈輸入密碼。按下「→」鍵增加數字,按「←」鍵減少數字。每輸
入一位數字,需拉動一次煞車手或按下電子揚聲器進行確認。每確認一位數字,車輛會發出一次「嗶」聲。
KO
비밀번호 설정 후, 라이더는 전원 버튼을 눌러 대시보드를 깨운 다음 방향 표시등 스위치를 눌러 비밀번호를 입력해야 합니다.
숫자는 "→"를 누를 때마다 1씩 증가하고 "←"를 누를 때마다 1씩 감소합니다. 라이더는 입력한 각 비밀번호 확인을 위해 브레이크
레버를 누르거나 경음기 버튼을 한 번 눌러야 합니다. 각 확인 때마다 신호음이 울립니다.
J P
パスコードを設定した後、電源ボタンを押してダッシュボードを起動し、方向指示方向インジケータ器スイッチを押してパスコード
を入力してください。数字は「→」を押すごとに1つ増え、「←」を押すごとに1つ減ります。ブレーキレバーを握るか、ホーンボタ
ンを1回押すと、入力したパスワードを確定できます。確認のたびに「ピッ」の音が鳴ります。
TR Sürücünün bir parola ayarladıktan sonra gösterge panelini uyandırmak için güç dü
ğ
mesine basması ve ardından yön sinyali
dü
ğ
mesine basarak parolayı girmesi gerekir. Ekrandaki sayı, “
→
” dü
ğ
mesine her basıldı
ğ
ında artar ve “
←
” dü
ğ
mesine her
basıldı
ğ
ında azalır. Sürücü, girilen parolayı onaylamak için fren kolunu sıkmalı veya bir kez korna dü
ğ
mesine basmalıdır. Her onay
için bir bip sesi duyulacaktır.
AR
PT Depois de definir uma palavra-passe, o piloto precisa de premir o botão de ligar/desligar para ativar o painel e, em seguida,
introduzir a palavra-passe premindo o interruptor indicador de direção. O número aumenta em um para cada premir de «→»
e diminui em um para cada premir de «←». O piloto tem que apertar a alavanca do freio ou pressionar o botão da buzina
uma vez para confirmar cada senha inserida. Um sinal sonoro será ouvido para cada confirmação.
ﻢﻗﺮﻟا دادﺰﻳ .هﺎﺠﺗﻻا ﺮﺷﺆﻣ حﺎﺘﻔﻣ ﲆﻋ ﻂﻐﻀﻟﺎﺑ روﺮﻤﻟا ﺰﻣر لﺎﺧدإ ﻢﺛ ،تﺎﻣﻮﻠﻌﻤﻟا ﺔﺣﻮﻟ ﻂﻴﺸﻨﺘﻟ ﺔﻗﺎﻄﻟا رز ﲆﻋ ﻂﻐﻀﻟا ﱃإ ﺐﻛاﺮﻟا جﺎﺘﺤﻳ ،روﺮﻤﻟا ﺰﻣر داﺪﻋإ ﺪﻌﺑ
ةﺮﻣ قﻮﺒﻟا رز ﲆﻋ ﻂﻐﻀﻟا وأ ﻞﻣاﺮﻔﻟا عارذ ﲆﻋ ﻂﻐﻀﻟا ﺐﻛاﺮﻟا ﲆﻋ ﺐﺠﻳ .«
←
» ﲆﻋ ﺔﻄﻐﺿ ﻞﻜﻟ ﺪﺣاو راﺪﻘﻤﺑ ﺾﻔﺨﻨﻳو «
→
» ﲆﻋ ﺔﻄﻐﺿ ﻞﻜﻟ ﺪﺣاو راﺪﻘﻤﺑ
.ﺪﻴﻛﺄﺗ ﻞﻜﻟ ةرﺎﻔﺻ ﻊﻤﺴُﺘﺳ .ﺎﻬﻟﺎﺧدإ ﻢﺘﻳ روﺮﻣ ﺔﻤﻠﻛ ﻞﻛ ﺪﻴﻛﺄﺘﻟ ةﺪﺣاو
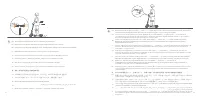
EN
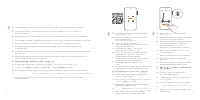
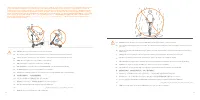
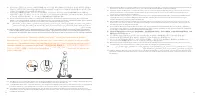
After setting a passcode, rider needs to press power button to wake up dashboard, then enter passcode by pressing direction
indicator switch. The number increases by one for each pressing of “
→
” and decreases by one for each pressing of “
←
”. Rider
has to squeeze the brake lever or press horn button once for confirming each password entered. A beep will be heard for each
confirmation.
F R
Après avoir défini un mot de passe, le pilote doit appuyer sur le bouton marche/arrêt pour réveiller le tableau de bord, puis saisir
le mot de passe en appuyant sur le commutateur d'indicateur de direction. Le nombre augmente de un à chaque pression sur «
→
» et diminue de un à chaque pression sur «
←
». Le pilote doit serrer le levier de frein ou appuyer une fois sur le bouton klaxon
pour confirmer chaque mot de passe saisi. Un bip retentira pour chaque confirmation.
02
03
04
05
06
07
08
09
10
11
12
13
14
15
16
17
18
19
20
21
22
23
24
25
26
27
28
29
30
31
32
33
34
35
36
37
38
39
40
41
42
43
44
45
46
47
48
49
50
51
52
53
54
55
59
01
56
57
58
"Cargando la instrucción" significa que debes esperar hasta que el archivo se cargue y puedas leerlo en línea. Algunas instrucciones son muy grandes y el tiempo de carga depende de la velocidad de tu conexión a Internet.
Otros modelos de scooters eléctricos Segway
-
 Segway A6
-
 Segway AA.00.0012.27
-
 Segway AA.00.0012.28
-
 Segway AA.05.12.01.0004
-
 Segway AA.10.04.02.0011
-
 Segway C10
-
 Segway C2
-
 Segway C2 E
-
 Segway C20
-
 Segway C8