SETUP • MONTAGE • PREPARACIÓN - Wagner 2419306 - Manual de uso - Página 4


Índice:
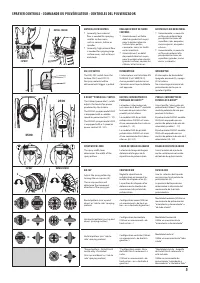
- Página 3 – PELIGRO: EXPLOSIÓN O INCENDIO
- Página 4 – SETUP • MONTAGE • PREPARACIÓN
- Página 6 – SPRAYING • PULVÉRISATION • ROCIADO; STOP; ALTO; Correct; iSPRAY
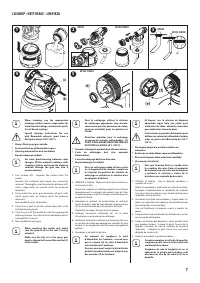
- Página 7 – CLEANUP • NETTOYAGE • LIMPIEZA; DETAIL FINISH
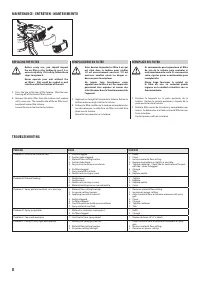
- Página 8 – REPLACING THE FILTER; REMPLACEMENT DU FILTRE; REEMPLAZO DEL FILTRO; PROBLEM
- Página 10 – PARTS LIST • LISTE DE PIÈCES • LISTA DE PIEZAS
4
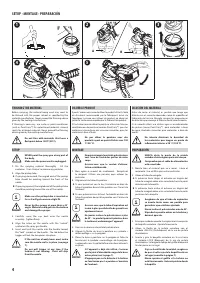
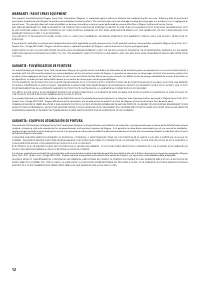
SETUP • MONTAGE • PREPARACIÓN
THINNING THE MATERIAL
Before spraying, the material being used may need to
be thinned with the proper solvent as specified by the
material manufacturer. Never exceed the thinning advice
given by the coating manufacturer.
If thinning is necessary, use water or paint conditioner
(such as Paint Easy™) for water-based materials, mineral
spirits for oil-based materials. Never exceed the thinning
advice given by the coating manufacturer.
Do not thin with materials that have a
flashpoint below 100°F (38°C).
SETUP
NEVER point the spray gun at any part of
the body.
Make sure the power cord is unplugged.
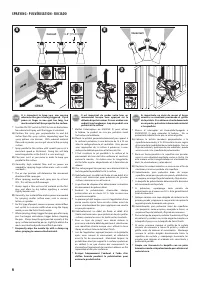
1. Stir the spraying material thoroughly. Fill the
container. Use a strainer to remove any particles.
2. Align the pickup tube -
A If spraying downward, the angled end of the pickup
tube should be pointing toward the front of the
nozzle.
B If spraying upward, the angled end of the pickup tube
should be pointing toward the rear of the nozzle.
i
Make sure the pickup tube is inserted as
far as it will go to ensure a tight fit.
Attention
Never tip the sprayer at more than a 45°
angle. Material could get into the turbine
and damage the sprayer.
3. Carefully screw the cup back onto the nozzle
assembly. Tighten firmly.
4. Align the arrow on the nozzle with the “unlock”
symbol on the spray gun handle.
5. Insert and twist the nozzle into the handle toward
the “lock” symbol on the handle. The tab below the
trigger will lock the two pieces into place.
Attention
If the unit has already been used, make
sure the nozzle seal is in place (see page
7).
Do not pull trigger at any time if the
turbine is not running. Paint will drip
from the nozzle.
DILUER LE PRODUIT
Il peut s’avérer nécessaire de diluer le produit utilisé à l’aide
du dissolvant recommandé par le fabriquant, avant de
l’appliquer. Lorsque vous diluez un produit, ne dépassez
jamais la limite recommandée par le fabricant du produit.
S’il est nécessaire de diluer la peinture, utilisez de l’eau ou
conditionneur de peinture (comme Paint Easy™) pour les
matériaux à base d’eau, des essences minérales pour les
matériaux à base d’huile.
Ne pas diluer la peinture avec des
produits ayant un point d’éclair sous 100
°F (38 °C).
MONTAGE
Ne pointez jamais le pistolet pulvérisateur
vers l’une ou l’autre des parties de votre
corps.
Assurez-vous que le cordon d’alimen-
tation est débranché.
1. Bien agiter le produit de revêtement. Remplissez
le récipient. Utilisez une passoire pour enlever les
particules.
2. Alignement du tube d’aspiration -
A Si vous pulvérisez vers le bas, l’extrémité en biais du
tube d’aspiration devrait être pointée vers l’avant de
l’embout.
B Si vous pulvérisez vers le haut, l’extrémité en biais du
tube d’aspiration devrait être pointée vers l’arrière de
l’embout.
i
Assurez-vous que le tube d’aspiration est
inséré le plus possible afin de garantir un
ajustement serré.
Attention
Ne jamais incliner le pulvérisateur à plus
de 45°. Le produit pourrait pénétrer dans
le turbine et endommager l’appareil.
3. Dévisser le réservoir du pistolet pulvérisateur.
4. Alignez la flèche du buse à peinture au symbole «
déverrouillage » sur la poignée.
5. Placez le buse à peinture sur la poignée et faites-le
tourner vers le symbole « verrouillage » de la poignée.
La plaquette sous la gâchette fixera les deux éléments
en place.
Attention
Si l’appareil a déjà été utilisé, s’assurer
que le joint d’étanchéité rouge de la buse
est en place (voir la page 7).
N’appuyez pas sur la détente si la turbine
ne fonctionne pas. La peinture s’écoulera
de l’embout.
DILUCIÓN DEL MATERIAL
Antes de rociar el material, es posible que tenga que
diluirlo con el solvente adecuado, como lo especifica el
fabricante del mismo. Respete siempre las proporciones
de dilución que aconseja el fabricante del revestimiento.
Si se necesita diluir, use utilizar agua o acondicionador
de pintura (como Paint Easy™) para materiales a base
de agua, alcoholes minerales para materiales a base de
aceite.
No intente disminuir la densidad de
los materiales que tengan un punto de
inflamación inferior a 38 °C (100 °F).
PREPARACIÓN
NUNCA dirija la punta de la pistola
rociadora hacia alguna parte del cuerpo.
Compruebe que el cable de alimentación
esté conectado.
1. Mezcle bien el material que va a rociar. Llene el
recipiente. Use un filtro para retirar partículas.
2. Alinee el tubo de recogida:
A Si pulveriza hacia abajo, el extremo en ángulo del
tubo de recogida debe estar orientado hacia la parte
delantera de la boquilla.
B Si pulveriza hacia arriba, el extremo en ángulo del
tubo de recogida debe estar orientado hacia la parte
posterior de la boquilla.
i
Asegúrese de que el tubo de aspiración
se inserte tanto como sea posible para
garantizar que esté bien ajustado.
Atención
Nunca incline el pulverizador más de 45°.
El producto prodría entrar en la turbina y
dañar el aparato.
3. Enrosque cuidadosamente la recipiente en la conjunto
de boquilla rociadora. Apriete firmemente.
4. Alinee la flecha de la pistola rociadora con el
símbolo UNLOCK (Desbloquear) de la asa de pistola
atomizadora.
5. Inserte y gire la boquilla rociadora en la asa hacia
el símbolo LOCK (Bloquear) de la asa de pistola
atomizadora. La lengüeta debajo del gatillo bloqueará
las dos piezas en su lugar.
Atención
Si ya se ha utilizado la unidad, asegúrese
de que el sello rojo de la boquilla esté en
su lugar (consulte la página 7).
Nunca apriete el gatillo si la turbina no
está funcionando. Goteará pintura desde
la boquilla.
1
2
A
B
3
4
5
"Cargando la instrucción" significa que debes esperar hasta que el archivo se cargue y puedas leerlo en línea. Algunas instrucciones son muy grandes y el tiempo de carga depende de la velocidad de tu conexión a Internet.
Resumen
3 IMPORTANT SAFETY INFORMATION • IMPORTANTES CONSIGNES DE SÉCURITÉ • INFORMACIÓN IMPORTANTE SOBRE SEGURIDAD RISQUE DE CHOC ÉLECTRIQUE Ce produit peut causer des blessures en raison du choc électrique. PRÉVENTION : • N’immergez jamais les composants électriques. • Ne laissez jamais l’appareil sous la...
4 SETUP • MONTAGE • PREPARACIÓN THINNING THE MATERIAL Before spraying, the material being used may need to be thinned with the proper solvent as specified by the material manufacturer. Never exceed the thinning advice given by the coating manufacturer.If thinning is necessary, use water or paint co...
6 SPRAYING • PULVÉRISATION • ROCIADO STOP It is important to keep your arm moving whenever the gun is being triggered. If you pause or linger in one spot too long, too much material will be sprayed to the surface. • Turn the ON/OFF switch to ON (I) to turn on the turbine. No material will spray u...
Otros modelos de pulverizadores de pintura Wagner
-
 Wagner 529033
-
 Wagner 529091
-
 Wagner 2409509
-
 Wagner 2410019
-
 Wagner 2428336