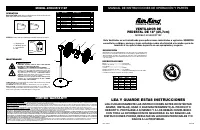
ARMADO DEL PEDESTAL; SAVE THESE INSTRUCTIONS; IMPORTANT SAFETY INFORMATION; Read all instructions before using this Fan.; CAUTION - Air King 9119 - Manual de uso - Página 2
Índice:
- Página 2 – ARMADO DEL PEDESTAL; SAVE THESE INSTRUCTIONS; IMPORTANT SAFETY INFORMATION; Read all instructions before using this Fan.; CAUTION
- Página 3 – STAND ASSEMBLY; HEAD ASSEMBLY; INSTRUCCIONES IMPORTANTES DE SEGURIDAD; Lea todas las instrucciones antes de usar este Ventilador.; PRECAUCIÓN; CONSERVE ESTAS INSTRUCCIONES
- Página 4 – VENTILADOR DE; ESPECIFICACIONES; LIMITED WARRANTY; MAINTENANCE; OPERATION; MANUAL DE INSTRUCCIONES DE OPERACIÓN Y PARTES; LEA Y GUARDE ESTAS INSTRUCCIONES
Rev. Q 4/17
2
2081044
Rev. Q 4/17
7
2081044
MODELO 4CH63F/9119F
ARMADO DE LA HÉLICE Y PARRILLA
(Figura 4)
1. Incline el Cabezal del Ventilador hacia atrás. Coloque la
Parrilla
Trasera
en el
Motor
.
2. Alinee la lengüeta de la
Parrilla Posterior de Plástico
con la ranura
de la parte superior de la cubierta delantera del
Motor
.
(Figura 4A)
3. Asiente totalmente la
Parrilla Trasera
y fíjela haciendo girar la
Tuerca Plástica
hacia la derecha. Deslice la
Hélice
sobre el
Eje
del Motor
(Alinee la ranura del cubo de la hélice con la espiga
del eje del motor).
(Figure 4B)
4. Para fijar la
Hélice
, atornille el
Rotador
sobre el Eje hacia la
izquierda hasta que quede fijo sobre el cubo de la
Hélice
.
5. Con el cabezal del motor en posición recta, alinee el
Ornamento
de la
Parrilla Delantera
para que quede horizontal y mirando
hacia arriba. Comenzando con la parte superior de la parrilla y
avanzando hacia abajo, inserte las
Trabas
de la
Parrilla Trasera
a través de las
Ranuras
de la
Parrilla Delantera. (Figura 5)
.
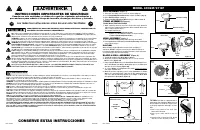
ARMADO DEL TUBO
(Figura 1)
1. Saque el tubo de su caja en la forma indicada.
(Paso 1)
2. Afloje la
Tuerca de Ajuste de Altura
haciéndola girar hacia la
izquierda.
(Paso 2)
3. Levante el
Tubo de Extensión
.
(Paso 3)
4. Apriete la
Tuerca de Ajuste de Altura
haciéndola girar hacia la
derecha.
(Paso 4)
Paso 2
Paso 4
Paso 3
Paso 1
Tuerca de
Ajuste de
Altura
Tubo de
Extensón
Figura 1
ARMADO DEL PEDESTAL
(Figura 2)
COLOQUE LA BASE DE MANERA HORIZONTAL SOBRE
EL PISO
1. Con un movimiento rotatorio, introduzca el extremo del tubo de
diámetro grande dentro del orificio de la Base. El tubo quedará
totalmente asentado en la base su lo hace girar mientras lo empuja.
2. Para Ajustar la Altura:
a.)Afloje la Tuerca de Ajuste de Altura.
b.)Levante o baje el
Tubo de Extensión
hasta alcanzar
la altura deseada.
c.)Apriete la
Tuerca de Ajuste de Altura
.
Figura 2
Tubo de
Extensión
Tuerca de
Ajuste de
Altura
Base
Tubo de
Extensión
Collar
Conjunto de
Cabezal
ARMADO DEL CABEZAL
(Figura 3)
1. Coloque el
Conjunto del Cabezal
con el
Collar
sobre el Conjunto
de Tubo.
2. Sosteniendo el
Tubo de Extensión
firmemente, gire el
Conjunto
del Cabezal
hacia abajo hasta que se asiente sobre el tubo.
Figura 3
Motor
Figura 4
Parrilla
Trasera
Hélice
Rotador
Tuerca de
Plástico
Parrilla
Trasera
Motor
Figura 4A
Espiga
Ranura
Figura 4B
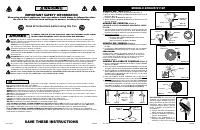
PRECAUCIÓN:
Cuando realice el ajuste de la altura después de conectar el
ensamblaje superior, SIEMPRE sostenga el tubo de extensión
con una mano, pues al aflojar la tuerca de ajuste de la altura
puede causar la caída libre del tubo de extensión y el
ensamblaje superior.
INCLINACIÓN:
Este Ventilador está
equipado con un Cabezal de Ventila-
dor para ángulos múltiples que per-
mite la Circulación del Aire en Toda la
Habitación. Siga los pasos indicados
a continuación para ajustar correcta-
mente el “ángulo de inclinación” de
su Ventilador.
1. Coloque una mano en la barra justo
debajo del Cuello del Ventilador.
2. Coloque la otra mano sobre la parte
superior del Ventilador.
3. Empuje o jale suavemente el ca-
bezal del Ventilador hasta que se
encuentre en la posición deseada.
SAVE THESE INSTRUCTIONS
IMPORTANT SAFETY INFORMATION
When using electrical appliances, basic precautions should always be followed to reduce
the risk of fire, electrical shock and injury to persons, including the following:
Read all instructions before using this Fan.
TO REDUCE THE RISK OF FIRE, ELECTRICAL SHOCK OR PERSONAL INJURY, ALWAYS
FOLLOW THESE IMPORTANT SAFETY INSTRUCTIONS AND WARNINGS:
DO NOT
use this fan to ventilate areas where flammable liquids or vapors are used, stored or are present, including paints,
gasoline, varnishes, floor refinishing products or solvents. ALWAYS read and follow all warnings and instructions on the con-
tainers for these products!
ALWAYS
be sure the plug fits tightly into the outlet. When plugs fit loosely into outlets, they may slip partially out of the outlet
and create a poor connection. This may cause outlets to overheat and create a potential fire hazard. Outlets in this condition
should be replaced by a qualified electrician.
ALWAYS
unplug the power cord when servicing, cleaning or moving the Fan. DO NOT use the ON/OFF switch as the sole means
of disconnecting power. NEVER leave children unattended when the Fan is on or plugged in. ALWAYS turn off and unplug the Fan
when not in use.
BE CERTAIN
that the power source for the Fan is 120V AC. DO NOT plug the Fan into 240V or other power source.
The
Blue Plug™
on your AirKing fan is a safety feature. It contains a non-replaceable safety device (fuse) that should not be removed
or tampered with. To reduce the risk of fire, electric shock and personal injury,
DO NOT
attempt to remove, replace, repair or tamper
with the originally supplied plug. If the Fan has stopped functioning, it may be due to the safety device incorporated in this plug.
The power cord is equipped with a three-prong grounded plug that must be inserted into a matching receptacle. Under no
circumstances should the grounding prong be cut off the plug. Where a two-prong wall receptacle is encountered, it must be
replaced with a properly grounded three-prong receptacle installed in accordance with the National Electrical Code (NEC) and
all applicable local codes and ordinances. This work must be done only by a qualified electrician, using copper wire only.
DO NOT USE A THREE-PRONG TO TWO-PRONG ADAPTER. IMPROPER CONNECTION MAY CREATE THE RISK OF ELEC-
TRICAL SHOCK. USE OF SUCH ADAPTERS IS NOT PERMITTED IN CANADA.
•
AVOID
the use of extension cords, power strips, power taps, outlet style air fresheners or other cord connected device, as these
devices may overheat and cause a fire hazard.
•
DO NOT
route power cord under rugs, carpets, runners or furniture. This may damage the cord or cause it to overheat creating a fire hazard.
•
ALWAYS
place the Fan on a stable, flat, level surface while in operation to prevent the Fan from overturning.
•
NEVER
insert or allow fingers or objects to enter grill openings while Fan is in operation or injury and/or damage to the Fan may occur.
•
DO NOT
block, cover or obstruct air flow to or from the fan while in operation.
•
DO NOT
use this Fan outdoors or near water or wet locations such as a bath tub, pool or hot tub. Use of this Fan in a wet location
may create a shock hazard.
•
DO NOT
run cord under carpeting. Do not cover cord with throw rugs, runners, or similar coverings. Do not route cord under furniture
or appliances. Arrange cord away from traffic area and where it will not be tripped over.
•
NEVER
use a single extension cord to operate more than one Fan or other electrical device.
•
DO NOT
use this Fan if it has been damaged or is not functioning properly.
•
THIS FAN DOES NOT MEET THE REQUIREMENTS OF NEC ARTICLE 547-7 (2008)
.This Fan is not suitable for use in agricultural
facilities including areas where livestock, poultry or other animals are confined. Please refer to National Electric Code (NEC) Article
547-7 (2008), or applicable state or local codes or standards relating to electrical requirements for agricultural buildings.
•
THIS FAN DOES NOT MEET THE REQUIREMENTS OF NEC ARTICLE 500 (2008)
.This Fan is not suitable for use in hazardous
locations. Please refer to National Electric Code (NEC) Article 500 or applicable state or local codes or standards relating to electrical
requirements for hazardous locations.
CAUTION
Ornamento
Trabas
Ranuras
Figura 5
"Cargando la instrucción" significa que debes esperar hasta que el archivo se cargue y puedas leerlo en línea. Algunas instrucciones son muy grandes y el tiempo de carga depende de la velocidad de tu conexión a Internet.
Resumen
Rev. Q 4/17 2 2081044 Rev. Q 4/17 7 2081044 MODELO 4CH63F/9119F ARMADO DE LA HÉLICE Y PARRILLA (Figura 4) 1. Incline el Cabezal del Ventilador hacia atrás. Coloque la Parrilla Trasera en el Motor . 2. Alinee la lengüeta de la Parrilla Posterior de Plástico con la ranura de la parte superior de la c...
Rev. Q 4/17 6 2081044 Rev. Q 4/17 3 2081044 MODEL 4CH63F/9119F TILTING: This Fan is equipped with a multi-angle Fan Head for Whole-Room Air Circulation. Follow the steps below to properly adjust the “tilt angle” of your Fan.1. Place one hand on the pole just under the Fan Neck. 2. Place your other h...
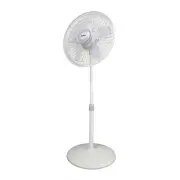
Rev. Q 4/17 4 2081044 Rev. Q 4/17 5 2081044 MODEL 4CH63F/9119F VENTILADOR DE PEDESTAL DE 18” (45,7cm) MODELO 4CH63F/9119F ESPECIFICACIONES Motor ............................................ 120V, 60Hz Tamaño de paletas ...................... 18” (47,5 cm) Velocidades ..................................
Otros modelos de ventiladores Air King
-
 Air King 9018
-
 Air King 9020