Main Power and Sewing Light Switches; Foot Controller; Interrupteur principal et de la lampe; Interruptor principal y de luz; Выключатель питания и лампочки - Brother JS-23 - Manual de uso - Página 10


Índice:
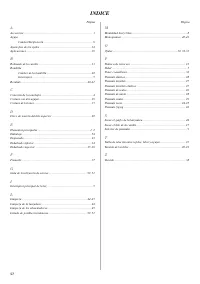
- Página 5 – INDICE; СОДЕРЖАНИЕ
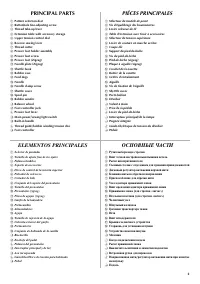
- Página 6 – PRINCIPAL PARTS; PIECES PRINCIPALES; ELEMENTOS PRINCIPALES
- Página 7 – PIÉCES PRINCIPALES
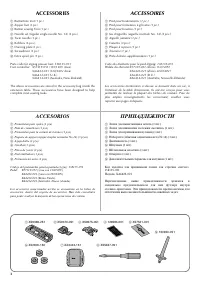
- Página 8 – ACCESSORIES; ACCESSOIRES; ПРИНАДЛЕЖНОСТИ
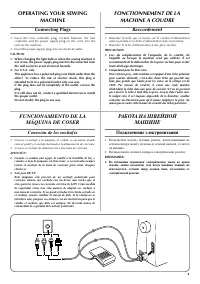
- Página 9 – Connecting Plugs; FONCTIONNEMENT DE LA; Raccordement; FUNCIONAMIENTO DE LA; Conexión de los enchufes; РАБОТА НА ШВЕЙНОЙ; Подключение электропитания
- Página 10 – Main Power and Sewing Light Switches; Foot Controller; Interrupteur principal et de la lampe; Interruptor principal y de luz; Выключатель питания и лампочки
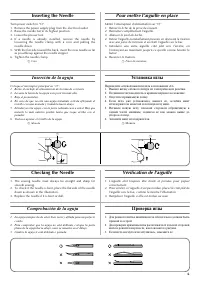
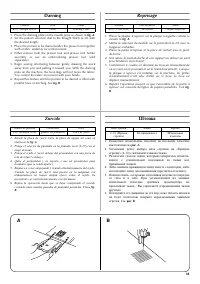
- Página 11 – Inserting the Needle; Checking the Needle; Pour mettre l’aiguille en place; Vérification de l’aiguille; Comprobación de la aguja; Установка иглы; Проверка иглы
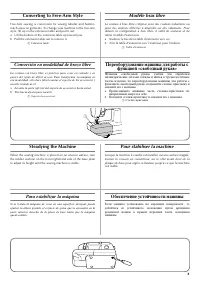
- Página 13 – Converting to Free-Arm Style; Steadying the Machine; Modèle bras libre; Pour stabiliser la machine; Para estabilizar la máquina; Переоборудование машины для работы с; Обеспечение устойчивости машины
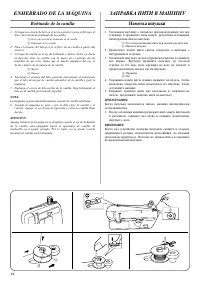
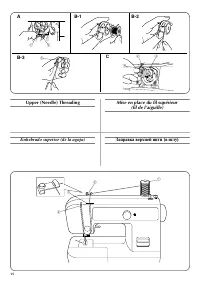
- Página 17 – ENHEBRADO DE LA MÁQUINA; Bobinado de la canilla; ЗАПРАВКА НИТИ В МАШИНУ; Намотка шпульки
- Página 23 – Costura con aguja doble; Шитье двойной иглой; УСТАНОВКА ДВОЙНОЙ ИГЛЫ; ЗАПРАВКА ДВОЙНОЙ ИГЛЫ НИТЬЮ
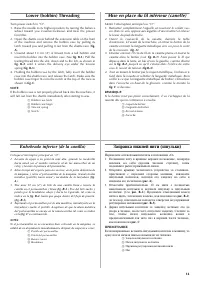
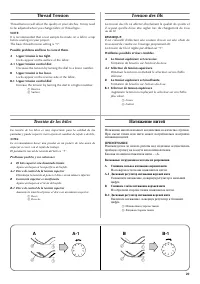
- Página 24 – Thread Tension; Tension des fils; Tensión de los hilos; Натяжение нитей; Возможные затруднения и методы их разрешения.; AE1 Дисковый регулятор натяжения верхней нити; BE1 Дисковый регулятор натяжения верхней нити
- Página 25 – Слишком слабое натяжение нижней нити.
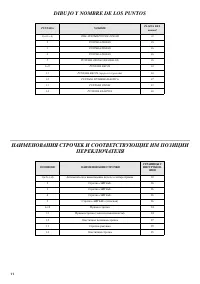
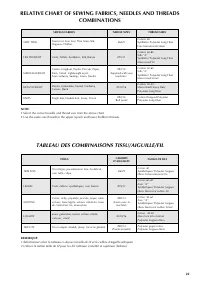
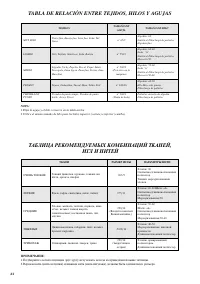
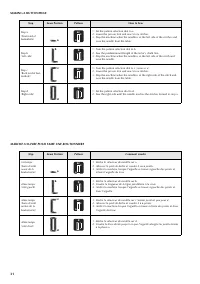
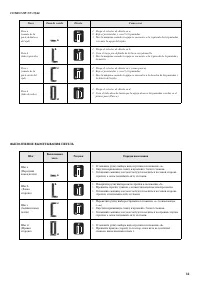
- Página 27 – TABLA DE RELACIÓN ENTRE TEJIDOS, HILOS Y AGUJAS; ТАБЛИЦА РЕКОМЕНДУЕМЫХ КОМБИНАЦИЙ ТКАНЕЙ,
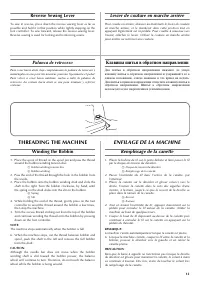
- Página 31 – Blind Hem Stitching; Point élastique invisible; Puntadas invisibles; Потайная строчкаEмережка
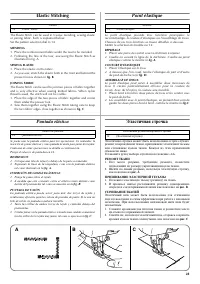
- Página 32 – Elastic Stitching; MENDING; JOINING FABRIC; Point élastique; Puntada elástica; Эластичная строчка; РЕМОНТ ТКАНИ; ПРИШИВАНИЕ ЭЛАСТИЧНОЙ ТЕСЬМЫ; СТАЧИВАНИЕ ТКАНЕЙ
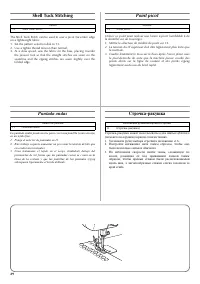
- Página 33 – Shell Tuck Stitching; Point picot; Puntada ondas; СтрочкаEракушка
- Página 34 – Making a Buttonhole; MAKING A BUTTONHOLE; Création d’une boutonnière; Para coser ojales; Выметывание петель; ВЫПОЛНЕНИЕ ВЫМЕТЫВАНИЯ ПЕТЕЛЬ
- Página 37 – ЗАКРЕПЛЕНИЕ СТРОЧКИ И ПРОРЕЗКА ПЕТЛИ
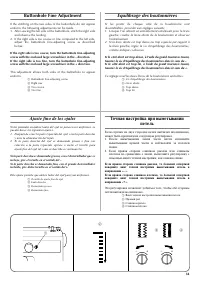
- Página 38 – Buttonhole Fine Adjustment; Equilibrage des boutonnières; Ajuste fino de los ojales; Точная настройка при выметывании
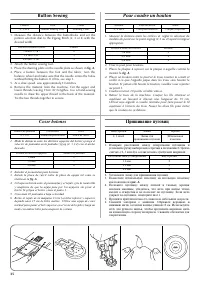
- Página 39 – Button Sewing; Pour coudre un bouton; Coser botones; Пришивание пуговиц
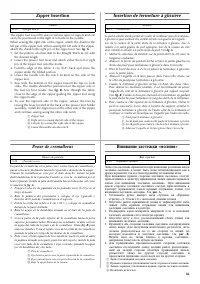
- Página 40 – Zipper Insertion; Insertion de fermeture à glissière; Poner de cremalleras; Вшивание застежки «молния»
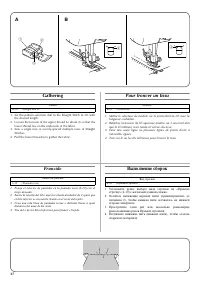
- Página 41 – Gathering; Pour froncer un tissu; Fruncido; Выполнение сборок
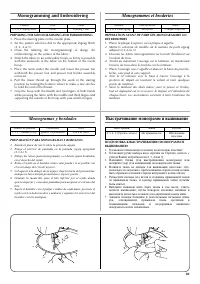
- Página 44 – Monogramming and Embroidering; PREPARING FOR MONOGRAMMING AND EMBROIDERING; Monogrammes et broderies; Monogramas y bordados; Выстрачивание монограмм и вышивание
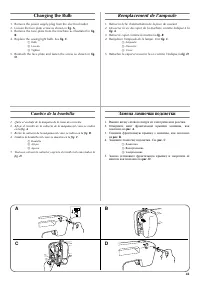
- Página 46 – Changing the Bulb; Remplacement de l’ampoule; Cambio de la bombilla; Замена лампочки подсветки
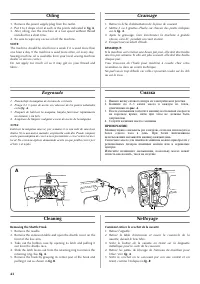
- Página 48 – Cleaning the Shuttle Race; Limpieza; Чистка; Извлечение челнока
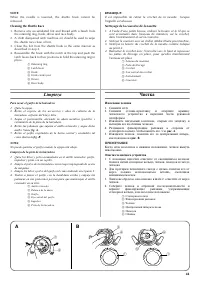
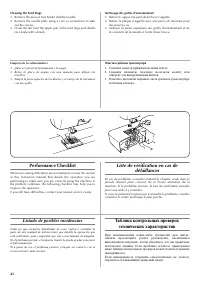
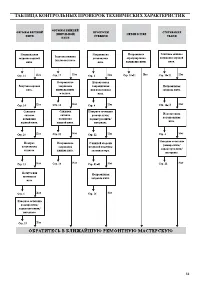
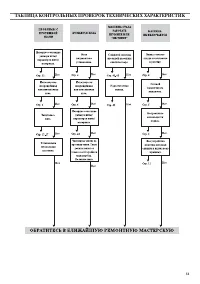
- Página 49 – Cleaning the Feed Dogs; Performance Checklist; Liste de vérification en cas de; Listado de posibles incidencias; Очистка гребенок транспортера; Таблица контрольных проверок
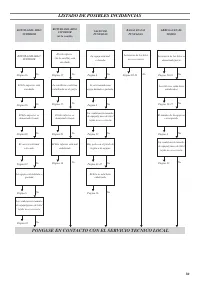
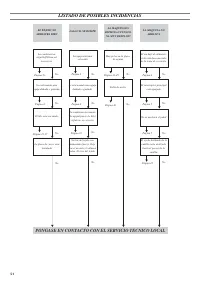
- Página 50 – LISTADO DE POSIBLES INCIDENCIAS; PONGASE EN CONTACTO CON EL SERVICIO TECNICO LOCAL
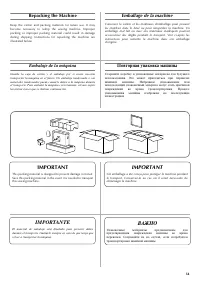
- Página 54 – Repacking the Machine; Emballage de la machine; IMPORTANT; Embalaje de la máquina; IMPORTANTE; Повторная упаковка машины; ВАЖНО
5
1
2
1
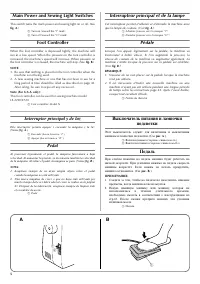
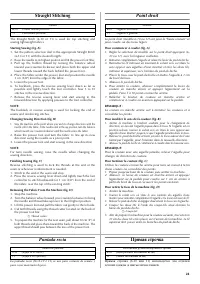
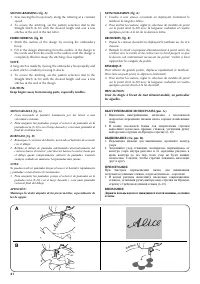
Main Power and Sewing Light Switches
This switch turns the main power and sewing light on or off. (See
fig. A
.)
a
Turn on (toward the “I” mark)
b
Turn off (toward the “O” mark)
Foot Controller
When the foot controller is depressed lightly, the machine will
run at a low speed. When the pressure on the foot controller is
increased, the machine’s speed will increase. When pressure on
the foot controller is released, the machine will stop. (See
fig. B
.)
NOTE:
1. Be sure that nothing is placed on the foot controller when the
machine is not being used.
2. A new sewing machine or one that has not been in use for a
long period of time should be oiled as described on page 43.
After oiling, be sure to wipe off any excess oil.
Note (For U.S.A. only):
This foot controller can be used for sewing machine model
LS-2220/2720.
a
Foot controller: Model N
Interrupteur principal et de la lampe
Cet interrupteur permet d’allumer et d’éteindre la machine ainsi
que la lampe de couture. (Voir
fig. A
.)
a
Allumer (pousser vers la marque “I”)
b
Eteindre (pousser vers la marque “O”)
Pédale
Lorsque l’on appuie légèrement sur la pédale, la machine va
fonctionner à faible vitesse. Si l’on augmente la pression, la
vitesse de couture de la machine va augmenter également. La
machine s’arrête lorsque la pression sur la pédale est relâchée.
(Voir
fig. B
.)
REMARQUE:
1. S’assurer de ne rien placer sur la pédale lorsque la machine
n’est pas utilisée.
2. Il est nécessaire d’huiler une nouvelle machine ou une
machine n’ayant pas été utilisée pendant une longue période
de temps selon les instructions page 43. Après l’avoir huilée,
essuyer tout excédent d’huile.
a
Pédale du rhéostat
Interruptor principal y de luz
Este interruptor permite apagar y encender la máquina y la luz.
(Véase
fig. A
.)
a
Encender (hacia la marca “I”)
b
Apagar (hacia la marca “O”)
Pedal
Al presionar ligeramente el pedal, la máquina funcionará a baja
velocidad. Al aumentar la presión, se incrementa también la velocidad
de la máquina. Al soltar el pedal, la máquina se para. (Véase
fig. B
.)
NOTA:
1. Asegúrese siempre de no dejar ningún objeto sobre el pedal
cuando la máquina no está utilizada.
2. Una nueva máquina de coser o que no haya sido utilizada por
mucho tiempo debe ser lubricada tal como se indica en la página
43. Después de la lubricación, asegúrese siempre de limpiar todo
el excedente de aceite.
a
Pedal
Выключатель питания и лампочки
подсветки
Этот выключатель служит для включения и выключения
машины и лампочки подсветки. (См.
рис. A
.)
a
Включен (нажата сторона с символом «I»)
b
Выключен (нажата сторона с символом «O»)
Педаль
При слабом нажатии на педаль машина будет работать на
низкой скорости. При усилении нажима на педаль скорость
машины возрастёт. Если нажим на педаль прекратить,
машина остановится. (См.
рис. B
.)
ПРИМЕЧАНИЕ:
1. Следите за тем, чтобы на педали не находились никакие
предметы, когда машина не используется.
2. Новую швейную машину или машину, которая не
использовалась в течение длительного времени,
необходимо смазать в соответствии с инструкциями на
стр.43. После смазки протрите машину для удаления
излишков масла.
a
Педаль
A
B
"Cargando la instrucción" significa que debes esperar hasta que el archivo se cargue y puedas leerlo en línea. Algunas instrucciones son muy grandes y el tiempo de carga depende de la velocidad de tu conexión a Internet.
Resumen
INDICE Página ELEMENTOS PRINCIPALES ......................................................... 1 ELEMENTOS PRINCIPALES ......................................................... 2 ACCESORIOS.................................................................................... 3 FUNCIONAMIENTO DE LA MÁQU...
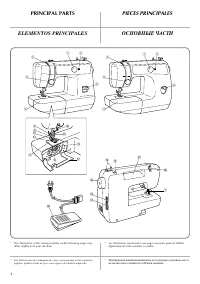
1 1 3 4 5 6 2 L O H I J K M N P 7 8 9 0 A B C E F D G 1 3 4 5 6 2 PRINCIPAL PARTS * The illustrations of the sewing machine on the following pages may differ slightly from your machine. PIECES PRINCIPALES * Les illustrations représentées aux pages suivantes peuvent différer légèrement de votre machi...
2 PRINCIPAL PARTS a Pattern selection dial b Buttonhole fine-adjusting screw c Thread take-up lever d Extension table with accessory storage e Upper tension control dial f Reverse sewing lever g Thread cutter h Presser foot holder assembly i Presser foot screw j Presser foot (Zigzag) k Needle plate ...
Otros modelos de máquinas de coser Brother
-
 Brother LS 2150
-
 Brother LS-1520
-
 Brother LS-2125
-
 Brother LS-3125
-
 Brother SL-7
-
 Brother SM2700
-
 Brother ST4031HD
-
 Brother X-5