Zipper Insertion; Insertion de fermeture à glissière; Poner de cremalleras; Вшивание застежки «молния» - Brother LS-2125 - Manual de uso - Página 40


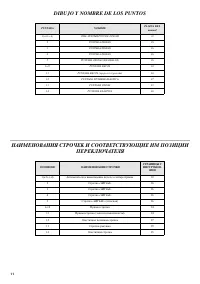


Índice:
- Página 5 – INDICE; СОДЕРЖАНИЕ
- Página 6 – PRINCIPAL PARTS; PIECES PRINCIPALES; ELEMENTOS PRINCIPALES
- Página 7 – PIÉCES PRINCIPALES
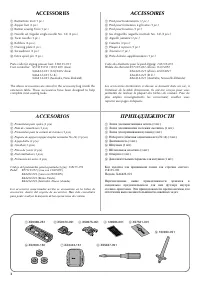
- Página 8 – ACCESSORIES; ACCESSOIRES; ПРИНАДЛЕЖНОСТИ
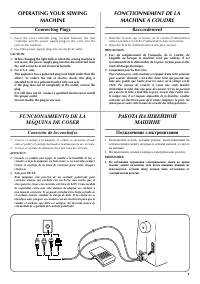
- Página 9 – Connecting Plugs; FONCTIONNEMENT DE LA; Raccordement; FUNCIONAMIENTO DE LA; Conexión de los enchufes; РАБОТА НА ШВЕЙНОЙ; Подключение электропитания
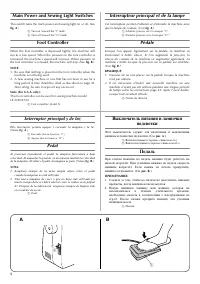
- Página 10 – Main Power and Sewing Light Switches; Foot Controller; Interrupteur principal et de la lampe; Interruptor principal y de luz; Выключатель питания и лампочки
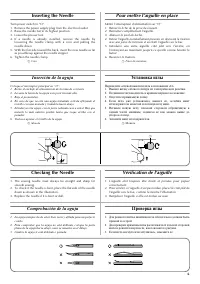
- Página 11 – Inserting the Needle; Checking the Needle; Pour mettre l’aiguille en place; Vérification de l’aiguille; Comprobación de la aguja; Установка иглы; Проверка иглы
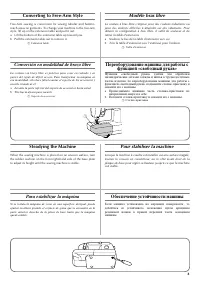
- Página 13 – Converting to Free-Arm Style; Steadying the Machine; Modèle bras libre; Pour stabiliser la machine; Para estabilizar la máquina; Переоборудование машины для работы с; Обеспечение устойчивости машины
- Página 17 – ENHEBRADO DE LA MÁQUINA; Bobinado de la canilla; ЗАПРАВКА НИТИ В МАШИНУ; Намотка шпульки
- Página 23 – Costura con aguja doble; Шитье двойной иглой; УСТАНОВКА ДВОЙНОЙ ИГЛЫ; ЗАПРАВКА ДВОЙНОЙ ИГЛЫ НИТЬЮ
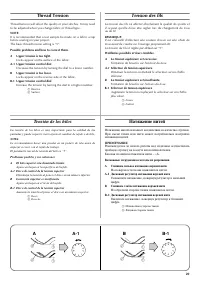
- Página 24 – Thread Tension; Tension des fils; Tensión de los hilos; Натяжение нитей; Возможные затруднения и методы их разрешения.; AE1 Дисковый регулятор натяжения верхней нити; BE1 Дисковый регулятор натяжения верхней нити
- Página 25 – Слишком слабое натяжение нижней нити.
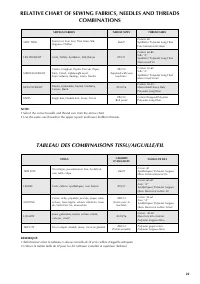
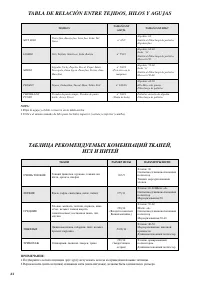
- Página 27 – TABLA DE RELACIÓN ENTRE TEJIDOS, HILOS Y AGUJAS; ТАБЛИЦА РЕКОМЕНДУЕМЫХ КОМБИНАЦИЙ ТКАНЕЙ,
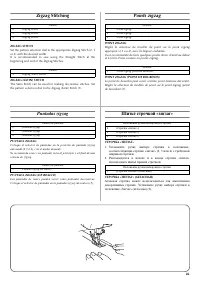
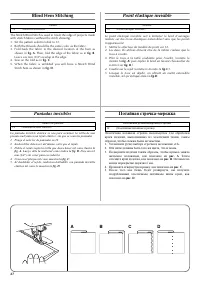
- Página 31 – Blind Hem Stitching; Point élastique invisible; Puntadas invisibles; Потайная строчкаEмережка
- Página 32 – Elastic Stitching; MENDING; JOINING FABRIC; Point élastique; Puntada elástica; Эластичная строчка; РЕМОНТ ТКАНИ; ПРИШИВАНИЕ ЭЛАСТИЧНОЙ ТЕСЬМЫ; СТАЧИВАНИЕ ТКАНЕЙ
- Página 33 – Shell Tuck Stitching; Point picot; Puntada ondas; СтрочкаEракушка
- Página 34 – Making a Buttonhole; MAKING A BUTTONHOLE; Création d’une boutonnière; Para coser ojales; Выметывание петель; ВЫПОЛНЕНИЕ ВЫМЕТЫВАНИЯ ПЕТЕЛЬ
- Página 37 – ЗАКРЕПЛЕНИЕ СТРОЧКИ И ПРОРЕЗКА ПЕТЛИ
- Página 38 – Buttonhole Fine Adjustment; Equilibrage des boutonnières; Ajuste fino de los ojales; Точная настройка при выметывании
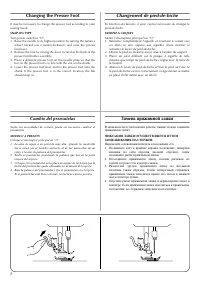
- Página 39 – Button Sewing; Pour coudre un bouton; Coser botones; Пришивание пуговиц
- Página 40 – Zipper Insertion; Insertion de fermeture à glissière; Poner de cremalleras; Вшивание застежки «молния»
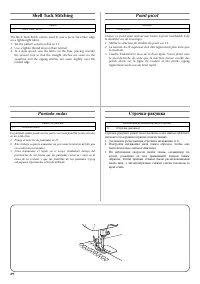
- Página 41 – Gathering; Pour froncer un tissu; Fruncido; Выполнение сборок
- Página 44 – Monogramming and Embroidering; PREPARING FOR MONOGRAMMING AND EMBROIDERING; Monogrammes et broderies; Monogramas y bordados; Выстрачивание монограмм и вышивание
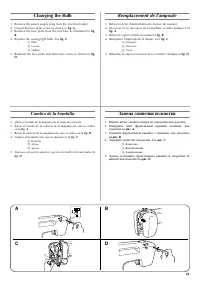
- Página 46 – Changing the Bulb; Remplacement de l’ampoule; Cambio de la bombilla; Замена лампочки подсветки
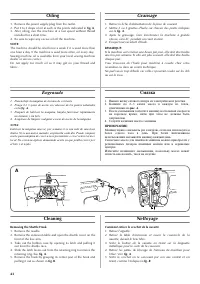
- Página 48 – Cleaning the Shuttle Race; Limpieza; Чистка; Извлечение челнока
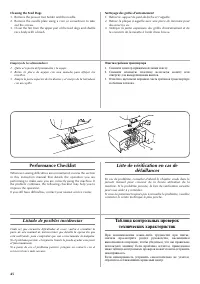
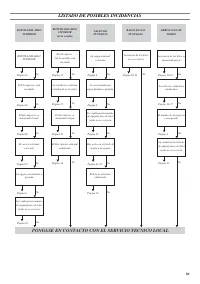
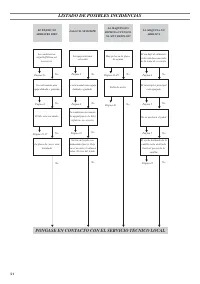
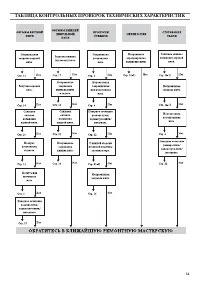
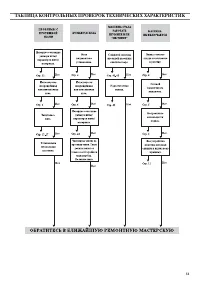
- Página 49 – Cleaning the Feed Dogs; Performance Checklist; Liste de vérification en cas de; Listado de posibles incidencias; Очистка гребенок транспортера; Таблица контрольных проверок
- Página 50 – LISTADO DE POSIBLES INCIDENCIAS; PONGASE EN CONTACTO CON EL SERVICIO TECNICO LOCAL
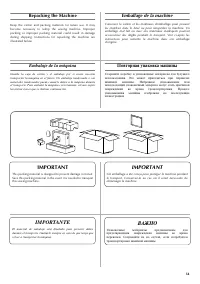
- Página 54 – Repacking the Machine; Emballage de la machine; IMPORTANT; Embalaje de la máquina; IMPORTANTE; Повторная упаковка машины; ВАЖНО
36
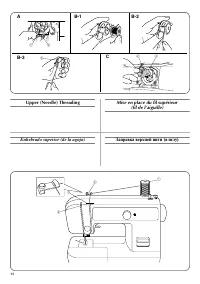
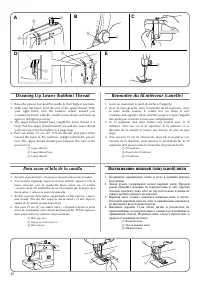
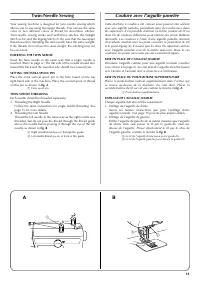
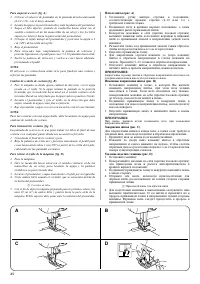
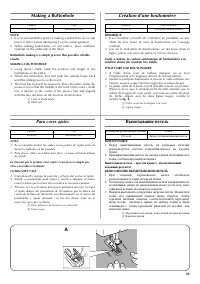
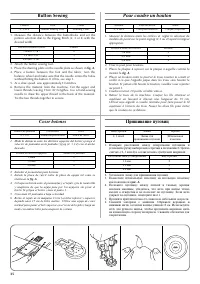
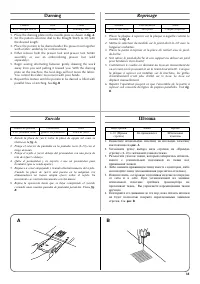
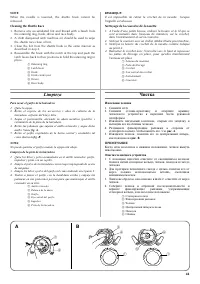
Zipper Insertion
The zipper foot is used to sew on various types of zippers and can
easily be positioned to the right or left side of the needle.
When sewing the right side of the zipper, attach the shank to the
left pin of the zipper foot. When sewing the left side of the zipper,
attach the shank to the right pin of the zipper foot. See
fig. A
.
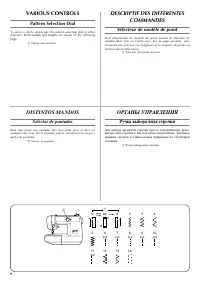
1. Set the pattern selection dial to the Straight Stitch (6-10) with
the desired length.
2. Lower the presser foot lever and attach either the left or right
pin of the zipper foot onto the shank.
3. Fold the edge of the fabric 2 cm (3/4") back and place the
zipper under the folded portion.
4. Lower the needle into the notch located on the side of the
zipper foot.
5. Sew from the bottom of the zipper toward the top on both
sides. The needle should be positioned on the zipper side of
the foot for best results. See
fig. B
. Sew through the fabric
close to the edge of the zipper guiding the zipper foot along
the zipper teeth.
6. To sew the opposite side of the zipper, release the foot by
raising the lever located at the back of the presser foot holder
assembly, install the zipper foot on the other side of the zipper
and continue sewing using the other side notch.
a
Zipper foot
b
Right pin for sewing the left side of the zipper
c
Left pin for sewing the right side of the zipper
d
Lower the needle into the notch
Pattern
6-10
(Straight Stitch)
Insertion de fermeture à glissière
Le pied à semelle étroite permet de coudre de nombreux types de fermetures
à glissière et peut aisément être installé à droite ou à gauche de l’aiguille.
Lors de la couture de la partie droite de la fermeture à glissière, fixer la
semelle à la partie gauche du pied approprié. Lors de la couture du côté
droit, installer la semelle à la partie droite du pied. Voir
fig. A
.
1. Mettre le sélecteur de modèle sur le point droit (6-10) avec la
longueur souhaitée.
2. Abaisser le levier du pied-de-biche et fixer la partie gauche ou
droite du pied pour fermetures à glissière dans l’encoche.
3. Plier le bord du tissu à 2 cm et placer la fermeture à glissière
sous la partie pliée.
4. Abaisser l’aiguille et la faire passer dans l’encoche située sur
le côté du pied pour fermetures à glissière.
5. Coudre la fermeture à glissière de bas en haut, des deux côtés.
Pour obtenir les meilleurs résultats, il est recommandé de placer
l’aiguille du côté de la fermeture à glissière par rapport au pied.
Voir
fig. B
. Coudre le tissu près du bord de la fermeture en guidant
le pied-de-biche pour fermetures le long des dents de la fermeture.
6. Pour coudre le côté opposé de la fermeture à glissière, libérer le
pied en relevant le levier situé à l’arrière du support, installer le
pied pour fermeture à glissière de l’autre côté de la fermeture et
continuer à coudre en faisant passer l’aiguille par l’autre encoche.
a
Pied pour fermetures à glissière
b
Axe de droite pour coudre le côté gauche de la fermeture à glissière.
c
Axe de gauche pour coudre le côté droit de la fermeture à glissière.
d
Abaisser l’aiguille et la faire glisser dans l’encoche.
Modèle
6-10 (Point
droit)
Poner de cremalleras
La pata de cremalleras sirve para coser varios tipos de cremalleras y
puede colocarse fácilmente hacia la izquierda o derecha de la aguja.
Cuando la cremallera se cose por el lado derecho, instale la pata
deslizándola hacia la izquierda. Cuando se cose la cremallera por el
lado izquierdo, instale la pata deslizándola hacia la derecha, tal como
lo muestra la
fig. A
.
1. Ponga el selector de puntadas en la puntada recta (6-10) con el
largo deseado.
2. Baje la palanca del prensatelas y coloque el eje izquierdo o
derecho de la pata de cremalleras en el soporte.
3. Doble la orilla del tejido a 2 cm (3/4") y coloque la cremallera
debajo de la parte doblada.
4. Baje la aguja en la hendidura situada en el lado de la pata de
cremalleras.
5. Cosa a partir de la parte inferior de la cremallera hacia la parte
superior, por ambos lados. Para mejores resultados, se debe colocar
la aguja del lado de la pata y de la cremallera. Véase
fig. B
para
mayores detalles. Cosa el tejido cerca de la orilla de la cremallera,
guiando la pata a lo largo de los dientes de la cremallera.
6. Para coser el lado opuesto de la cremallera, suelte la pata al subir
la palanca situada en la parte posterior del soporte, instale la pata
en el otro lado de la cremallera y siga cosiendo, pasando la aguja
por la hendidura del otro lado.
a
Pata de cremalleras
b
Eje derecho para coser la parte izquierda de la cremallera
c
Eje izquierdo para coser la parte derecha de la cremallera.
d
Baje la aguja dentro de la ranura.
Número de puntada
6-10
(Puntada recta)
Вшивание застежки «молния»
Лапка для «молний» применяется при вшивании различных видов
застёжек*«молний» и может быть легко позиционирована как к
правостороннему, так и к левостороннему положению иглы.
При вшивании правой стороны застежки «молния» следует
присоединить к адаптеру прижимной лапки левый стерженек
лапки для вшивания застежки «молния». При вшивании
левой стороны застежки «молния» следует присоединить к
адаптеру прижимной лапки правый стерженек лапки для
вшивания застежки «молния». См.
рис. A
..
1. Установите ручку выбора вида строчки на «Прямую
строчку» (6*10 или 11) с желаемой длиной стежка.
2. Опустите рычаг прижимной лапки и зафиксируйте либо
левый, либо правый стерженек лапки для вшивания
застежки «молния» в адаптере.
3. Подверните край материала шириной 2 см и положите
застежку «молния» под загнутую кромку.
4. Опустите иглу в паз, расположенный сбоку лапки для
вшивания застежки «молния».
5. Прошейте обе стороны застежки «молния» в направлении
снизу вверх. Для получения наилучшего результата, игла
должна располагаться по ту же сторону от лапки, по
которую находится и застежка «молния». См.
рис. B
.
Ведите шов по ткани близко к кромке «молнии»,
направляя лапку вдоль зубцов застёжки.
6. Для пришивания противоположной стороны застежки
«молния» отсоедините лапку, подняв рычаг, расположен*
ный на задней стороне адаптера прижимной лапки,
разместите лапку на другой стороне «молнии» и
продолжите вшивание, используя паз на другой стороне.
a
Лапка для вшивания застежки «молния»
b
Правый стерженек для вшивания левой стороны застежки «молния»
c
Левый стерженек для вшивания правой стороны застежки «молния»
d
Вхождение иглы в паз.
Вид строчки
6*10
(Прямая строчка)
"Cargando la instrucción" significa que debes esperar hasta que el archivo se cargue y puedas leerlo en línea. Algunas instrucciones son muy grandes y el tiempo de carga depende de la velocidad de tu conexión a Internet.
Resumen
INDICE Página ELEMENTOS PRINCIPALES ......................................................... 1 ELEMENTOS PRINCIPALES ......................................................... 2 ACCESORIOS.................................................................................... 3 FUNCIONAMIENTO DE LA MÁQU...
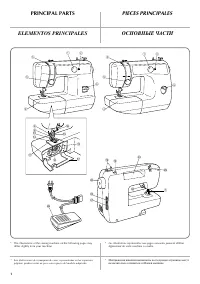
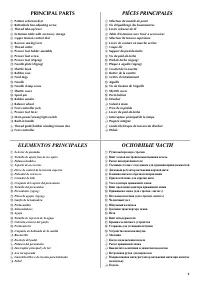
1 1 3 4 5 6 2 L O H I J K M N P 7 8 9 0 A B C E F D G 1 3 4 5 6 2 PRINCIPAL PARTS * The illustrations of the sewing machine on the following pages may differ slightly from your machine. PIECES PRINCIPALES * Les illustrations représentées aux pages suivantes peuvent différer légèrement de votre machi...
2 PRINCIPAL PARTS a Pattern selection dial b Buttonhole fine-adjusting screw c Thread take-up lever d Extension table with accessory storage e Upper tension control dial f Reverse sewing lever g Thread cutter h Presser foot holder assembly i Presser foot screw j Presser foot (Zigzag) k Needle plate ...
Otros modelos de máquinas de coser Brother
-
 Brother JS-23
-
 Brother LS 2150
-
 Brother LS-1520
-
 Brother LS-3125
-
 Brother SL-7
-
 Brother SM2700
-
 Brother ST4031HD
-
 Brother X-5