OPERATION; CONTROL REMOTO - Lasko 2 x LKO-5790 - Manual de uso - Página 3
Índice:
- Página 2 – MANTENIMIENTO; CONSEJOS DE SOLUCIÓN DE PROBLEMAS; SAVE THESE INSTRUCTIONS; Read all instructions before using this Heater.; IMPORTANT SAFETY INFORMATION; CAUTION; WARNING
- Página 3 – OPERATION; CONTROL REMOTO
- Página 4 – FUNCIONAMIENTO; REMOTE CONTROL
- Página 5 – CONSERVE ESTAS INSTRUCCIONES; Lea todas las instrucciones antes de usar este Calefactor.; INFORMACIÓN GENERAL DE SEGURIDAD; PRECAUTIÓN; ADVERTENCIA
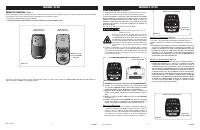
OPERATION
(Figure 1)
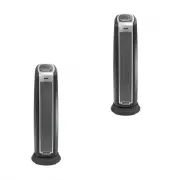
1. Carefully remove the Heater from the plastic bag and the carton.
2. Place the Heater on a firm and level surface.
Plastic or rubber tabs, like the feet on this unit, may stick to
furniture surfaces and/or hardwood floors. The unit may leave a
residue that could darken, stain or leave permanent blemishes on
the finish of certain furniture surfaces, including wood surfaces,
and/or hardwood floors.
3. Plug the cord set into a 120 volt outlet.
Be sure that the plug fits tightly into outlet.
When plugs fit loosely into receptacles, they may
slip partially or completely out of the receptacle
with only the slight movement of the attached cord.
Receptacles in this condition may overheat and
pose a serious fire hazard; if covered by a curtain
or drape, the fire hazard is even greater.
4. When the Heater is initially plugged in, there will be a ‘beep’ and
the Power Light will come on indicating that there is power to the
unit. The Power Light will remain lit until the Heater is unplugged
from the electrical outlet.
5. Turn the Heater ON by pressing the Power Button.
6. When initially turned on, the Heater will be in High heat (1500 Watts)
on Max. (The High light will be steady and the Max light will be blinking).
7. Press the Power Button once and the Heater will be in Low Heat
indicated by the steady light beside Low.
8. Pressing the Power Button a third time will turn the Heater OFF.
9. When the Heater is turned OFF, the red light on the Heater will
remain lit until the Heater is unplugged from the electrical outlet.
Oscillation Function:
1. Pressing the Oscillation Button
(OSC)
will allow the Heater to
oscillate back and forth. To stop the oscillation, press the Os-
cillation Button
(OSC)
again. When the Heater is in Automatic
Temperature Control, the oscillation function will stop when the
set temperature is reached and resume when the Heater turns
back on.
Rev. C 4/13
10
5790ES
Rev. C 4/13
3
5790ES
MODEL 5790
Temperature Function
Figure 2
Figure 3
Timer
Button
Temperature Function
(Figure 2)
The automatic temperature function will only operate on "High"
heat. You cannot set the temperature automatically when the
unit is in the low heat mode.
1 . To s e t t h e ro o m a t a s p e c i f i c t e m p e r a t u re , p re s s t h e
Te m perature Button
to the desired setting. The light under
the chosen temperature will continue to blink until the room
reaches the desired temperature. The Heater will cycle off and
on to maintain the room temperature. When set on MAX, the
Heater will run continuously.
Timer Function
(Figure 3)
1. The Timer Function may be activated when the Heater display
is in any speed or temperature. This function allows you to set
the length of time the Heater will run before turning itself off,
from 1 hour to 7 hours. Pressing the Timer Button will increase
the length of time, in combinations of 1, 2 and 4 hours. Continu-
ously pressing the button will result in the timer being set for 7
hours. The Heater will turn off when the set time has elasped.
The unit can be turned back on by pressing the Power Button.
NOTE: When the Temperature Button is set to the MAX setting,
the unit will shut off when time length has elapsed.
Timer Function
Temperature
Button
Display when Heater is initially turned on
Power Light
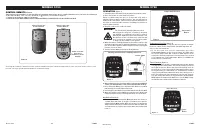
MODELO 5790
CONTROL REMOTO
Figura 4
Todas las funciones realizadas con el Control Remoto operan del mismo modo que los controles manuales, m
enos la vuelta de la
Calefactor
de Alto Calentar Bajo. Esto es hecho apretando el ( ) el Botón en su mando a distancia.
1 .
Instale las dos baterías “AAA” (no incluidas).
2. NO SE DESHÁGA DE BATERÍAS EN EL FUEGO. BATERÍAS PUEDEN ESTALLAR O PUEDEN SALIRSE.
Vista de frente del
Control Remoto
Si usted pierde su mando a distancia, por favor Cliente de llamada Serive para ordenar un reaplacement en 1-800 -233-0268, de lunes a viernes, entre
las 8 a.m. y las 5 p.m. (Horario Estándar del Este de los Estados Unidos).
Figura 4
Vista posterior del
Control Remoto
Retire el tornillo
antes de la
instalación de las
baterías
Figure 1
"Cargando la instrucción" significa que debes esperar hasta que el archivo se cargue y puedas leerlo en línea. Algunas instrucciones son muy grandes y el tiempo de carga depende de la velocidad de tu conexión a Internet.
Resumen
Rev. C 4/13 2 5790ES 11 5790ES Rev. C 4/13 MODELO 5790 MANTENIMIENTO Para reducir el riesgo de choque eléctrico e incendio por favor obedezca las siguientes instrucciones. Limpiar el Calefactor regularmente ayudará a mantener su eficiencia. - Siempre desconecte el cable eléctrico antes de mov...
OPERATION (Figure 1) 1. Carefully remove the Heater from the plastic bag and the carton.2. Place the Heater on a firm and level surface.Plastic or rubber tabs, like the feet on this unit, may stick to furniture surfaces and/or hardwood floors. The unit may leave a residue that could darken, stain or...
Rev. C 4/13 4 5790ES Rev. C 4/13 9 5790ES MODEL 5790 FUNCIONAMIENTO (Figura 1) 1. Cuidadosamente retire el Calefactor de la bolsa y de la caja.2. Coloque el Calefactor sobre una superficie firme y plana. Los tacos de plástico o hule, tales como las patas de esta unidad, pueden pegarse a la superfic...
Otros modelos de calentadores Lasko
-
 Lasko 101
-
 Lasko 5160
-
 Lasko 5309
-
 Lasko 5397
-
 Lasko 5409
-
 Lasko 5538
-
 Lasko 5572
-
 Lasko 5624
-
 Lasko 5775
-
 Lasko 5790