QT; Primo® Pre-Filled Exchange Water or Self-Service Refill - Primo 601243-C - Manual de uso - Página 2
Índice:
- Página 1 – Water Dispenser + Pet Station; WARNINGS & SAFETY PRECAUTIONS; DELUXE PET FEATURES; FEATURES; ater; CARA
- Página 2 – QT; Primo® Pre-Filled Exchange Water or Self-Service Refill
- Página 3 – OPERATING INSTRUCTIONS
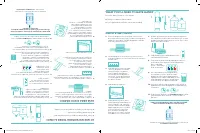
WHAT YOU’LL NEED TO HAVE HANDY
1.
Primo
®
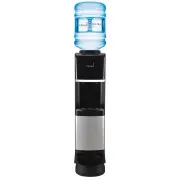
Water Dispenser + Pet Station
2.
Phillips screwdriver (not included)
3.
3 or 5-gallon bottle of Primo
®
water (not included)
QUICK START GUIDE
2
®
®
3
1
1 2 3 4
1
QT
1
HR
12
MIN
1.
Place the dispenser on a level floor surface in the
desired location in your home. Product is intended for
indoor use only. [Note: Do NOT plug power cord into
wall outlet until instructed.]
2.
Position dispenser so the back is at least 4 inches
from wall and there are at least 4 inches of clearance
on both sides.
3.
Clip wall bracket onto rear right
corner of dispenser as shown.
Using a Phillips screwdriver
(not included), install plastic
anchor directly into drywall or
sheetrock. Secure by installing
screw through the bracket into
the plastic anchor.
4.
Slide drip tray into place.
5.
Grab a bottle of Primo
®
water
(sold separately) and remove the
sticker from the cap. Carefully
lift bottle and insert onto probe.
Apply slight pressure if needed
to ensure that the cap is fully
pierced. Water will begin to
flow into the reservoirs causing
air bubbles to rise in the bottle.
6.
Remove pet bowl tray from the top of the dispenser.
Place bowl tray in desired location (front, left, or right)
and push into place until you hear a click. Place cover
panels over unused sides.
7.
Plug dispenser into a ground fault circuit
interrupting (GFCI) outlet.
8.
Turn on desired functions by flipping the switches
on the back of the dispenser to the ON position.
Blue - nightlight
Green - chills water
Red - heats water
9.
Once the dispenser has stopped filling
the internal reservoirs, dispense and
dispose at least 1 quart (approximately
2 pint glasses) of water from both the hot
and cold spouts. Dispense enough water
to fill half of the pet bowl then discard.
10.
Your water will be ready to dispense fully chilled in
approximately 1 hour or piping hot in approximately
12 minutes.
11.
Register your dispenser at PrimoWater.com to activate
your warranty, which runs for 1 year from date of
purchase.
Available at thousands of locations nationwide. Learn more at
PrimoWater.com/locations.
Primo® Pre-Filled Exchange Water or Self-Service Refill
Water from Primo® & Glacier® (sold separately)
LO
Q
UE NE
CES
ITARÁ
TENER
A
MAN
O
1.
Primo
®
Dispensador De Agua + Es
tación P
ara Masc
otas
2.
Des
tornillador Phillips (no incluido)
3.
Bot
ellón de 3 o 5 galones de agua Primo
®
(no incluido)
GUÍA
PARA
INI
CIO
RÁP
IDO
2
®
®
3
1
1
2
3
4
1
QT
1
HR
12
MIN
1.
Coloque el dispensador sobr
e el piso nivelado en el
lugar selec
cionado de su casa. Es
te pr
oducto solament
e
debe usarse en int
eriores. [Not
a: NO enchufe el c
ordón
eléctrico en el t
omacorrient
e de la pared has
ta que se l
e
indique].
2.
Coloque el dispensador de maner
a que la parte tr
asera
esté por l
o menos a 4 pulgadas (10 cm) de la pared y hay
a
por lo menos 4 pulgadas de espacio en ambos lados.
3.
Enganche el soporte de par
ed en la
esquina derecha del dispensador
como se mues
tra. Con un
destornillador Phillips (no incluido),
instal
e el ancla de plástic
o
direct
amente en el panel de y
eso.
Asegure ins
talando el t
ornillo a tr
avés
del soporte y dentr
o del anclaje de plástic
o.
4.
Deslice la bandeja de got
eo en su lugar .
5.
T ome un bot
ellón de agua Primo
®
(vendido por separ
ado) y retir
e la
pegatina de la tapa. Cuidadosament
e
lev
ante el bot
ellón e inserte el tubo
surtidor . Pr
esione lev
emente si es
necesario par
a asegurar que la
tapa es
té compl
etament
e
perfor
ada. El agua empezará a
fluir a los t
anques produciendo
burbujas de agua que se elev
arán
en el botellón.
6.
Retire el t
azón para masc
otas de la part
e superior del
dispensador . Col
oque la bandeja del tazón en el lugar
deseado (al frent
e, a la izquierda o a
la derecha) y empújel
o en su lugar
hasta que escuche un clic. Col
oque
los panel
es para r
ecubrir los lados
no utilizados.
7.
Enchufe el dispensador en un
tomac
orriente c
on circuit
o de
falla a tierr
a (GFCI, por sus
siglas en inglés).
8.
Active las funciones deseadas c
oloc
ando los int
erruptor
es
situados en la parte tr
asera del dispensador en la
posición ON (activado).
Azul: luz nocturna
Ver
de: enfría agua
Rojo: calient
a agua
9.
Después que el dispensador haya t
erminado
de llenar l
os tanques int
ernos, dispense y
deseche por lo menos 1 cuart
o de galón
(aproximadament
e 2 pintas o 946 ml) de
agua por los surtidor
es de agua calient
e y
fría. Dispense suficiente agua par
a llenar
la mitad del t
azón para masc
otas y luego deséchela.
10.
El agua estará lis
ta par
a dispensar compl
etament
e fría
en aproximadament
e 1 hora y agua e
xtremadament
e
calient
e en aproximadament
e 12 minutos.
11.
Registr
e su dispensador en PrimoW
ater
.com
para activ
ar
su garantía de un año a partir de la f
echa de compr
a.
Disponible en mil
es de ubicaciones en t
odo el país.
Conozca más en
PrimoWat
er .c
om/loc
ations.
Agua Pr
imo® de
l progr
ama de descuen
to a c
ambio de b
ote
lla
o de aut
oservici
o de resur
tido de ag
ua de Prim
o® & Gla
cier
®
(de v
enta p
or separ
ado
)
17-PRMO-2028-Pet Dispenser_FINAL_PrinterSpreads.indd 5-6
12/7/17 8:41 AM
"Cargando la instrucción" significa que debes esperar hasta que el archivo se cargue y puedas leerlo en línea. Algunas instrucciones son muy grandes y el tiempo de carga depende de la velocidad de tu conexión a Internet.
Resumen
Water Dispenser + Pet Station #601243 T255 You’ve just chosen better water for you and your family! The Primo ® Water Dispenser + Pet Station means all of your family members (four-legged included) can drink quality water with the convenience of a single, easy-to-use dispenser! Thanks for trusting ...
WHAT YOU’LL NEED TO HAVE HANDY 1. Primo ® Water Dispenser + Pet Station 2. Phillips screwdriver (not included) 3. 3 or 5-gallon bottle of Primo ® water (not included) QUICK START GUIDE 2 ® ® 3 1 1 2 3 4 1 QT 1 HR 12 MIN 1. Place the dispenser on a level floor surface in the desired location in y...
Water Dispenser + Pet Station LIMITED WARRANTY Primo Water Corporation, (“Vendor”) warrants to the original purchaser of this dispenser, and to no other person, that if this dispenser is assembled and operated in accordance with the printed instructions accompanying it, then for a period of one (1...
Otros modelos de dispensadores de agua Primo
-
 Primo 601244
-
 Primo 601363
-
 Primo 601258-C
-
 Primo 601324-C