Sharper Image SI-470 - Manual de uso - Página 3

Vapor Sharper Image SI-470 - Manual de uso, léela gratuitamente en línea en formato PDF. Esperamos que esto te ayude a resolver cualquier duda que puedas tener. Si tienes más preguntas, contáctanos a través del formulario de contacto.
Índice:
34 Français
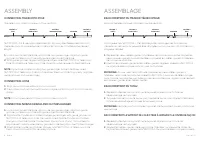
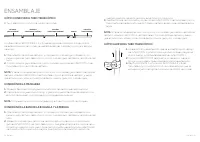
vous d’orienter le support de l’injecteur à vapeur et le cintre de façon que le
support de l’injecteur à vapeur soit dirigé vers l’avant de l’appareil. Cette position
aidera à améliorer la stabilité de l’appareil quand des vêtements lourds seront
accrochés sur le crochet de cintre.
3.
Faites glisser le support de l’injecteur à vapeur et le cintre de façon sur la
SECTION 1 du manche télescopique. Appuyez fermement jusqu’à ce que la
partie supérieure du manche se fixe solidement en place.
REMARQUE :
Si vous avez de la difficulté à repérer les deux arêtes-guides à
l’intérieur de la base du manche, insérez la SECTION 4 du manche télescopique
dans la base du manche, puis faites pivoter le manche pour aligner correctement
les rainures-guides et les arêtes-guides.
RÉGLAGE DU MANCHE TÉLESCOPIQUE
1.
Dégagez le verrou d’extension directement sous la
SECTION 1 en faisant basculer la charnière vers le côté,
comme illustré. Vous pouvez maintenant allonger ou rac
courcir la SECTION 1.
2.
Une fois la SECTION 1 réglée à la longueur désirée, rabattez
la charnière afin de fermer à nouveau le verrou d’extension.
3.
Répétez les ÉTAPES 1 et 2 pour les SECTIONS 2 et 3 du
manche télescopique, en utilisant le verrou d’extension situé
directement sous chacune de ces sections.
7
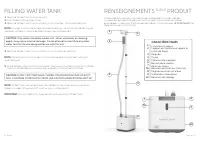
English
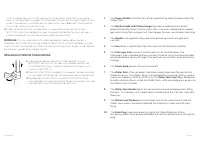
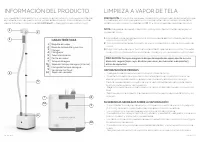
The
Steam Nozzle
emits the flow of hot, penetrating steam produced by the
Water Tank.
The
Nozzle Cradle and Clothes Hanger
provides a safe and convenient
place to hang the steam nozzle when not in use and is designed to support
garments hung from a clean rust-free hanger for easy, accessible steaming.
The
Handle
is designed to stay cool while providing maximum grip and
comfort.
The
Hose
directs steam flow from the main unit to the Steam Nozzle.
The
Telescopic Pole
connects to the main unit at the Pole Base. The
Telescopic Pole is divided into four sections, three of which can be extended
and lowered to a variety of heights for optimal user comfort and convenient
storage.
The
Steam Knob
powers the unit on and off.
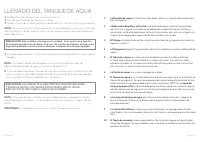
The
Water Tank
is the container that holds water to be transferred into the
Water Reservoir. The Water Tank is removeable for convenient filling, up to a
maximum capacity of 54 oz (1597ml). The
Water Tank Cap
(7A)
is designed
to safely contain steam inside the Water Tank, while providing easy access to
the Water Tank’s fill hole.
The
Water Tank Handle
allows for convenient removal and grip when filling
the tank. This handle is not meant to be used to move the Canister Garment
Steamer.
The
Water Level Window
permits a clear view of the water level inside the
Water Tank, and is marked to indicate the maximum water level for easy
filling.
The
Drain Plug
is opened to easily empty the Water Reservoir of any
remaining water. Use caution and allow the unit to cool before removing the
plug.
1
2
3
4
5
6
7
8
9
10
"Cargando la instrucción" significa que debes esperar hasta que el archivo se cargue y puedas leerlo en línea. Algunas instrucciones son muy grandes y el tiempo de carga depende de la velocidad de tu conexión a Internet.
Resumen
14 English Vornado Air, LLC warrants to the original consumer or purchaser this Sharper Image® Steam Product (“Product”) is free from defects in material or workmanship for a period of one (1) year from the date of purchase. If any such defect is discovered within the warranty period, Vornado, at it...
26 Español RESOLUCIÓN DE PROBLEMAS POSIBLE CAUSA Y SOLUCIÓN PROBLEMA La unidad no cali-enta. La unidad no está enchufada. Enchufe el cable de ali-mentación en el tomacorriente. El interruptor de circuito/la falla a tierra del hogar se desconectó o se quemó un fusible. Vuelva a conectar el interrupto...
16 Español INSTRUCCIONES DE SEGURIDAD IMPORTANTES Este manual de usuario y todos los folletos adicionales se consideran parte del producto. Contienen información importante sobre seguridad, utilización y eliminación. Antes de utilizar el producto, lea todas las instrucciones de seguridad y de operac...