de la manija; Assemblage; poignée; HANDLE ASSEMBLY HARDWARE PACKAGE; PAQUETE DE PERNOS Y TUERCAS PARA EL ENSAMBLAJE DE LA MANIJA; NECESSAIRE DE QUINCAILLERIE POUR L’ASSEMBLEE DE LA POIGNEE; Handle; Figure 1; Ilustración 1; Illustration 1 - American Lawn Mower 1304-14GC - Manual de uso - Página 2


Índice:
- Página 2 – de la manija; Assemblage; poignée; HANDLE ASSEMBLY HARDWARE PACKAGE; PAQUETE DE PERNOS Y TUERCAS PARA EL ENSAMBLAJE DE LA MANIJA; NECESSAIRE DE QUINCAILLERIE POUR L’ASSEMBLEE DE LA POIGNEE; Handle; Figure 1; Ilustración 1; Illustration 1
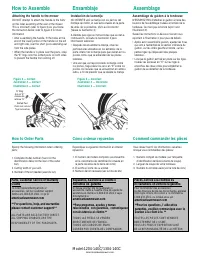
- Página 3 – How to Assemble; Attaching the handle to the mower; Ensamblaje; Instalación de la manija; Assemblage du guidon à la tondeuse; How to Order Parts; notre ligne directe du soutien à la clientèle au; Figure 2 — Correct; Ilustración 2 — Correct; Illustration 2 — Correct; Figure 3 — Incorrect; Ilustración 3 — Incorrecto; Illustration 3 — Incorrect; Comment commander les piè ces
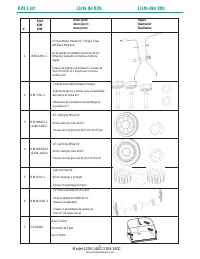
- Página 5 – Figure 4; Ilustración 4; Illustration 4; Usage and Care; General Care; Pautas generales para el cuidado; Entretien général; To prevent unnecessary wear on
- Página 6 – Figure 5; Ilustración5; Illustration 5; Do not adjust unless absolutely needed.
- Página 7 – Sharpening the cutting blades; Pour aiguiser les lames; Ilustración 6
- Página 8 – California Proposition 65 Warning:; ANY; ççç; propulsion non manuelle utilisée dans
- Página 10 – Refer to figure 3; Proposición 65 de California:
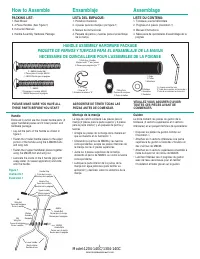
How to Assemble
PACKING LIST:
1. Reel Mower
2. 4 Piece Handles (See Figure 1)
3. Instruction Manual
4. Handle Assembly Hardware Package
Ensamblaje
LISTA DEL EMPAQUE:
1. Podadora mecánica
2. 4 piezas para las manijas (ver figura 1)
3. Manual de instrucciones
4. Paquete de pernos y tuercas para el ensamblaje
de la manija
Assemblage
LISTE DU CONTENU:
1. Tondeuse à lame hélicoïdale
2. Poignée en 4 pièces (illustration 1)
3. Manuel d’instructions
4. Nécessaire de quincaillerie d’assemblage de la
poignée
HANDLE ASSEMBLY HARDWARE PACKAGE
PAQUETE DE PERNOS Y TUERCAS PARA EL ENSAMBLAJE DE LA MANIJA
NECESSAIRE DE QUINCAILLERIE POUR L’ASSEMBLEE DE LA POIGNEE
2 - M6X55 Handle Bolt
2 Pernos para la manija, M6X55
2 - M6X55 Boulon pour la poignée
1 - M6X45
1 Pernos para la manija,
M6X45
1 - M6X45 Boulon pour la poignée
T-Style 4 pc. Handles
Manijas estilo "T" de 4 piezas
4 Pièces pour poignée style "T"
2 "E" Rings
2 Aros en "E"
2 Anneaux de retenue "E"
3 Wing Nuts
3 Tuercas de mariposa
3 Écrou à oreilles
3 Washers
3 Arondelas
3 Rondelles
2 Grips
2 Puños
2 Manchons
PLEASE MAKE SURE YOU HAVE ALL
THESE PARTS BEFORE YOU START
VEUILLEZ VOUS ASSURER D’AVOIR
TOUTES CES PIÈCES AVANT DE
COMMENCER.
ASEGÚRESE DE TENER TODAS LAS
PIEZAS ANTES DE COMENZAR.
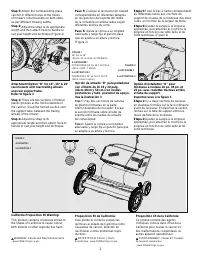
Handle
Enclosed in carton are the: mower handle parts (2
upper handlebar pieces and 2 lower pieces) and
hardware package.
• Lay out the parts of the handle as shown in
figure 1.
• Fasten the 2 lower handle pieces to the upper
portion of the handle using the 2-M6X55 bolts
and wing nuts.
• Fasten the 2 upper handlebar pieces together
using the M6X45 bolt and wing nut.
• Lubricate the inside of the 2 handle grips with
soapy water (for easier application) and slide
onto the handle.
Montaje de la manija
La caja de cartón contiene: Las piezas para lo
manija (2 piezas para la parte superior y 2 piezas
para la parte inferior) y un paquete de pernos y
tuercas.
• Arregle las piezas de la manija de la manera en
que se muestra en la Ilustración 1.
• Utilizando los pernos de M6X55 y las tuercas
correspondientes, acople las piezas inferiores de
la manija con las 2 piezas superiores.
• Junte las 2 piezas superiores de la manija
utilizando el perno de M6X45, así como la tuerca
correspondiente.
• Lubrique la parte inferior de los puños de la
manija con agua jabonosa (para facilitar su
aplicación) y deslícelo sobre los extremos de la
manija.
Guidon
La boîte contient: les pièces du guidon de la
tondeuse (2 sections supérieures et 2 sections
inférieures) et un paquet d'articles de quincaillerie.
• Disposer les pièces du guidon comme sur
l'illustration 1.
• Attachez les 2 sections inférieures à la partie
supérieure du guidon à l'aide des 2 boulons et
des 2 écrous de M6X55.
• Attachez les 2 sections supérieures ensemble à
l'aide du boulon et de l'écrou de M6X45.
• Lubrifiez l'intérieur des 2 poignées du guidon
avec de l'eau savonneuse pour en faciliter
l'installation et faites glisser sur le guidon.
Figure 1
Ilustración 1
Illustration 1
M6
Wing Nut
Tuerca de mariposa
Écrou à oreilles
Lower Handle
Manija inferior
Section du bas
M6X45
Handle Bolt
Pernos para ls manija
Boulon pour la poignée
M6X55
Handle Bolts
Pernos para ls manija
Boulon pour la poignée
M6
Wing Nut
Tuerca de mariposa
Écrou à oreilles
Washer
Arondela
Rondelle
Upper Handle
Manija superio
Section du haut
Handle Plug
Tapón de la manija
Bouchon de la poignée
Handle Grip
Puño de la manija
Manchon de la poignée
2
Americanlawnmower.com
2 L-shaped connection tube
2 Tubo de conexión en forma de L
2 Tube de raccordement en forme de L
Model:1204-14GC/1304-14GC
"Cargando la instrucción" significa que debes esperar hasta que el archivo se cargue y puedas leerlo en línea. Algunas instrucciones son muy grandes y el tiempo de carga depende de la velocidad de tu conexión a Internet.
Resumen
How to Assemble PACKING LIST: 1. Reel Mower2. 4 Piece Handles (See Figure 1)3. Instruction Manual4. Handle Assembly Hardware Package Ensamblaje LISTA DEL EMPAQUE: 1. Podadora mecánica2. 4 piezas para las manijas (ver figura 1)3. Manual de instrucciones4. Paquete de pernos y tuercas para el ensamblaj...
How to Assemble Attaching the handle to the mower DO NOT attempt to attach the handle to the boltson the roller assembly at the rear of the mower.This is incorrect! (refer to figure 3) As you followthe instruction below, refer to figure 2 for moreinformation. • After assembling the handle, fit the h...
Minor cutting height adjustments The cutting height on these units can be adjust-ed simply by adjusting the roller assembly.Model 1204-14GC can be adjusted from 1/2" (1.27cm) to 1 3/4" (4.45 cm) and Model 1304-14GC canbe adjusted from 1" (2.54 cm) to 2 1/4" (5.72cm). Keep in mind tha...
Otros modelos de cortacéspedes American Lawn Mower
-
 American Lawn Mower 1304-14-21
-
 American Lawn Mower 1815-18-21