How to Assemble; Attaching the handle to the mower; Ensamblaje; Instalación de la manija; Assemblage du guidon à la tondeuse; How to Order Parts; notre ligne directe du soutien à la clientèle au; Figure 2 — Correct; Ilustración 2 — Correct; Illustration 2 — Correct; Figure 3 — Incorrect; Ilustración 3 — Incorrecto; Illustration 3 — Incorrect; Comment commander les piè ces - American Lawn Mower 1304-14GC - Manual de uso - Página 3

Índice:
- Página 2 – de la manija; Assemblage; poignée; HANDLE ASSEMBLY HARDWARE PACKAGE; PAQUETE DE PERNOS Y TUERCAS PARA EL ENSAMBLAJE DE LA MANIJA; NECESSAIRE DE QUINCAILLERIE POUR L’ASSEMBLEE DE LA POIGNEE; Handle; Figure 1; Ilustración 1; Illustration 1
- Página 3 – How to Assemble; Attaching the handle to the mower; Ensamblaje; Instalación de la manija; Assemblage du guidon à la tondeuse; How to Order Parts; notre ligne directe du soutien à la clientèle au; Figure 2 — Correct; Ilustración 2 — Correct; Illustration 2 — Correct; Figure 3 — Incorrect; Ilustración 3 — Incorrecto; Illustration 3 — Incorrect; Comment commander les piè ces
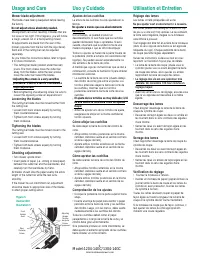
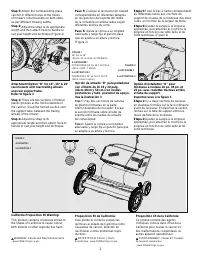
- Página 5 – Figure 4; Ilustración 4; Illustration 4; Usage and Care; General Care; Pautas generales para el cuidado; Entretien général; To prevent unnecessary wear on
- Página 6 – Figure 5; Ilustración5; Illustration 5; Do not adjust unless absolutely needed.
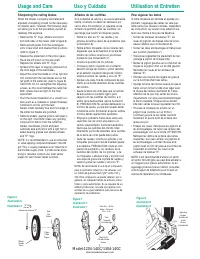
- Página 7 – Sharpening the cutting blades; Pour aiguiser les lames; Ilustración 6
- Página 8 – California Proposition 65 Warning:; ANY; ççç; propulsion non manuelle utilisée dans
- Página 10 – Refer to figure 3; Proposición 65 de California:
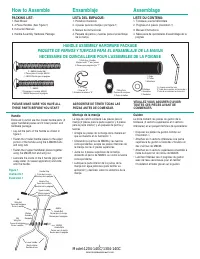
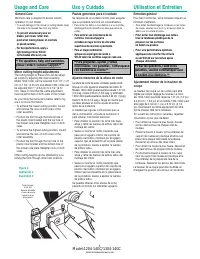
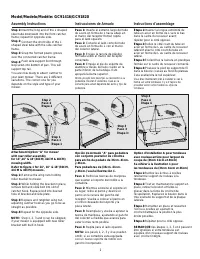
How to Assemble
Attaching the handle to the mower
DO NOT attempt to attach the handle to the bolts
on the roller assembly at the rear of the mower.
This is incorrect! (refer to figure 3) As you follow
the instruction below, refer to figure 2 for more
information.
• After assembling the handle, fit the holes at the
end of the lower portion of the handle on the left
and right side, over the short posts extending out
from the side plates.
• When the handle is in place over the posts, snap
the “E” rings onto the slotted posts on both sides
to prevent the handle from coming off.
Ensamblaje
Instalación de la manija
NO INTENTE unir la manija con los pernos del
montaje de rodillo, el cual está situado en la parte
de atrás de la podadora. ¡Esto es incorrecto!
(Véase la Ilustración 3)
A medida que siga las instrucciones que se dan a
continuación, consulte la Ilustración 2 para
información adicional.
• Después de ensamblar la manija, sitúe las
perforaciones ubicadas en los extremos de la
parte inferior de la manija para que calcen en los
postes cortos que se extienden de las placas
laterales.
• Una vez que se haya colocado la manija sobre
los postes, haga calzar los aros en "E" sobre los
postes con ranuras que se encuentran en ambos
lados, a fin de prevenir que se desate la manija.
Assemblage
Assemblage du guidon à la tondeuse
N'ESSAYEZ PAS d'attacher le guidon à l'aide des
boulons de l'assemblage rouleau à l'arrière de la
tondeuse. Ce n'est pas la bonne façon! (voir
l'illustration 3)
Suivez les instructions ci-dessous tout en vous
reportant à l'illustration 2 pour plus de détails.
• Après avoir assemblé le guidon, ajustez les trous
qui sont à l'extrémité de la section inférieure du
guidon, sur les côtés gauche et droite, sur les
petites tiges qui dépassent des plaques
latérales.
• Lorsque le guidon est fixé en place sur les tiges,
insérez les anneaux en "E" sur les tiges à
encoches des deux côtés pour empêcher le
guidon de se détacher de la tondeuse.
3
Americanlawnmower.com
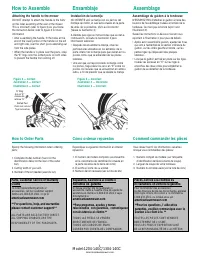
How to Order Parts
Specify the following information when ordering
parts:
Cómo ordenar repuestos
Especifique la siguiente información al ordenar
repuestos:
Vous devez fournir les informations suivantes
lorsque vous commandez des pièces:
Parts, Customer Service or Warranty
Claims
To order replacement part kits or
accessories, call our customer support
hotline at 1-800-633-1501, or go to
americanlawnmower.com
** For questions, help, and warranties
please contact customer support.**
ALL PARTS ARE SOLD FACTORY DIRECT.
ALL SHIPPING CHARGES ARE THE
RESPONSIBILITY OF THE PURCHASER.
ou des trousses de piè ces de rechange, appelez
1 800 633-1501, ou rendez-vous sur
TOUTES LES PIECES SONT VENDUES
DIRECTEMENT DE L’USINE.
TOUS LES FRAIS D’EXPEDITION SONT
DE LA RESPONSABILITE DE L’ACHETEUR
Pour commander des accessoires
Piè ces, service à la clientè le ou
ré clamations en vertu de la garantie
americanlawnmower.com
**Pour les questions, l' aide et les
garanties, veuillez communique avec le
soutien à la client è le. **
accesorios, llame a nuestra línea de ayuda de
asistencia al cliente al 1-800-633-1501 o vaya
directamente a
TODAS LAS PIEZAS SE VENDEN
DIRECTAMENTE DE FABRICA.
TODOS LOS CARGOS DE ENVIO
CORREN POR CUENTA DEL COMPRADOR.
Si desea solicitar kits de reemplazo o
Repuestos, Asistencia al cliente o
Reclamos de garantía
**Para preguntas, ayudas y temas
relacionados con garantías, comuníquese
con Asistencia al cliente.**
americanlawnmower.com
notre ligne directe du soutien à la clientèle au
1. Complete model number (found on the
identification decal on the rear of the cutter
bar).
2. Cutting width of your unit.
1. El número de modelo completo (se encuentra
en la calcomanía de identificación situada en
la parte de atrás de la barra de corte).
1. Numéro complet du modèle (sur l’étiquette
d’identification derrière la barre de coupe)
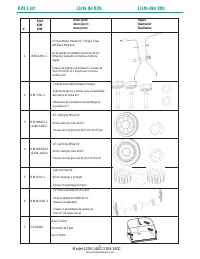
3. Number of the kit needed (see kits list).
3. Número del kit necesario(ver la lista de kits)
3. Numéro du kit nécessaire(voir la liste des kits)
2. El ancho el corte de su unidad.
2. Larguer de coupe de votre tondeuse
Figure 2 — Correct
Ilustración 2 — Correct
Illustration 2 — Correct
"E" Ring
Aro en "E"
Anneau de
retenue "E"
Slotted Post
Poste con ranuras
Tige à encoches
Figure 3 — Incorrect
Ilustración 3 — Incorrecto
Illustration 3 — Incorrect
Comment commander les piè ces
Model:1204-14GC/1304-14GC
"Cargando la instrucción" significa que debes esperar hasta que el archivo se cargue y puedas leerlo en línea. Algunas instrucciones son muy grandes y el tiempo de carga depende de la velocidad de tu conexión a Internet.
Resumen
How to Assemble PACKING LIST: 1. Reel Mower2. 4 Piece Handles (See Figure 1)3. Instruction Manual4. Handle Assembly Hardware Package Ensamblaje LISTA DEL EMPAQUE: 1. Podadora mecánica2. 4 piezas para las manijas (ver figura 1)3. Manual de instrucciones4. Paquete de pernos y tuercas para el ensamblaj...
How to Assemble Attaching the handle to the mower DO NOT attempt to attach the handle to the boltson the roller assembly at the rear of the mower.This is incorrect! (refer to figure 3) As you followthe instruction below, refer to figure 2 for moreinformation. • After assembling the handle, fit the h...
Minor cutting height adjustments The cutting height on these units can be adjust-ed simply by adjusting the roller assembly.Model 1204-14GC can be adjusted from 1/2" (1.27cm) to 1 3/4" (4.45 cm) and Model 1304-14GC canbe adjusted from 1" (2.54 cm) to 2 1/4" (5.72cm). Keep in mind tha...
Otros modelos de cortacéspedes American Lawn Mower
-
 American Lawn Mower 1304-14-21
-
 American Lawn Mower 1815-18-21