Cleaning the Feed Dogs; Performance Checklist; Liste de vérification en cas de; Listado de posibles incidencias; Очистка гребенок транспортера; Таблица контрольных проверок - Brother X-5 - Manual de uso - Página 49


Índice:
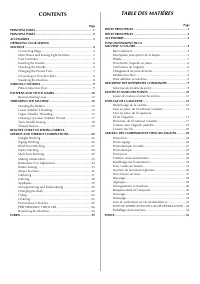
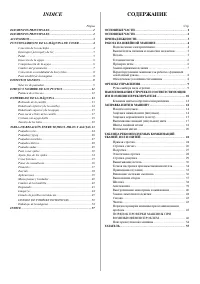
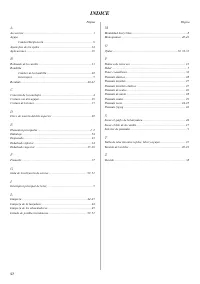
- Página 5 – INDICE; СОДЕРЖАНИЕ
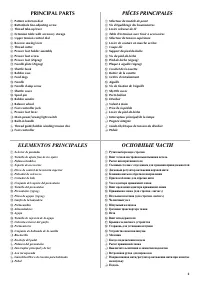
- Página 6 – PRINCIPAL PARTS; PIECES PRINCIPALES; ELEMENTOS PRINCIPALES
- Página 7 – PIÉCES PRINCIPALES
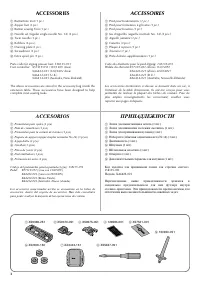
- Página 8 – ACCESSORIES; ACCESSOIRES; ПРИНАДЛЕЖНОСТИ
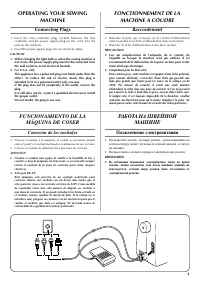
- Página 9 – Connecting Plugs; FONCTIONNEMENT DE LA; Raccordement; FUNCIONAMIENTO DE LA; Conexión de los enchufes; РАБОТА НА ШВЕЙНОЙ; Подключение электропитания
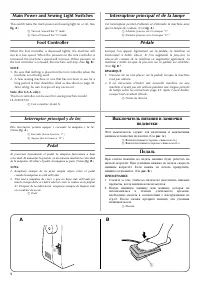
- Página 10 – Main Power and Sewing Light Switches; Foot Controller; Interrupteur principal et de la lampe; Interruptor principal y de luz; Выключатель питания и лампочки
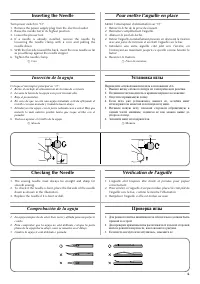
- Página 11 – Inserting the Needle; Checking the Needle; Pour mettre l’aiguille en place; Vérification de l’aiguille; Comprobación de la aguja; Установка иглы; Проверка иглы
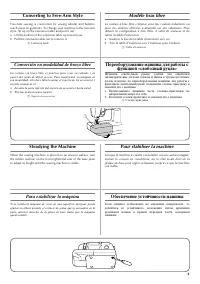
- Página 13 – Converting to Free-Arm Style; Steadying the Machine; Modèle bras libre; Pour stabiliser la machine; Para estabilizar la máquina; Переоборудование машины для работы с; Обеспечение устойчивости машины
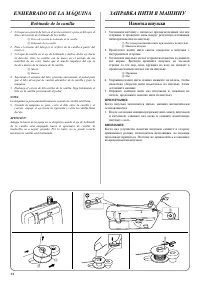
- Página 17 – ENHEBRADO DE LA MÁQUINA; Bobinado de la canilla; ЗАПРАВКА НИТИ В МАШИНУ; Намотка шпульки
- Página 23 – Costura con aguja doble; Шитье двойной иглой; УСТАНОВКА ДВОЙНОЙ ИГЛЫ; ЗАПРАВКА ДВОЙНОЙ ИГЛЫ НИТЬЮ
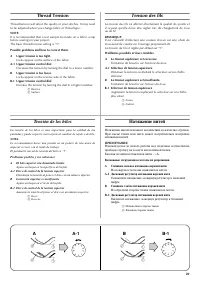
- Página 24 – Thread Tension; Tension des fils; Tensión de los hilos; Натяжение нитей; Возможные затруднения и методы их разрешения.; AE1 Дисковый регулятор натяжения верхней нити; BE1 Дисковый регулятор натяжения верхней нити
- Página 25 – Слишком слабое натяжение нижней нити.
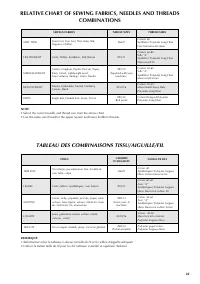
- Página 27 – TABLA DE RELACIÓN ENTRE TEJIDOS, HILOS Y AGUJAS; ТАБЛИЦА РЕКОМЕНДУЕМЫХ КОМБИНАЦИЙ ТКАНЕЙ,
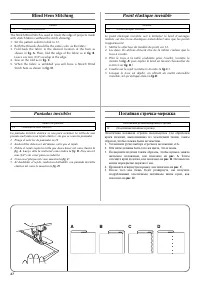
- Página 31 – Blind Hem Stitching; Point élastique invisible; Puntadas invisibles; Потайная строчкаEмережка
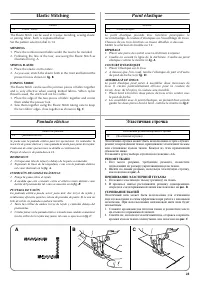
- Página 32 – Elastic Stitching; MENDING; JOINING FABRIC; Point élastique; Puntada elástica; Эластичная строчка; РЕМОНТ ТКАНИ; ПРИШИВАНИЕ ЭЛАСТИЧНОЙ ТЕСЬМЫ; СТАЧИВАНИЕ ТКАНЕЙ
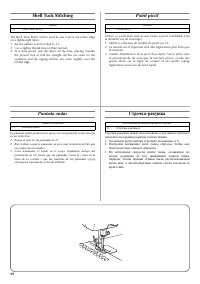
- Página 33 – Shell Tuck Stitching; Point picot; Puntada ondas; СтрочкаEракушка
- Página 34 – Making a Buttonhole; MAKING A BUTTONHOLE; Création d’une boutonnière; Para coser ojales; Выметывание петель; ВЫПОЛНЕНИЕ ВЫМЕТЫВАНИЯ ПЕТЕЛЬ
- Página 37 – ЗАКРЕПЛЕНИЕ СТРОЧКИ И ПРОРЕЗКА ПЕТЛИ
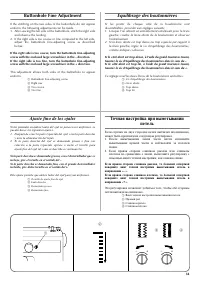
- Página 38 – Buttonhole Fine Adjustment; Equilibrage des boutonnières; Ajuste fino de los ojales; Точная настройка при выметывании
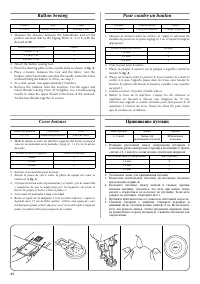
- Página 39 – Button Sewing; Pour coudre un bouton; Coser botones; Пришивание пуговиц
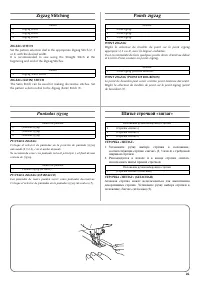
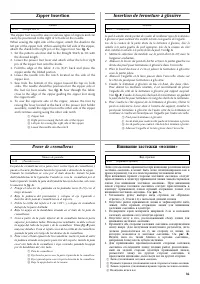
- Página 40 – Zipper Insertion; Insertion de fermeture à glissière; Poner de cremalleras; Вшивание застежки «молния»
- Página 41 – Gathering; Pour froncer un tissu; Fruncido; Выполнение сборок
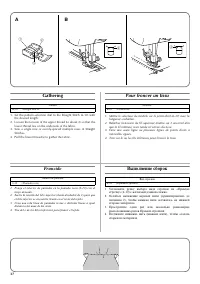
- Página 44 – Monogramming and Embroidering; PREPARING FOR MONOGRAMMING AND EMBROIDERING; Monogrammes et broderies; Monogramas y bordados; Выстрачивание монограмм и вышивание
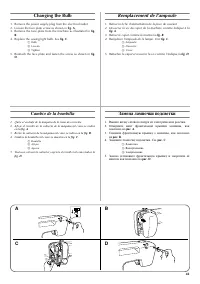
- Página 46 – Changing the Bulb; Remplacement de l’ampoule; Cambio de la bombilla; Замена лампочки подсветки
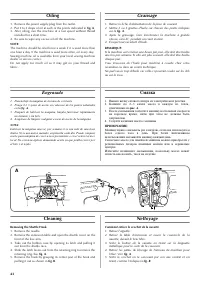
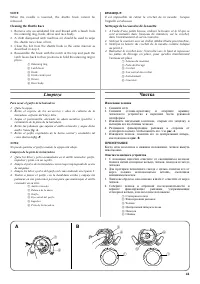
- Página 48 – Cleaning the Shuttle Race; Limpieza; Чистка; Извлечение челнока
- Página 49 – Cleaning the Feed Dogs; Performance Checklist; Liste de vérification en cas de; Listado de posibles incidencias; Очистка гребенок транспортера; Таблица контрольных проверок
- Página 50 – LISTADO DE POSIBLES INCIDENCIAS; PONGASE EN CONTACTO CON EL SERVICIO TECNICO LOCAL
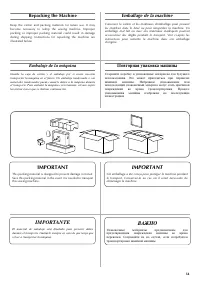
- Página 54 – Repacking the Machine; Emballage de la machine; IMPORTANT; Embalaje de la máquina; IMPORTANTE; Повторная упаковка машины; ВАЖНО
45
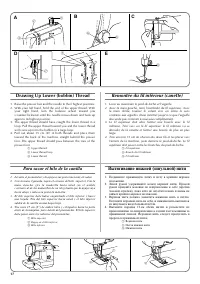
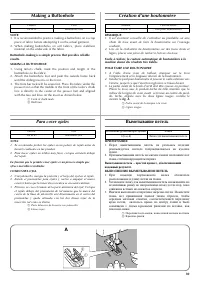
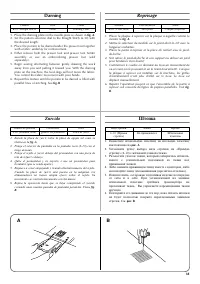
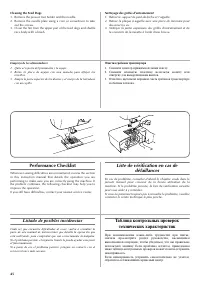
Cleaning the Feed Dogs
1. Remove the presser foot holder and the needle.
2. Remove the needle plate using a coin or screwdriver to take
out the screws.
3. Clean the lint from the upper part of the feed dogs and shuttle
race body with a brush.
Performance Checklist
Whenever sewing difficulties are encountered, review the section
in this instruction manual that details the operation you are
performing to make sure you are correctly using the machine. If
the problem continues, the following checklist may help you to
improve the operation.
If you still have difficulties, contact your nearest service center.
Nettoyage des griffes d’entraînement
1. Retirer le support de pied-de-biche et l’aiguille.
2. Retirer la plaque à aiguille avec une pièce de monnaie pour
desserrer les vis.
3. Nettoyer la partie supérieure des griffes d’entraînement et de
la coursière de la navette à l’aide d’une brosse.
Liste de vérification en cas de
défaillances
En cas de problème, consulter d’abord le chapitre voulu dans le
présent manuel pour s’assurer de la bonne utilisation de la
machine. Si le problème persiste, la liste de vérification suivante
peut vous aider à y remédier.
Si vous ne parvenez toujours pas à résoudre le problème, veuillez
contacter le centre technique le plus proche.
Limpieza de los alimentadores
1. Quite el soporte del prensatelas y la aguja.
2. Retire la placa de agujas con una moneda para aflojar los
tornillos.
3. Limpie la parte superior de los dientes y el cuerpo de la lanzadera
con un cepillo.
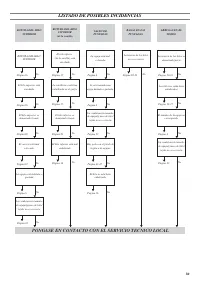
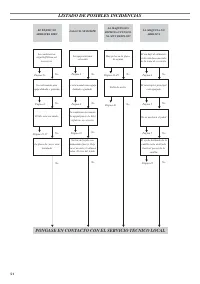
Listado de posibles incidencias
Cada vez que encuentre dificultades al coser, vuelva a consultar la
parte de este manual de instrucciones que detalla la operación que
está realizando, para comprobar que usa correctamente la máquina.
Si el problema persiste, el siguiente listado le puede ayudar a mejorar
el funcionamiento.
Si a pesar de eso el problema persiste, póngase en contacto con el
servicio técnico más cercano.
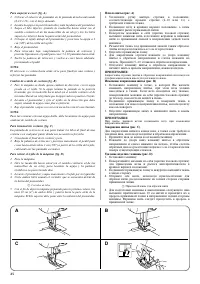
Очистка гребенок транспортера
1. Снимите адаптер прижимной лапки и иглу.
2. Снимите игольную пластину, используя монету или
отвёртку для выворачивания винтов.
3. Очистите щеточкой верхнюю часть гребенок транспортера
и обоймы челнока.
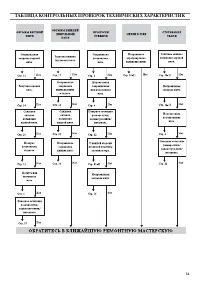
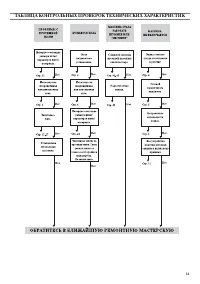
Таблица контрольных проверок
технических характеристик
При возникновении каких*либо трудностей при шитье,
сначала просмотрите раздел руководства, касающийся
выполняемой операции, чтобы убедиться, что вы правильно
используете машину. Если проблема остается, приведенная
ниже таблица контрольных проверок может помочь устранить
неисправность.
Если неисправность устранить самостоятельно не удается,
обратитесь в ближайший сервисный центр.
"Cargando la instrucción" significa que debes esperar hasta que el archivo se cargue y puedas leerlo en línea. Algunas instrucciones son muy grandes y el tiempo de carga depende de la velocidad de tu conexión a Internet.
Resumen
INDICE Página ELEMENTOS PRINCIPALES ......................................................... 1 ELEMENTOS PRINCIPALES ......................................................... 2 ACCESORIOS.................................................................................... 3 FUNCIONAMIENTO DE LA MÁQU...
1 1 3 4 5 6 2 L O H I J K M N P 7 8 9 0 A B C E F D G 1 3 4 5 6 2 PRINCIPAL PARTS * The illustrations of the sewing machine on the following pages may differ slightly from your machine. PIECES PRINCIPALES * Les illustrations représentées aux pages suivantes peuvent différer légèrement de votre machi...
2 PRINCIPAL PARTS a Pattern selection dial b Buttonhole fine-adjusting screw c Thread take-up lever d Extension table with accessory storage e Upper tension control dial f Reverse sewing lever g Thread cutter h Presser foot holder assembly i Presser foot screw j Presser foot (Zigzag) k Needle plate ...
Otros modelos de máquinas de coser Brother
-
 Brother JS-23
-
 Brother LS 2150
-
 Brother LS-1520
-
 Brother LS-2125
-
 Brother LS-3125
-
 Brother SL-7
-
 Brother SM2700
-
 Brother ST4031HD