Candy CSN 62 T Lavadora – Manual de instrucciones en formato pdf, léalo en línea gratis. Esperamos que le ayude a resolver cualquier duda que pueda tener al utilizar el aparato.
Si aún tiene preguntas, escríbalas debajo del manual de instrucciones.
"Estamos cargando el manual" significa que debe esperar a que se cargue el archivo para poder leerlo en línea. Algunos manuales son muy pesados y el tiempo que tardan en aparecer depende de su velocidad de internet.

EL
:'o# o *!$$o '
" / $" o
'#, ') *
.
)$ !
!.
H '' b
!
'/ set
)$) '.
T '$ set )$) '
b ''
'b.
:
( )
*
:'# '$
.
K )$
'$
', '
'
#
’
$
)$.
8 ' /
)$
'$ )$
' ,
$! '
)$
'$
!, 50 n /
$ ' *.
8 ,
'
'$ '
' .
18
19
min 50 cm
max 85 cm
+2,6 mt max
max 100 cm
min 4 cm
min 50 cm
max 85 cm
+2,6 mt max
max 100 cm
min 4 cm
EN
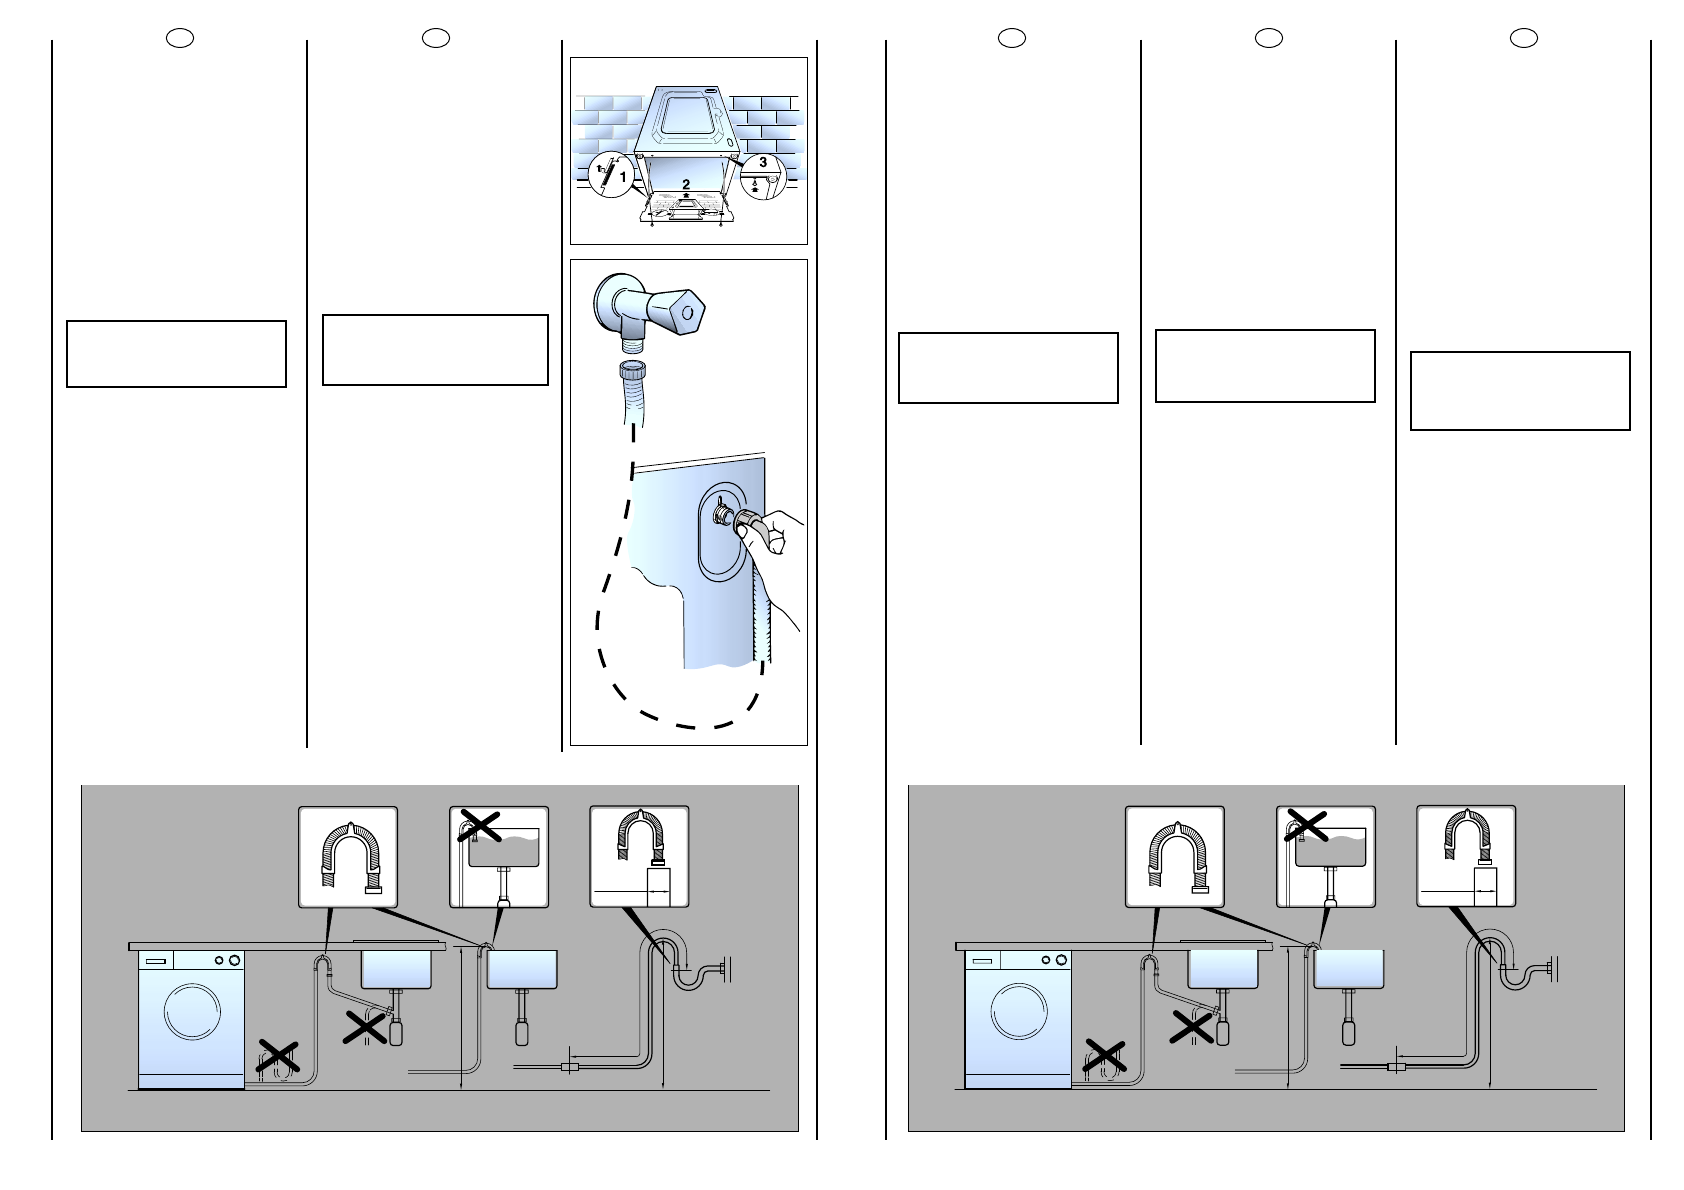
Fix the sheet of corrugated
material on the bottom as
shown in picture.
Connect the fill hose
to the tap.
The appliance must be
connected to the water
mains using new hose-sets.
The old hose-sets should not
be reused.
IMPORTANT:
DO NOT TURN THE TAP
ON AT THIS TIME.
Position the washing
machine next to the wall.
Hook the outlet tube to the
edge of the bath tub,
paying attention that there
are no bends or
contractions along the tube.
It is better to connect the
discharge hose to a fixed
outlet of a diameter greater
than that of the outlet tube
and at a height of min. 50
cm. If is necessary to use the
plastic sleeve supplied.
PL
Umieéciç wyciszajacy
materiaä tak jak pokazano
na rysunku.
Podäåczyç do kranu wåã
doprowadzajåcy wodë.
Urzådzenie musi byç
podäåczone do sieci
wodociågowej za pomocå
nowego zestawu wëãy
gumowych. Nie naleãy
uãywaç starego zestawu.
U
UW
WA
AG
GA
A::
N
NIIEE O
OD
DKKR
RËËC
CA
AÇ
Ç
JJEESSZZC
CZZEE KKR
RA
AN
NU
U
Przysunåç urzådzenie do
éciany. Zawiesiç wåã
odpäywowy na krawëdzi
wanny, uwaãajåc aby nie
miaä on zaäamañ i aby byä
droãny na caäej swej
däugoéci. Wskazanym jest
doäåczenie wëãa
odprowadzajåcego wodë
do staäego odpäywu o
érednicy wiëkszej niã wåã
odprowadzajåcy wodë z
pralki i znajdujåcego sië na
wysokoéci co najmniej 50
cm. W miarë potrzeby
nalezy uãyç
usztywniajåcego kolanka,
dostarczonego w komplecie
wraz z pralkå.
FR
Appliquer la feuille
supplémentaire sur le fond
comme dans la figure.
Raccorder le tube de l’eau
aux robinets.
L'appareil doit être relié à
l'arrivée d'eau exlusivement
avec les tuyaux fournis .
Ne pas réutiliser les anciens
tuyaux .
ATTENTION:
NE PAS OUVRIR LE
ROBINET
Approcher la machine
contre le mur en faisant
attention à ce que le tuyau
n’ait ni coudes ni
étranglements.
Raccorder le tuyau de
vidange au rebord de la
baignoire ou, mieux encore,
à un dispositif fixe
d’évacuation, hauteur mini.
50 cm et de diamètre
supérieur au tuyau de la
machine à laver.
En cas de besoin, utiliser le
coude rigide livré avec la
machine.
RU
Çaêpeïèòå
∧
ècò
ãoôpèpoâaííoão ìaòåpèa
∧
a
ía äíe, êaê ïoêaçaío ía
pècyíêe.
Ïpèñîåäèíèòå òpóáó ê
âîäîïpîâîäíîìó êpàíó è ê
ìàøèíå.
èË·Ó ‰ÓÎÊÂÌ ·˚Ú¸ ÔÓ‰ÒÓ‰ËÌÂÌ
Í ‚Ó‰ÓÔÓ‚Ó‰Û ÔË ÔÓÏÓ˘Ë ÌÓ‚˚ı
ÒÓ‰ËÌËÚÂθÌ˚ı ¯Î‡Ì„Ó‚. çÂ
ËÒÔÓθÁÛÈÚ ÒÚ‡˚ ¯Î‡Ì„Ë Ë
ÒÓ‰ËÌÂÌËfl.
Âíèìàíèå!
Íå îòêpûâàéòå
âîäîïpîâîäíûé êpàí.
Ïpèäâèíüòå ìàøèíó ê ñòåíå,
îápàùàÿ âíèìàíèå íà òî,
÷òîáû îòñóòñòâîâàëè
ïåpåãèáû, çàæèìû òpóá,
çàêpåïèòå ñëèâíó
˛
òpóáó íà
áîpòó pàêîâèíû èëè ëó÷øå ê
êàíàëèçàöèîííîé òpóáå ñ
ìèíèìàëüíîé âûñîòîé íàä
ópîâíåì ïîëà 50 ñì è
äèàìåòpîì áîëüøå
äèàìåòpà ñëèâíîé òpóáêè.
 ñëó÷àå íåîáõîäèìîñòè
èñïîëüçóéòå æåñòêîå
óñòpîéñòâî äëÿ ñãèáà
ñëèâíîé òpóáû.
¿Tiene más preguntas?¿No ha encontrado la solución a su problema en el manual o tiene otros problemas? Haga su pregunta en el siguiente formulario con una descripción detallada de su situación para que otras personas y expertos puedan responderla. Si sabe cómo resolver el problema de otra persona, ayúdele :)


