STEP 7 INSERTING/SECURING INTO - Monogram ZIR361NPRII - Manual de uso - Página 13

Frigorífico Monogram ZIR361NPRII - Manual de uso, léela gratuitamente en línea en formato PDF. Esperamos que esto te ayude a resolver cualquier duda que puedas tener. Si tienes más preguntas, contáctanos a través del formulario de contacto.


Índice:
- Página 2 – ANTES DE COMENZAR; IMPORTANTE; PRECAUCIÓN; ADVERTENCIA; FORMA ADECUADA DE DESCARTAR SU ELECTRODOMÉSTICO
- Página 4 – Installation Instructions - Reversing the Door Swing; WARNING; Risque de
- Página 5 – STEP 2 REMOVE DOOR; Door Hinge Pinch
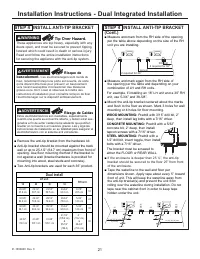
- Página 8 – STEP 4 INSTALL ANTI-TIP BRACKET; Dual install
- Página 9 – Electrical Shock Hazard.; Trisque de
- Página 10 – ON; STEP 12 START ICEMAKER; OFF; CAUTION; ATTENTION
- Página 13 – STEP 7 INSERTING/SECURING INTO
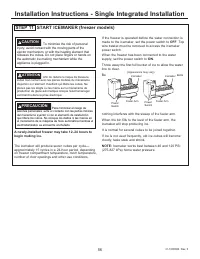
- Página 17 – STEP 11 START ICEMAKER (freezer models)
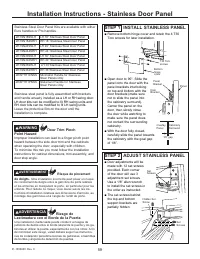
- Página 19 – Installation Instructions - Stainless Door Panel; Door Trim Pinch; STEP 1 INSTALL STAINLESS PANEL; Risque de pincement
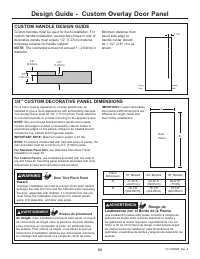
- Página 21 – /4” CUSTOM DECORATIVE PANEL DIMENSIONS; Design Guide - Custom Overlay Door Panel; CUSTOM HANDLE DESIGN GUIDE; Door Trim Pinch Point
41
31-1000600 Rev. 0
Installation Instructions - Dual Retro-Fit Installation
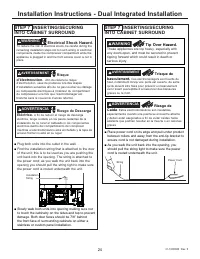
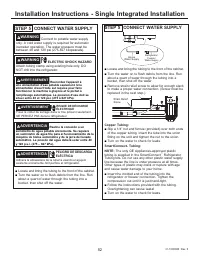
STEP 7 INSERTING/SECURING INTO
CABINET SURROUND
Ŷ
Slowly walk both units into opening making sure not
to touch the cabinetry on the sides and top to prevent
damage. The back side of the top and side retro
trims should be touching the cabinet surround when
the units are pushed back.
Ŷ
Place power cord on its edge and pull under product
between rollers and away from the anti-tip bracket to
ensure cord is not damaged during installation.
Ŷ
As you walk the unit back into the opening, you
should pull the string tight to make sure the power
cord is routed underneath the unit.
Ŷ
Replace the waterline strain relief screw.
Ŷ
Store the excess strapping, string, and water tubing
under the unit.
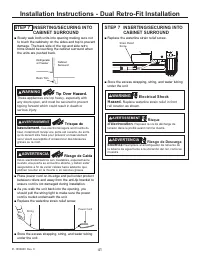
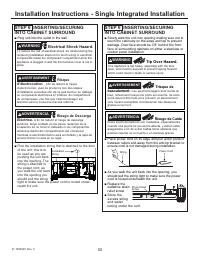
STEP 7 INSERTING/SECURING INTO
CABINET SURROUND
Ŷ
Replace the waterline strain relief screw.
Ŷ
Store the excess strapping, string, and water tubing
under the unit.
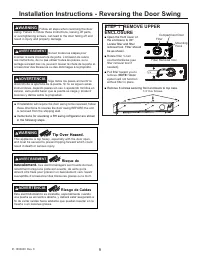
WARNING
Tip Over Hazard.
These appliances are top heavy, especially with
any doors open, and must be secured to prevent
tipping forward which could result in death or
serious injury.
WARNING
Electrical Shock
Hazard.
Replace waterline strain relief in front
rail location as shown.
Strain Relief
Screw
Power Cord
String
AVERTISSEMENT
Trisque de
basculement.
Ces électroménagers sont lourds du
haut, notamment lorsqu’une porte est ouverte, de sorte
qu’ils doivent être fixés pour prévenir un basculement
vers l’avant susceptible d’occasionner des blessures
graves ou la mort.
ADVERTENCIA
Riesgo de Caída
Estos electrodomésticos son inestables, especialmente
cuando una puerta se encuentre abierta, y deben estar
asegurados a fin de evitar caídas hacia adelante que
podrían resultar en la muerte o en lesiones graves
AVERTISSEMENT
Risque
d’électrocution.
Reposez la vis de décharge de
tension dans le profilé avant comme illustré.
ADVERTENCIA
Riesgo de Descarga
Eléctrica
Reemplace el amortiguador de refuerzo de
la tubería de agua frente a la ubicación del riel, como se
muestra.
Refrigerator
or Freezer
Retro Trim
Cabinet
Surround
"Cargando la instrucción" significa que debes esperar hasta que el archivo se cargue y puedas leerlo en línea. Algunas instrucciones son muy grandes y el tiempo de carga depende de la velocidad de tu conexión a Internet.
Resumen
4 31-1000600 Rev. 0 Safety Information ANTES DE COMENZAR Lea estas instrucciones en su totalidad y atentamente. • IMPORTANTE – Conserve estas instrucciones para uso del inspector local. Cumpla con todos los códigos y ordenanzas gubernamentales. • Nota para el Instalador – Asegúrese de que el Com...
9 31-1000600 Rev. 0 Installation Instructions - Reversing the Door Swing STEP 1 REMOVE UPPER ENCLOSURE Ŷ Open the front cover of the enclosure to 90°. Locate filter and filter removal tool. Filter should be as shown. Ŷ 5RWDWH¿OWHUóWXUQ counterclockwise (use ¿OWHUUHPRYDOWRROLI needed). Ŷ 3XOO¿OWHUWR...
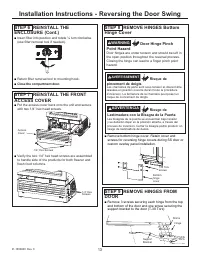
10 31-1000600 Rev. 0 Installation Instructions - Reversing the Door Swing STEP 2 REMOVE DOOR Ŷ Open the door to the open position. Ŷ Have a second person support the open door. Ŷ Remove 2 T30 Torx screws securing the bottom hinge to the case. Ŷ Remove the 2 T30 Torx screws securing the top hinge...