ASSEMBLY; ENSAMBLAJE - ProTeam 107252 - Manual de uso - Página 5


Índice:
- Página 2 – AVERTISSEMENT
- Página 3 – INTRODUCTION; INTRODUCCIÓN; WARNING
- Página 4 – GROUNDING INSTRUCTIONS; INSTRUCCIONES DE CONEXIÓN A TIERRA; INSTRUCTIONS RELATIVES À LA MISE À LA TERRE
- Página 5 – ASSEMBLY; ENSAMBLAJE
- Página 6 – BASICS; OPERACIONES BÁSICAS; INFORMATIONS ESSENTIELLES
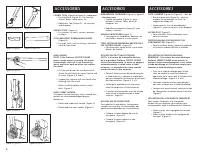
- Página 7 – ACCESSORIES; ACCESORIOS
- Página 8 – FILTERS; FILTROS
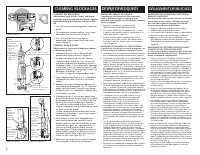
- Página 9 – CLEARING BLOCKAGES; DESPEJE DE BLOQUEOS; DÉGAGEMENT DES BLOCAGES
- Página 10 – TROUBLESHOOTING; RESOLUCIÓN DE PROBLEMAS
- Página 11 – LIMITED WARRANTY; GARANTÍA LIMITADA
4
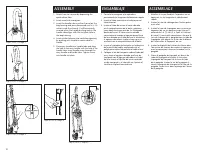
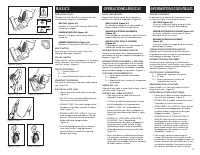
ASSEMBLY
1. Attach hose to vacuum by depressing the
quick release tabs.
2. Insert wand into wand port.
3. Insert the handle tube into the channel on the
bag housing and press downward until it is 2-3
inches inside the channel. It will be correctly
inserted when the handle bushing hole in the
handle tube aligns with the nut plate hole in
the bag housing.
4. Insert ratchet fastener into cord clasp opening
by pushing with thumb to secure cord to
handle.
5. Place carry handle over handle tube and align
the hole in the carry handle with the hole in the
handle tube. Insert handle screw through the
carry handle and handle tube. Tighten screw
into handle nut plate.
ENSAMBLAJE
1. Conecte la manguera a la aspiradora
presionando las lengüetas de liberación rápida.
2. Inserte el tubo extensor en el orificio para el
tubo extensor.
3. Inserte el tubo del asa en el canal ubicado
en el compartimiento de la bolsa y presione
hacia abajo hasta que esté de 2 a 3 pulgadas
dentro del canal. El tubo estará insertado
correctamente cuando el agujero para el buje
del asa ubicado en el tubo del asa se alinee con
el agujero ubicado en la placa-tuerca que se
encuentra en el compartimiento de la bolsa.
4. Inserte el sujetador de trinquete en la abertura
de la presilla del cable, empujando con el
pulgar para sujetar firmemente el cable al asa.
5. Coloque el asa de transporte sobre el tubo del
asa y alinee el agujero ubicado en el asa de
transporte con el agujero ubicado en el tubo
del asa. Inserte el tornillo del asa a través del
asa de transporte y el tubo del asa. Apriete el
tornillo en la placa-tuerca del asa.
ASSEMBLAGE
1. Attachez le tuyau flexible à l’aspirateur en en
appuyant sur les languettes à relâchement
rapide.
2. Insérez le tube de rallonge dans l’orifice prévu
à cet effet.
3. Insérez le tube de la poignée dans le canal du
logement du sac et appuyez jusqu’à ce qu’il
enfoncé de 5 à 7,5 cm (2 à 3 po) à l’intérieur
du canal. Il sera inséré correctement lorsque le
trou de la bague de la poignée dans le tube de
la poignée sera aligné sur le trou de la plaque
de l’écrou dans le logement du sac.
4. Insérez le dispositif de fixation du cliquet dans
l’ouverture du fermoir du cordon en appuyant
avec le pouce pour sécuriser le cordon sur la
poignée.
5. Placez la poignée de transport en dessus du
tube de la poignée et alignez le trou dans
la poignée de transport sur le trou du tube
de la poignée. Insérez la vie de la poignée à
travers la poignée de transport et le tube de la
poignée. Serrez la vis dans la plaque de l’écrou
de la poignée.
Step 1/
Paso 1
/ Étape 1
Step 2/
Paso 2
/ Étape 2
Step 3/
Paso 3
/ Étape 3
Step 4/
Paso 4
/ Étape 4
Step 5/
Paso 5
/ Étape 5
"Cargando la instrucción" significa que debes esperar hasta que el archivo se cargue y puedas leerlo en línea. Algunas instrucciones son muy grandes y el tiempo de carga depende de la velocidad de tu conexión a Internet.
Resumen
1 IMPORTANT SAFETY INSTRUCTIONS INSTRUCCIONES DE SEGURIDAD IMPORTANTES CONSIGNES DE SÉCURITÉ IMPORTANTES 1. DO NOT leave any ProTeam vacuum plugged in when not in use. Unplug unit from the outlet before servicing. 2. DO NOT use outdoors or on wet surfaces. 3. DO NOT allow the vacuum to be used a...
2 INTRODUCTION INSPECTION Carefully unpack and inspect your new ProTeam vacuum for shipping damage. Each unit is tested and thoroughly inspected before shipping. For instructions regarding any shipping damage, contact ProTeam immediately (866.888.2168). All returns must have a Return Authorization ...
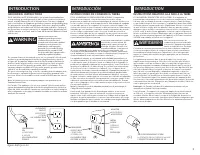
3 INTRODUCTION GROUNDING INSTRUCTIONS THESE VACUUMS MUST BE GROUNDED. If a vacuum should malfunction or stop working, grounding provides a path of least resistance for electrical current, thereby reducing the risk of electrical shock. This unit is equipped with a cord that has an equipment-grounding...
Otros modelos de aspiradoras ProTeam
-
 ProTeam 105896
-
 ProTeam 107251
-
 ProTeam 107303
-
 ProTeam 107304
-
 ProTeam 107308
-
 ProTeam 107310
-
 ProTeam 107363
-
 ProTeam 107535
-
 ProTeam 107538
-
 ProTeam 107713