Brother LS-3125 - Manual de uso - Página 18


Índice:
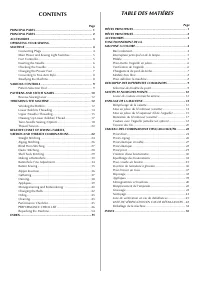
- Página 5 – INDICE; СОДЕРЖАНИЕ
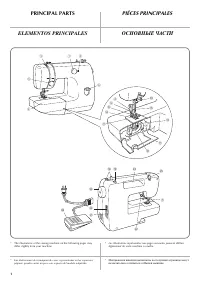
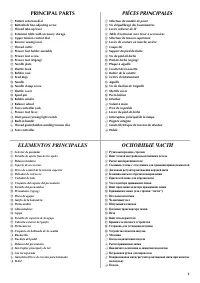
- Página 6 – PRINCIPAL PARTS; PIÉCES PRINCIPALES; ELEMENTOS PRINCIPALES; ОСНОВНЫЕ ЧАСТИ
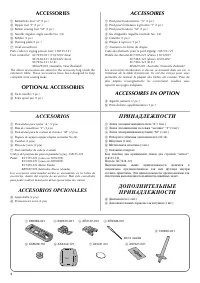
- Página 8 – ACCESSORIES; OPTIONAL ACCESSORIES; ACCESSOIRES; ACCESSOIRES EN OPTION; ACCESORIOS OPCIONALES; ДОПОЛНИТ Е ЛЬНЫ Е
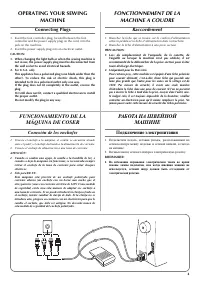
- Página 9 – Connecting Plugs; FONCTIONNEMENT DE LA; Raccordement; FUNCIONAMIENTO DE LA; Conexión de los enchufes; РАБОТА НА ШВЕЙНОЙ; Подключение электропитания
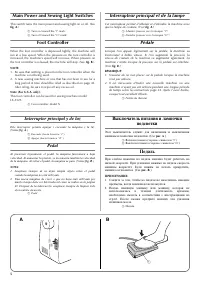
- Página 10 – Main Power and Sewing Light Switches; Foot Controller; Interrupteur principal et de la lampe; Interruptor principal y de luz; Выключатель питания и лампочки
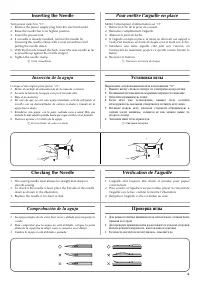
- Página 11 – Inserting the Needle; Checking the Needle; Pour mettre l’aiguille en place; Vérification de l’aiguille; Comprobación de la aguja; Установка иглы; Проверка иглы
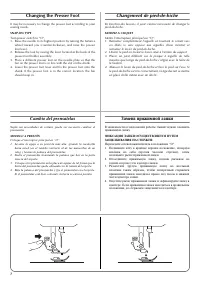
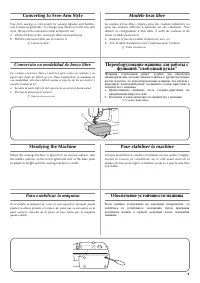
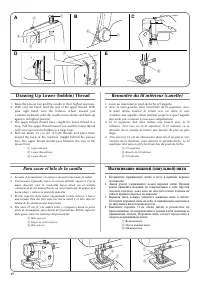
- Página 13 – Converting to Free-Arm Style; Steadying the Machine; Modèle bras libre; Pour stabiliser la machine; Para estabilizar la máquina; Переоборудование машины для работы с; Обеспечение устойчивости машины
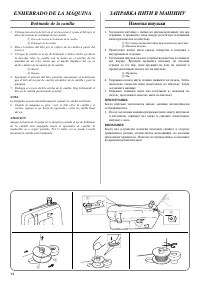
- Página 17 – ENHEBRADO DE LA MÁQUINA; Bobinado de la canilla; ЗАПРАВКА НИТИ В МАШИНУ; Намотка шпульки
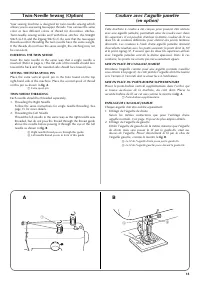
- Página 23 – УСТАНОВКА ДВОЙНОЙ ИГЛЫ; ЗАПРАВКА ДВОЙНОЙ ИГЛЫ НИТЬЮ
- Página 24 – Thread Tension; Tension des fils; Tensión de los hilos; Натяжение нитей; Возможные затруднения и методы их разрешения.; A-1 Дисковый регулятор натяжения верхней нити; B-1 Дисковый регулятор натяжения верхней нити
- Página 25 – Слишком слабое натяжение нижней нити.
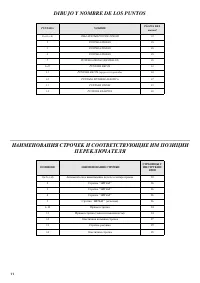
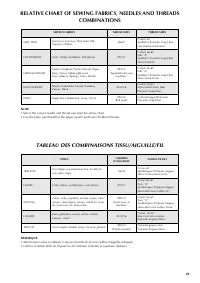
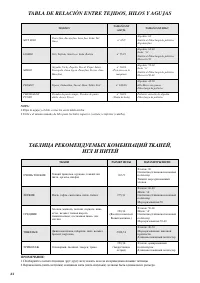
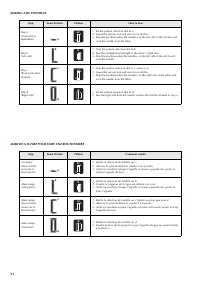
- Página 27 – TABLA DE RELACIÓN ENTRE TEJIDOS, HILOS Y AGUJAS; ТАБЛИЦА РЕКОМЕНДУЕМЫХ КОМБИНАЦИЙ ТКАНЕЙ,
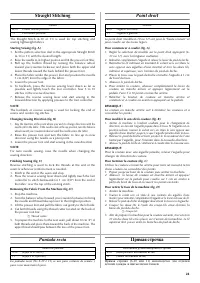
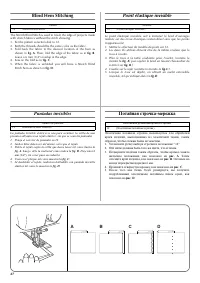
- Página 31 – Blind Hem Stitching; Point élastique invisible; Puntadas invisibles; Потайная строчка-мережка
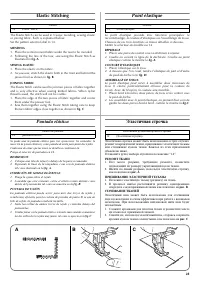
- Página 32 – Elastic Stitching; MENDING; SEWING ELASTIC; JOINING FABRIC; Point élastique; Puntada elástica; Эластичная строчка; РЕМОНТ ТКАНИ; ПРИШИВАНИЕ ЭЛАСТИЧНОЙ ТЕСЬМЫ; СТАЧИВАНИЕ ТКАНЕЙ
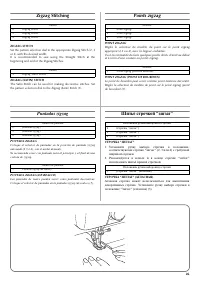
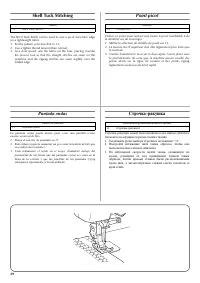
- Página 33 – Shell Tuck Stitching; Point picot; Puntada ondas
- Página 34 – Making a Buttonhole; MAKING A BUTTONHOLE; Création d’une boutonnière; Para coser ojales; Выметывание петель
- Página 36 – ВЫПОЛНЕНИЕ ВЫМЕТЫВАНИЯ ПЕТЕЛЬ
- Página 37 – ЗАКРЕПЛЕНИЕ СТРОЧКИ И ПРОРЕЗКА ПЕТЛИ
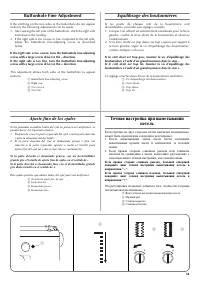
- Página 38 – Buttonhole Fine Adjustment; Equilibrage des boutonnières; Ajuste fino de los ojales; Точная настройка при выметывании
- Página 39 – Button Sewing; Pour coudre un bouton; Coser botones; Пришивание пуговиц
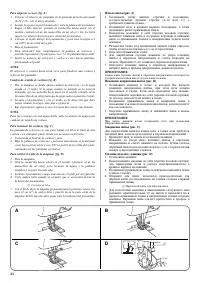
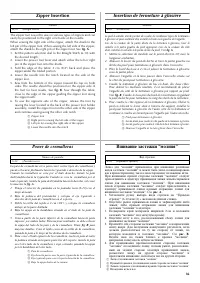
- Página 40 – Zipper Insertion; Insertion de fermeture à glissière; Poner de cremalleras; Вшивание застежки “молния”
- Página 41 – Gathering; Pour froncer un tissu; Fruncido; Выполнение сборок
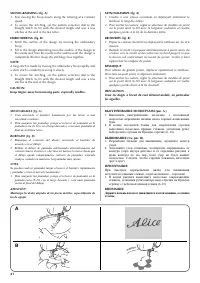
- Página 44 – Monogramming and Embroidering; PREPARING FOR MONOGRAMMING AND EMBROIDERING; Monogrammes et broderies; Monogramas y bordados; Выстрачивание монограмм и вышивание
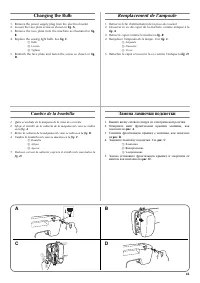
- Página 46 – Changing the Bulb; Remplacement de l’ampoule; Cambio de la bombilla; Замена лампочки подсветки
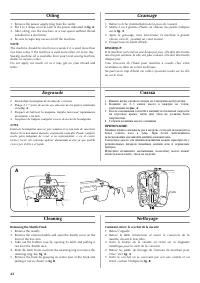
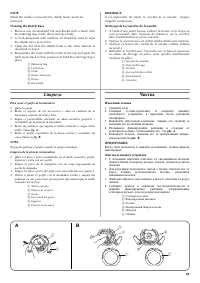
- Página 48 – Cleaning the Shuttle Race; Limpieza; Чистка; Извлечение челнока
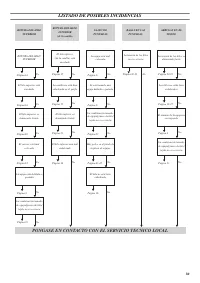
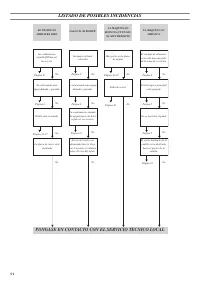
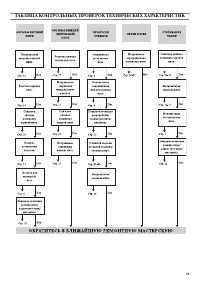
- Página 49 – Cleaning the Feed Dogs; Performance Checklist; Liste de vérification en cas de; Listado de posibles incidencias; Очистка гребенок транспортера; Таблица контрольных проверок
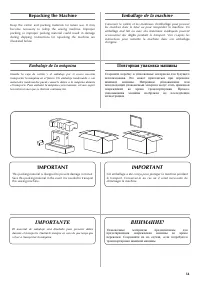
- Página 54 – Repacking the Machine; Emballage de la machine; IMPORTANT; Embalaje de la máquina; IMPORTANTE; Повторная упаковка машины
14
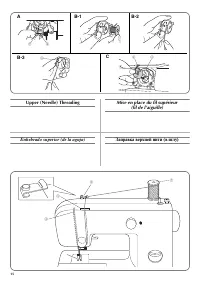
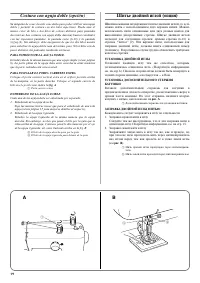
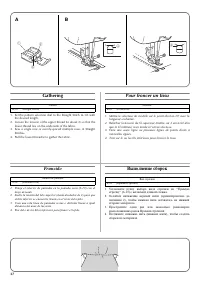
Lower (bobbin) Threading
Turn power switch to “O”.
1. Raise the needle to its highest position by turning the balance
wheel toward you (counterclockwise) and raise the presser
foot lifter.
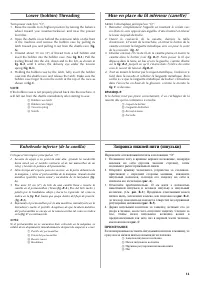
2. Open the shuttle cover behind the extension table on the front
of the machine and remove the bobbin case by pulling its
latch toward you and pulling it out from the shuttle race (
fig.
A
).
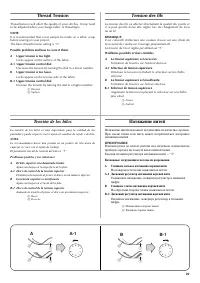
3. Unwind about 10 cm (4") of thread from a full bobbin and
insert the bobbin into the bobbin case. (See
fig. B-1
.) Pull the
trailing thread into the slot, down and to the left, as shown in
fig. B-2
, until it enters the delivery eye under the tension
spring (
fig. B-3
).
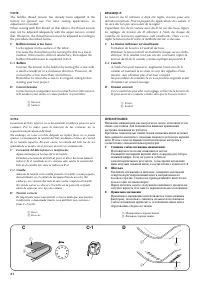
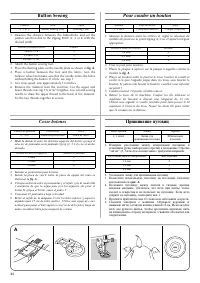
4. Holding the bobbin case by the latch, fully insert the bobbin
case into the shuttle race and release the latch. Make sure the
bobbin case finger fits into the notch at the top of the race as
shown in
fig. C
.
NOTE:
If the bobbin case is not properly placed back into the machine, it
will fall out from the shuttle immediately after starting to sew.
a
Bobbin case latch
b
Bobbin case finger
c
Tension spring
d
Notch
Mise en place du fil inférieur (canette)
Mettre l’interrupteur principal sur “O”.
1. Remonter complètement l’aiguille en tournant le volant vers
soi (dans le sens opposé aux aiguilles d’une montre) et relever
le levier du pied-de-biche.
2. Ouvrir le couvercle de la navette, derrière la table
d’extension, à l’avant de la machine, et retirer le boîtier de la
canette en tirant la languette métallique vers soi pour le sortir
de la coursière. (
fig. A
)
3. Dévider environ 10 cm de fil de la canette pleine et insérer la
canette dans le boîtier (voir
fig. B-1
). Faire passer le fil qui
dépasse dans la fente, en bas et vers la gauche, comme illustré
sur la
fig. B-2
, jusqu’à ce qu’il s’insère dans l’orifice de sortie
sous le ressort de tension (
fig.B-3
).
4. Tout en tenant le boîtier par le loquet métallique, l’enfoncer à
fond dans la navette et relâcher la languette métallique. Bien
veiller à ce que la languette métallique du boîtier s’introduise
dans l’encoche en haut de la glissière, comme le montre la
fig. C
ci-dessous.
REMARQUE:
Si le boîtier n’est pas placé correctement, il va s’échapper de la
navette dès qu’on commence à coudre.
a
Loquet du boîtier
b
Languette du boîtier
c
Ressort tenseur
d
Encoche
Enhebrado inferior (de la canilla)
Coloque el interruptor principal en “O”.
1. Levante la aguja a su posición más alta, girando la ruedecilla
hacia usted (en el sentido contrario al de las manecillas de un
reloj) y levante la palanca del prensatelas.
2. Abra la tapa del soporte para accesorios, en la parte delantera de
la máquina, y retire el portacanillas de la máquina, tirando la uña
metálica (pestillo) hacia usted y sacándola de la lanzadera (
fig.
A
).
3. Tire unos 10 cm (4") de hilo de una canilla llena e inserte la
canilla en el portacanillas. (Véase
fig. B-1
.) Tire del hilo suelto y
páselo por la hendidura, abajo y hacia la izquierda, tal como se
indica en la
fig. B-2
, hasta que quepa dentro del fleja de presión.
(
fig. B-3
).
4. Sujetando el portacanillas por la uña metálica, introdúzcalo en la
lanzadera y suelte el pestillo. Asegúrese de que la uñeta metálica
del portacanillas se encaje en la ranura arriba tal como se indica
en la
fig. C
a continuación.
NOTA:
Si el portacanillas no se encuentra bien colocado en la máquina, se
saldrá de su alojamiento inmediatamente después de empezar a coser.
a
Pestillo del portacanillas
b
Uñeta del portacanillas
c
Resorte tensor
d
Hendidura
Заправка нижней нити (шпульки)
Переведите сетевой выключатель в положение “О”
1. Поднимите иглу в крайнее верхнее положение, повернув
маховик на себя (против часовой стрелки), затем
поднимите рычаг прижимной лапки.
2. Откройте крышку челночного устройства за столиком-
приставкой с передней стороны машины, извлеките
шпульный колпачок, потянув его защелку на себя и
извлекая его из челнока (
рис. A
).
3. Отмотайте приблизительно 10 см нити с полностью
намотанной шпульки и вставьте шпульку в шпульный
колпачок. (См.
рис. B-1
.) Проденьте отмотанный конец
нити в щель, затем вниз и влево, как показано на
рис. B-2
,
до тех пор, пока нить не попадет в отверстие под пружиной
регулировки натяжения (
рис. B-3
).
4. Держа шпульный колпачок за защелку, вставьте его до
упора в челнок, после чего отпустите защелку. Следите за
тем, чтобы палец шпульного колпачка вошел в
предназначенный для него паз в верхней части челнока,
как показано на
рис. C
.
ПРИМЕЧАНИЕ:
Если неправильно вставить шпульный колпачок в машину, то
сразу после начала шитья он выпадет из челнока.
a
Защелка шпульного колпачка
b
Палец шпульного колпачка
c
Пружина регулировки натяжения нити
d
Паз
"Cargando la instrucción" significa que debes esperar hasta que el archivo se cargue y puedas leerlo en línea. Algunas instrucciones son muy grandes y el tiempo de carga depende de la velocidad de tu conexión a Internet.
Resumen
INDICE Página ELEMENTOS PRINCIPALES ......................................................... 1ELEMENTOS PRINCIPALES ......................................................... 2ACCESORIOS.................................................................................... 3FUNCIONAMIENTO DE LA MÁQUINA...
1 PRINCIPAL PARTS * The illustrations of the sewing machine on the following pages may differ slightly from your machine. PIÉCES PRINCIPALES * Les illustrations représentées aux pages suivantes peuvent différer légèrement de votre machine à coudre. ELEMENTOS PRINCIPALES * Las ilustraciones de la máq...
3 ACCESSORIES a Buttonhole foot “A” (1 pc.) b Zipper foot “I” (1 pc.) c Button sewing foot “M” (1 pc.) d Needle (regular single needle No. 14) e Bobbin (1 pc.) f Darning plate (1 pc.) g Oval screwdriver Parts code for zigzag presser foot: 138135-121Foot controller: XC7359-021 (110/120V Area) XC7438-...
Otros modelos de máquinas de coser Brother
-
 Brother JS-23
-
 Brother LS 2150
-
 Brother LS-1520
-
 Brother LS-2125
-
 Brother SL-7
-
 Brother SM2700
-
 Brother ST4031HD
-
 Brother X-5