Making a Buttonhole; MAKING A BUTTONHOLE; Création d’une boutonnière; Para coser ojales; Выметывание петель - Brother LS-3125 - Manual de uso - Página 34


Índice:
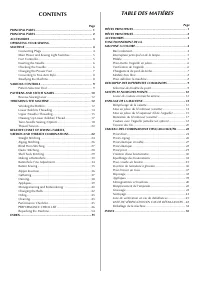
- Página 5 – INDICE; СОДЕРЖАНИЕ
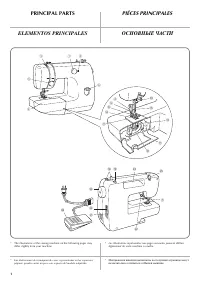
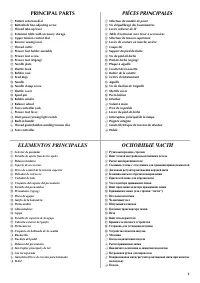
- Página 6 – PRINCIPAL PARTS; PIÉCES PRINCIPALES; ELEMENTOS PRINCIPALES; ОСНОВНЫЕ ЧАСТИ
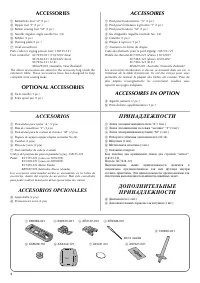
- Página 8 – ACCESSORIES; OPTIONAL ACCESSORIES; ACCESSOIRES; ACCESSOIRES EN OPTION; ACCESORIOS OPCIONALES; ДОПОЛНИТ Е ЛЬНЫ Е
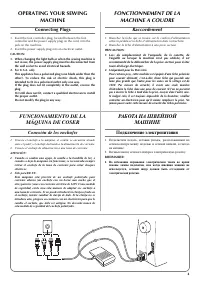
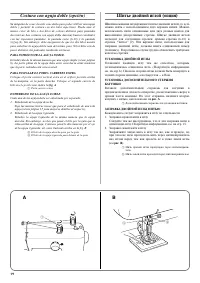
- Página 9 – Connecting Plugs; FONCTIONNEMENT DE LA; Raccordement; FUNCIONAMIENTO DE LA; Conexión de los enchufes; РАБОТА НА ШВЕЙНОЙ; Подключение электропитания
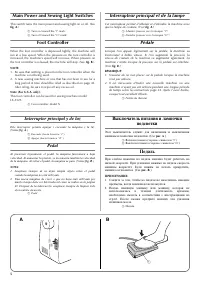
- Página 10 – Main Power and Sewing Light Switches; Foot Controller; Interrupteur principal et de la lampe; Interruptor principal y de luz; Выключатель питания и лампочки
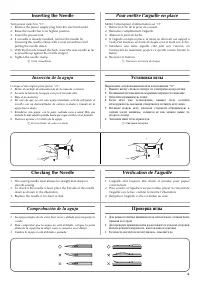
- Página 11 – Inserting the Needle; Checking the Needle; Pour mettre l’aiguille en place; Vérification de l’aiguille; Comprobación de la aguja; Установка иглы; Проверка иглы
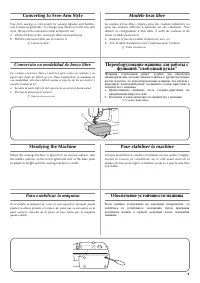
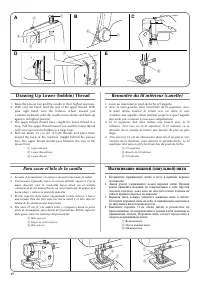
- Página 13 – Converting to Free-Arm Style; Steadying the Machine; Modèle bras libre; Pour stabiliser la machine; Para estabilizar la máquina; Переоборудование машины для работы с; Обеспечение устойчивости машины
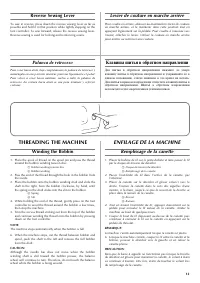
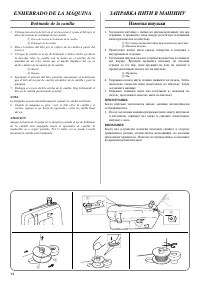
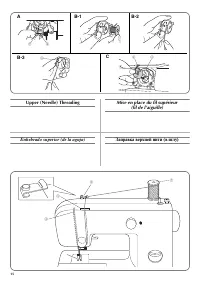
- Página 17 – ENHEBRADO DE LA MÁQUINA; Bobinado de la canilla; ЗАПРАВКА НИТИ В МАШИНУ; Намотка шпульки
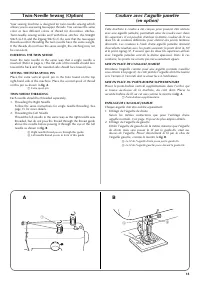
- Página 23 – УСТАНОВКА ДВОЙНОЙ ИГЛЫ; ЗАПРАВКА ДВОЙНОЙ ИГЛЫ НИТЬЮ
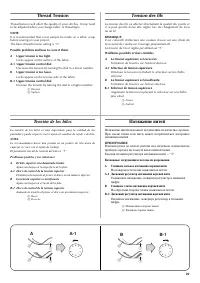
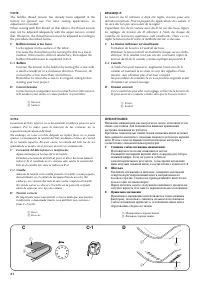
- Página 24 – Thread Tension; Tension des fils; Tensión de los hilos; Натяжение нитей; Возможные затруднения и методы их разрешения.; A-1 Дисковый регулятор натяжения верхней нити; B-1 Дисковый регулятор натяжения верхней нити
- Página 25 – Слишком слабое натяжение нижней нити.
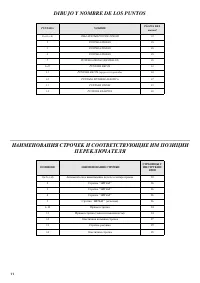
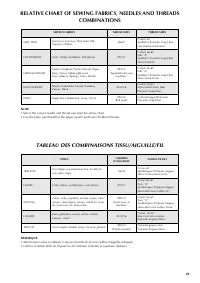
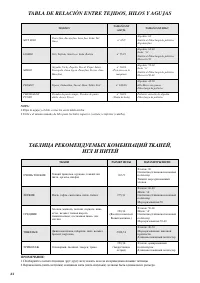
- Página 27 – TABLA DE RELACIÓN ENTRE TEJIDOS, HILOS Y AGUJAS; ТАБЛИЦА РЕКОМЕНДУЕМЫХ КОМБИНАЦИЙ ТКАНЕЙ,
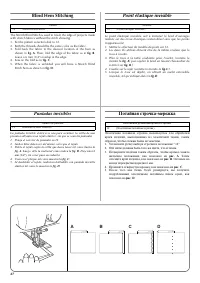
- Página 31 – Blind Hem Stitching; Point élastique invisible; Puntadas invisibles; Потайная строчка-мережка
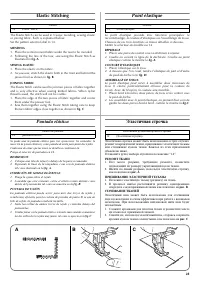
- Página 32 – Elastic Stitching; MENDING; SEWING ELASTIC; JOINING FABRIC; Point élastique; Puntada elástica; Эластичная строчка; РЕМОНТ ТКАНИ; ПРИШИВАНИЕ ЭЛАСТИЧНОЙ ТЕСЬМЫ; СТАЧИВАНИЕ ТКАНЕЙ
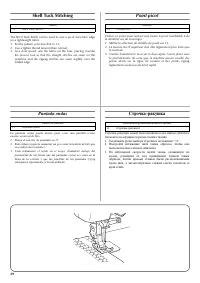
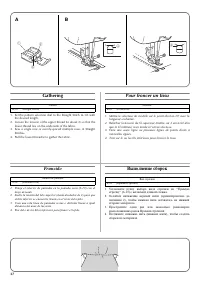
- Página 33 – Shell Tuck Stitching; Point picot; Puntada ondas
- Página 34 – Making a Buttonhole; MAKING A BUTTONHOLE; Création d’une boutonnière; Para coser ojales; Выметывание петель
- Página 36 – ВЫПОЛНЕНИЕ ВЫМЕТЫВАНИЯ ПЕТЕЛЬ
- Página 37 – ЗАКРЕПЛЕНИЕ СТРОЧКИ И ПРОРЕЗКА ПЕТЛИ
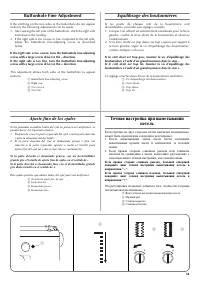
- Página 38 – Buttonhole Fine Adjustment; Equilibrage des boutonnières; Ajuste fino de los ojales; Точная настройка при выметывании
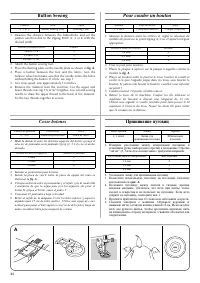
- Página 39 – Button Sewing; Pour coudre un bouton; Coser botones; Пришивание пуговиц
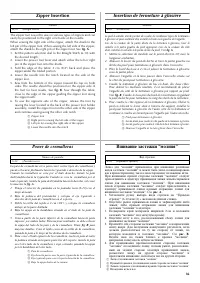
- Página 40 – Zipper Insertion; Insertion de fermeture à glissière; Poner de cremalleras; Вшивание застежки “молния”
- Página 41 – Gathering; Pour froncer un tissu; Fruncido; Выполнение сборок
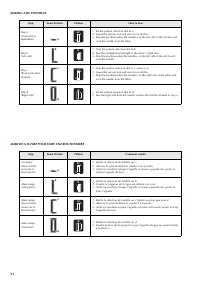
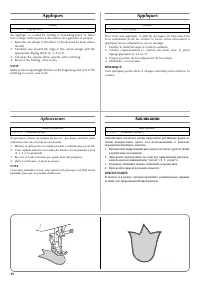
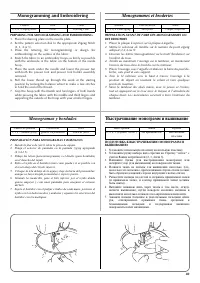
- Página 44 – Monogramming and Embroidering; PREPARING FOR MONOGRAMMING AND EMBROIDERING; Monogrammes et broderies; Monogramas y bordados; Выстрачивание монограмм и вышивание
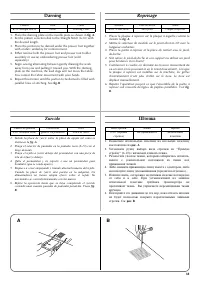
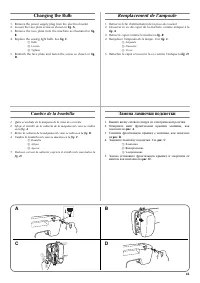
- Página 46 – Changing the Bulb; Remplacement de l’ampoule; Cambio de la bombilla; Замена лампочки подсветки
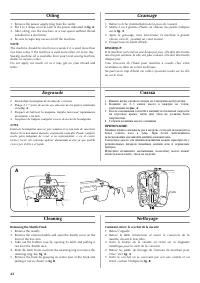
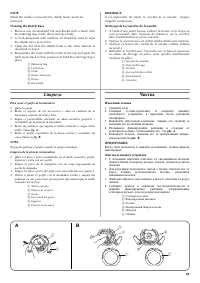
- Página 48 – Cleaning the Shuttle Race; Limpieza; Чистка; Извлечение челнока
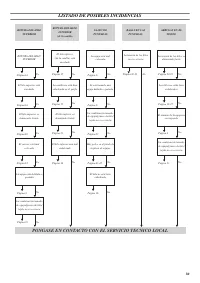
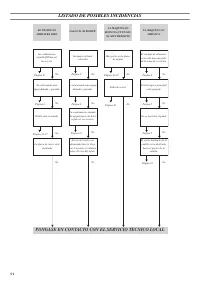
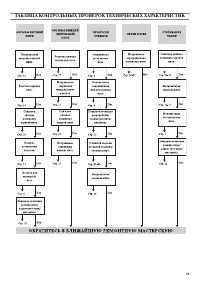
- Página 49 – Cleaning the Feed Dogs; Performance Checklist; Liste de vérification en cas de; Listado de posibles incidencias; Очистка гребенок транспортера; Таблица контрольных проверок
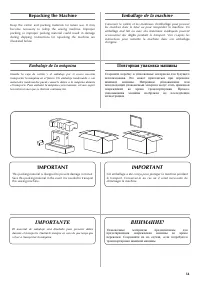
- Página 54 – Repacking the Machine; Emballage de la machine; IMPORTANT; Embalaje de la máquina; IMPORTANTE; Повторная упаковка машины
30
1
2
Making a Buttonhole
NOTE:
1. It is recommended to practice making a buttonhole on a scrap
piece of fabric before attempting it on the actual garment.
2. When making buttonholes on soft fabrics, place stabilizer
material on the underside of the fabric.
Buttonhole-making is a simple process that provides reliable
results.
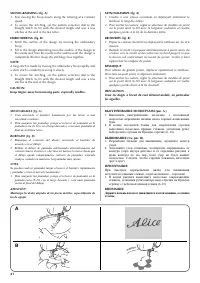
MAKING A BUTTONHOLE
1. Using tailor’s chalk, mark the position and length of the
buttonhole on the fabric.
2. Attach the buttonhole foot and push the outside frame back
until the sliding insert is in the front.
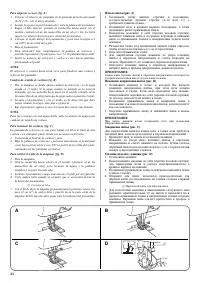
3. The front bar tack will be sewn first. Place the fabric under the
presser foot so that the middle of the front of the tailor’s chalk
line is directly in the center of the presser foot and aligned
with the two red lines on the insert as shown below.
a
Front of chalk mark
b
Red lines
Pattern
Foot
1(b ac d)
Buttonhole foot
Création d’une boutonnière
REMARQUE:
1. Il est vivement conseillé de s’entraîner au préalable sur une
chute de tissu avant de faire la boutonnière sur l’ouvrage
souhaité.
2. Lors de la réalisation de boutonnières sur des tissus doux et
légers, placer une pièce de renfort à l’envers du tissu.
Facile à réaliser, la couture automatique de boutonnières à la
machine donne des résultats très fiables.
POUR FAIRE UNE BOUTONNIERE
1. A l’aide d’une craie de tailleur, marquer sur le tissu
l’emplacement et la longueur désirée de la boutonnière.
2. Installer le pied pour boutonnière et pousser le cadre extérieur vers
l’arrière, jusqu’à.ce que l’insertion à glissière se trouve devant.
3. La partie avant de la bride d'arrêt doit être cousue en premier.
Placer le tissu sous le pied-de-biche de façon à ce que le
milieu de la partie avant de la ligne à la craie du tailleur se
trouve directement au centre du pied-de-biche et aligné sur
les deux lignes rouges du renfort comme illustré ci-après.
a
Partie avant de la marque à la craie
b
Lignes rouges
Modèle
Pied-de-biche
1(b ac d)
Pied pour boutonnières
Para coser ojales
NOTA:
1. Se recomienda probar los ojales en un pedazo de tejido antes de
hacerlo realmente en las prendas.
2. Para hacer ojales en telidos muy finos, coloque entretela debajo
del tejido.
La función que le permite coser ojales es un proceso simple que
ofrece increíbles resultados.
COSIDO DEL OJAL
1. Con jaboncillo, marque la posición y el largo del ojal en el tejido.
2. Instale el prensatelas para ojales y vuelva a empujar el marco
exterior hasta que la inserción corredera se encuentre delante.
3. Primero se cose el remate de la parte delantera del ojal. Coloque
el tejido debajo del prensatelas de tal manera que la marca del
centro de la línea de jaboncillo esté directamente en el centro del
prensatelas y quede alineada con las dos líneas rojas de la
inserción, como se muestra a continuación.
a
Parte delantera de la marca con jaboncillo.
b
Líneas rojas
Pattern
Foot
1(b ac d)
Buttonhole foot
Выметывание петель
ПРИМЕЧАНИЕ:
1. Перед выметыванием петель на реальном изделии
рекомендуется сначала попрактиковаться на кусочке
ткани.
2. При выметывании петель на мягких тканях подложите под
ткань стабилизирующий материал.
Выметывание петель – простой процесс, обеспечивающий
надежный результат.
ВЫПОЛНЕНИЕ ВЫМЕТЫВАНИЯ ПЕТЕЛЬ
1. При помощи портновского мелка обозначьте
расположение и длину петли на ткани.
2. Установите лапку для вымётывания петель и нажимайте на
её внешнюю рамку по направлению назад до тех пор, пока
сдвижная вставка не окажется спереди.
3. Вначале выполняется передняя закрепка петли. Поместите
ткань под прижимной лапкой таким образом, чтобы
середина передней части меловой отметки оказалась
прямо по центру прижимной лапки и совместилась с двумя
красными рисками на вставке, как показано ниже.
a
Передняя часть метки, нанесенной мелком на ткань
b
Красные риски
Положение ручки выбора строчки
Лапка
1 (b ac d)
Лапка для выметывания петель
"Cargando la instrucción" significa que debes esperar hasta que el archivo se cargue y puedas leerlo en línea. Algunas instrucciones son muy grandes y el tiempo de carga depende de la velocidad de tu conexión a Internet.
Resumen
INDICE Página ELEMENTOS PRINCIPALES ......................................................... 1ELEMENTOS PRINCIPALES ......................................................... 2ACCESORIOS.................................................................................... 3FUNCIONAMIENTO DE LA MÁQUINA...
1 PRINCIPAL PARTS * The illustrations of the sewing machine on the following pages may differ slightly from your machine. PIÉCES PRINCIPALES * Les illustrations représentées aux pages suivantes peuvent différer légèrement de votre machine à coudre. ELEMENTOS PRINCIPALES * Las ilustraciones de la máq...
3 ACCESSORIES a Buttonhole foot “A” (1 pc.) b Zipper foot “I” (1 pc.) c Button sewing foot “M” (1 pc.) d Needle (regular single needle No. 14) e Bobbin (1 pc.) f Darning plate (1 pc.) g Oval screwdriver Parts code for zigzag presser foot: 138135-121Foot controller: XC7359-021 (110/120V Area) XC7438-...
Otros modelos de máquinas de coser Brother
-
 Brother JS-23
-
 Brother LS 2150
-
 Brother LS-1520
-
 Brother LS-2125
-
 Brother SL-7
-
 Brother SM2700
-
 Brother ST4031HD
-
 Brother X-5