Cleaning the Shuttle Race; Limpieza; Чистка; Извлечение челнока - Brother LS-3125 - Manual de uso - Página 48


Índice:
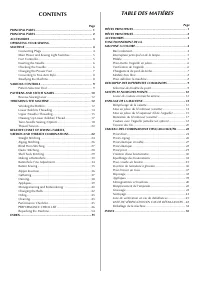
- Página 5 – INDICE; СОДЕРЖАНИЕ
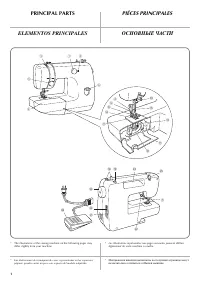
- Página 6 – PRINCIPAL PARTS; PIÉCES PRINCIPALES; ELEMENTOS PRINCIPALES; ОСНОВНЫЕ ЧАСТИ
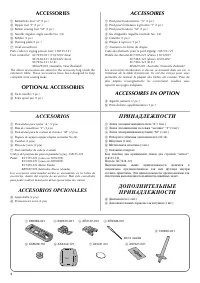
- Página 8 – ACCESSORIES; OPTIONAL ACCESSORIES; ACCESSOIRES; ACCESSOIRES EN OPTION; ACCESORIOS OPCIONALES; ДОПОЛНИТ Е ЛЬНЫ Е
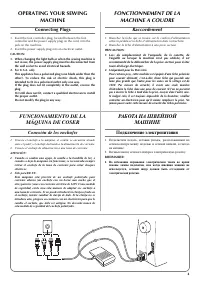
- Página 9 – Connecting Plugs; FONCTIONNEMENT DE LA; Raccordement; FUNCIONAMIENTO DE LA; Conexión de los enchufes; РАБОТА НА ШВЕЙНОЙ; Подключение электропитания
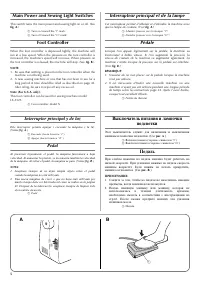
- Página 10 – Main Power and Sewing Light Switches; Foot Controller; Interrupteur principal et de la lampe; Interruptor principal y de luz; Выключатель питания и лампочки
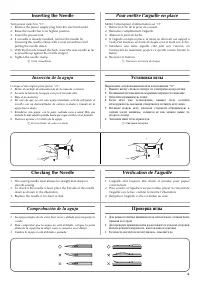
- Página 11 – Inserting the Needle; Checking the Needle; Pour mettre l’aiguille en place; Vérification de l’aiguille; Comprobación de la aguja; Установка иглы; Проверка иглы
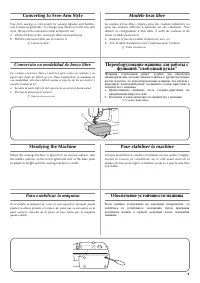
- Página 13 – Converting to Free-Arm Style; Steadying the Machine; Modèle bras libre; Pour stabiliser la machine; Para estabilizar la máquina; Переоборудование машины для работы с; Обеспечение устойчивости машины
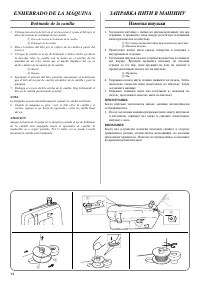
- Página 17 – ENHEBRADO DE LA MÁQUINA; Bobinado de la canilla; ЗАПРАВКА НИТИ В МАШИНУ; Намотка шпульки
- Página 23 – УСТАНОВКА ДВОЙНОЙ ИГЛЫ; ЗАПРАВКА ДВОЙНОЙ ИГЛЫ НИТЬЮ
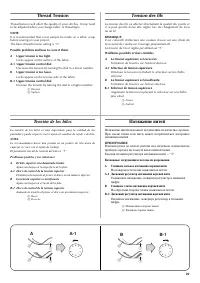
- Página 24 – Thread Tension; Tension des fils; Tensión de los hilos; Натяжение нитей; Возможные затруднения и методы их разрешения.; A-1 Дисковый регулятор натяжения верхней нити; B-1 Дисковый регулятор натяжения верхней нити
- Página 25 – Слишком слабое натяжение нижней нити.
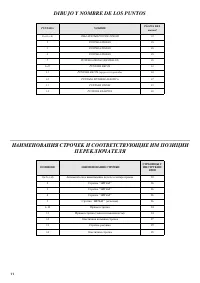
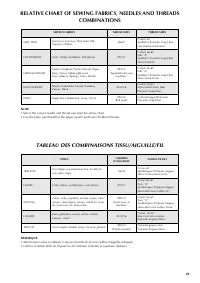
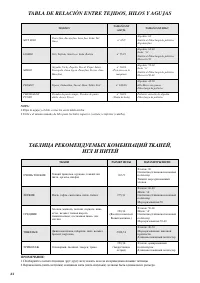
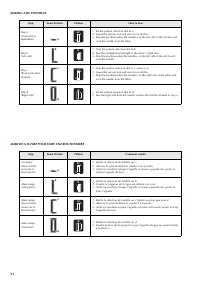
- Página 27 – TABLA DE RELACIÓN ENTRE TEJIDOS, HILOS Y AGUJAS; ТАБЛИЦА РЕКОМЕНДУЕМЫХ КОМБИНАЦИЙ ТКАНЕЙ,
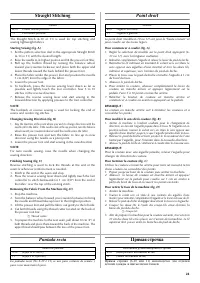
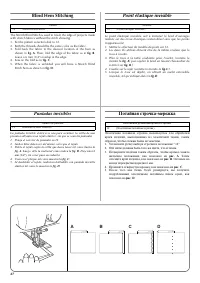
- Página 31 – Blind Hem Stitching; Point élastique invisible; Puntadas invisibles; Потайная строчка-мережка
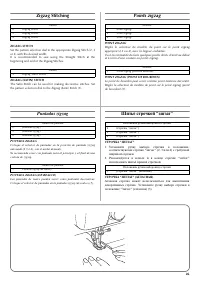
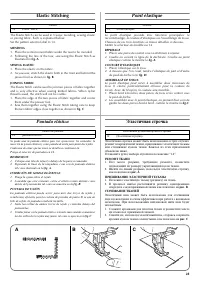
- Página 32 – Elastic Stitching; MENDING; SEWING ELASTIC; JOINING FABRIC; Point élastique; Puntada elástica; Эластичная строчка; РЕМОНТ ТКАНИ; ПРИШИВАНИЕ ЭЛАСТИЧНОЙ ТЕСЬМЫ; СТАЧИВАНИЕ ТКАНЕЙ
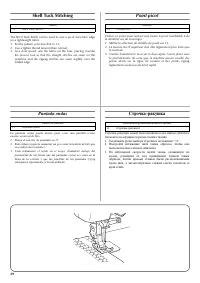
- Página 33 – Shell Tuck Stitching; Point picot; Puntada ondas
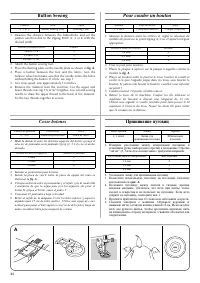
- Página 34 – Making a Buttonhole; MAKING A BUTTONHOLE; Création d’une boutonnière; Para coser ojales; Выметывание петель
- Página 36 – ВЫПОЛНЕНИЕ ВЫМЕТЫВАНИЯ ПЕТЕЛЬ
- Página 37 – ЗАКРЕПЛЕНИЕ СТРОЧКИ И ПРОРЕЗКА ПЕТЛИ
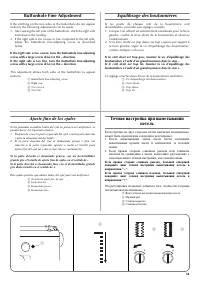
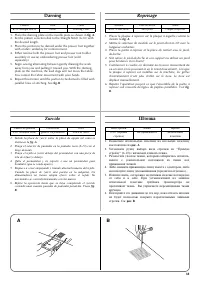
- Página 38 – Buttonhole Fine Adjustment; Equilibrage des boutonnières; Ajuste fino de los ojales; Точная настройка при выметывании
- Página 39 – Button Sewing; Pour coudre un bouton; Coser botones; Пришивание пуговиц
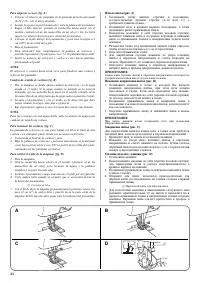
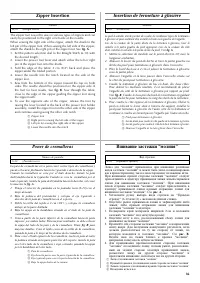
- Página 40 – Zipper Insertion; Insertion de fermeture à glissière; Poner de cremalleras; Вшивание застежки “молния”
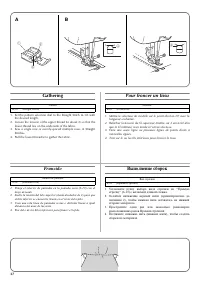
- Página 41 – Gathering; Pour froncer un tissu; Fruncido; Выполнение сборок
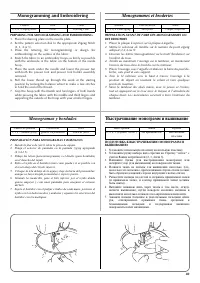
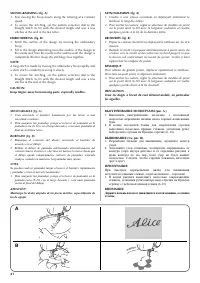
- Página 44 – Monogramming and Embroidering; PREPARING FOR MONOGRAMMING AND EMBROIDERING; Monogrammes et broderies; Monogramas y bordados; Выстрачивание монограмм и вышивание
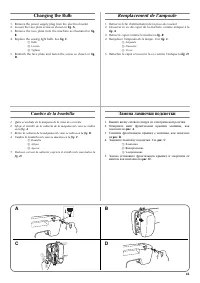
- Página 46 – Changing the Bulb; Remplacement de l’ampoule; Cambio de la bombilla; Замена лампочки подсветки
- Página 48 – Cleaning the Shuttle Race; Limpieza; Чистка; Извлечение челнока
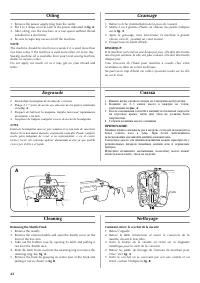
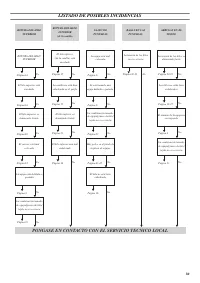
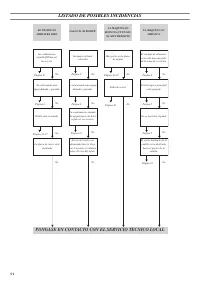
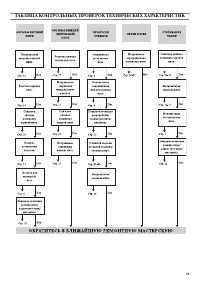
- Página 49 – Cleaning the Feed Dogs; Performance Checklist; Liste de vérification en cas de; Listado de posibles incidencias; Очистка гребенок транспортера; Таблица контрольных проверок
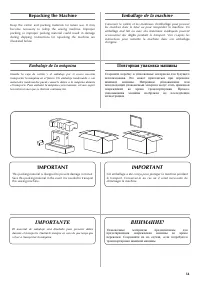
- Página 54 – Repacking the Machine; Emballage de la machine; IMPORTANT; Embalaje de la máquina; IMPORTANTE; Повторная упаковка машины
44
1
2
NOTE:
When the needle is lowered, the shuttle hook cannot be
removed.
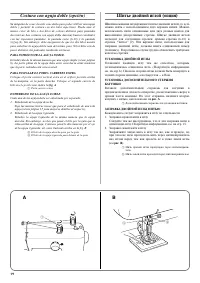
Cleaning the Shuttle Race
1. Remove any accumulated lint and thread with a brush from
the retaining ring, hook, driver and race body.
2. A cloth dampened with machine oil should be used to wipe
the shuttle race clean of lint.
3. Clean the lint from the shuttle hook in the same manner as
described in step 2.
4. Reassemble the hook with the notch at the top and push the
latch levers back to their positions to hold the retaining ring in
place.
a
Retaining ring
b
Latch lever
c
Hook
d
Hook center post
e
Driver
f
Race body
REMARQUE:
Il est impossible de retirer le crochet de la navette lorsque
l’aiguille est abaissée.
Nettoyage de la coursière de la navette
1. A l’aide d’une petite brosse, enlever la bourre et le fil qui se
sont accumulés dans l’anneau de maintien, sur le crochet,
dans l’entraînement et sur la coursière.
2. Nettoyer la coursière avec un chiffon imbibé d’huile pour machine.
3. Nettoyer la bourre du crochet de la navette comme indiqué
au point 2.
4. Remonter le crochet avec l’encoche vers le haut et repousser
les pattes de blocage en place, pour qu’elles maintiennent
l’anneau en place.
a
Anneau de maintien
b
Patte de blocage
c
Crochet
d
Axe central du crochet
e
Entraînement
f
Coursière
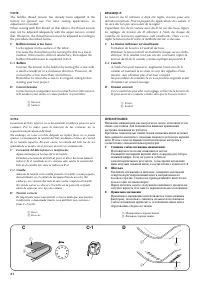
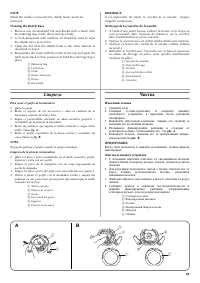
Limpieza
Para sacar el garfio de la lanzadera
1. Quite la aguja.
2. Retire el soporte de los accesorios y abra la cubierta de la
lanzadera, enfrente del brazo libre.
3. Saque el portacanilla, abriendo su uñeta metálica (pestillo) y
retirándolo de la pista de la lanzadera.
4. Retire las palancas que sujetan el anillo retenedor y saque dicho
anillo. Véase
fig. A
.
5. Retire el garfio cogiéndolo de la barra central y sacándolo tal
como ilustra la
fig. B
.
NOTA:
No puede quitarse el garfio cuando la aguja está abajo.
Limpieza de la pista de la lanzadera
1. Quite los hilos y polvo acumulados en el anillo retenedor, garfio,
impulsor y pista con un cepillo.
2. Limpie el polvo de la lanzadera con un trapo impregnado de
aceite de máquina.
3. Limpie los hilos y polvo del garfio tal como indicado en el punto 2.
4. Vuelva a juntar el garfio con la hendidura arriba y empuje las
palancas en sus posiciones previas para que mantengan el anillo
retenedor en su sitio.
a
Anillo retenedor
b
Palanca de la uñeta
c
Garfio
d
Eje central del garfio
e
Impulsor
f
Pista de la lanzadera.
Чистка
Извлечение челнока
1. Снимите иглу.
2. Снимите столик-приставку и откройте крышку
челночного устройства в передней части рукавной
платформы.
3. Извлеките шпульный колпачок, открыв его защёлку и
вытащив его из обоймы челнока.
4. Раздвиньте фиксирующие рычажки в стороны от
стопорного кольца, чтобы вынуть его. См.
рис. A
.
5. Извлеките челнок, захватив его за центральный штырь,
как показано на
рис. B
.
ПРИМЕЧАНИЕ:
Когда игла находится в нижнем положении, челнок вынуть
невозможно.
Очистка челночного устройства
1. С помощью щеточки очистите от скопившихся волокон
ткани и нитей стопорное кольцо, челнок, поводок и гнездо
челнока.
2. Для протирки челночного гнезда с целью очистки его от
ворса должна использоваться ветошь, смоченная
машинным маслом.
3. Таким же образом, как описано в шаге 2, очистите от ворса
челнок.
4. Соберите челнок в обратной последовательности и
верните фиксирующие рычажки, удерживающие
стопорное кольцо, в их исходное положение.
a
Стопорное кольцо
b
Фиксирующий рычажок
c
Челнок
d
Центральный штырь челнока
e
Поводок
f
Обойма
A
B
6
1
5
1
3
4
"Cargando la instrucción" significa que debes esperar hasta que el archivo se cargue y puedas leerlo en línea. Algunas instrucciones son muy grandes y el tiempo de carga depende de la velocidad de tu conexión a Internet.
Resumen
INDICE Página ELEMENTOS PRINCIPALES ......................................................... 1ELEMENTOS PRINCIPALES ......................................................... 2ACCESORIOS.................................................................................... 3FUNCIONAMIENTO DE LA MÁQUINA...
1 PRINCIPAL PARTS * The illustrations of the sewing machine on the following pages may differ slightly from your machine. PIÉCES PRINCIPALES * Les illustrations représentées aux pages suivantes peuvent différer légèrement de votre machine à coudre. ELEMENTOS PRINCIPALES * Las ilustraciones de la máq...
3 ACCESSORIES a Buttonhole foot “A” (1 pc.) b Zipper foot “I” (1 pc.) c Button sewing foot “M” (1 pc.) d Needle (regular single needle No. 14) e Bobbin (1 pc.) f Darning plate (1 pc.) g Oval screwdriver Parts code for zigzag presser foot: 138135-121Foot controller: XC7359-021 (110/120V Area) XC7438-...
Otros modelos de máquinas de coser Brother
-
 Brother JS-23
-
 Brother LS 2150
-
 Brother LS-1520
-
 Brother LS-2125
-
 Brother SL-7
-
 Brother SM2700
-
 Brother ST4031HD
-
 Brother X-5